1. Wichtige Sicherheitshinweise
Read all safety warnings and instructions before operating this product. Failure to follow the warnings and instructions may result in electric shock, fire, and/or serious injury. Keep this manual for future reference.
- Persönliche Schutzausrüstung: Always wear eye protection (safety glasses or goggles), hearing protection, and heavy-duty gloves when operating the hedge trimmer. Long pants and sturdy footwear are also recommended.
- Sicherheit am Arbeitsplatz: Halten Sie den Arbeitsbereich sauber und gut beleuchtet. Betreiben Sie Elektrowerkzeuge nicht in explosionsgefährdeten Bereichen, beispielsweise in der Nähe von brennbaren Flüssigkeiten, Gasen oder Staub. Halten Sie Kinder und Unbeteiligte fern, während Sie ein Elektrowerkzeug bedienen.
- Elektrische Sicherheit: Vermeiden Sie Körperkontakt mit geerdeten oder geerdeten Oberflächen. Setzen Sie Elektrowerkzeuge weder Regen noch Nässe aus. Eindringendes Wasser erhöht das Risiko eines Stromschlags.
- Werkzeuggebrauch und -pflege: Wenden Sie keine Gewalt an. Verwenden Sie das für Ihren Anwendungszweck geeignete Elektrowerkzeug. Trennen Sie den Akku vom Elektrowerkzeug, bevor Sie Einstellungen vornehmen, Zubehör wechseln oder Elektrowerkzeuge lagern.
- Klingensicherheit: Keep hands and feet away from the cutting blade. The blade remains sharp after the tool is switched off. Always use the blade cover when the tool is not in use or during transport.
- Telescopic Pole Use: This tool is designed for use with the extension pole only and is not intended for handheld operation without the pole. Ensure the pole is securely locked before use.
- Batteriegebrauch und -pflege: Use only the specified charger for the battery pack. Do not use a damaged battery pack or tool. Do not short-circuit the battery pack.
- Schulterriemen: Always use the provided shoulder strap to distribute weight and maintain control, reducing fatigue during extended use.
2. Packungsinhalt
Packen Sie alle Artikel sorgfältig aus und vergewissern Sie sich, dass alle Komponenten vorhanden und unbeschädigt sind. Sollten Teile fehlen oder beschädigt sein, kontaktieren Sie bitte den Kundendienst.

Image: All components of the TaskStar Cordless Pole Hedge Trimmer kit, including the trimmer head, telescopic pole, power grip, batteries, charger, handle, shoulder strap, and blade cover.
- 1 x TaskStar Cordless Hedge Trimmer Head
- 1 x Teleskopstange
- 1 x Power Grip with Battery Slot
- 2 x 4.0Ah Lithium Batteries
- 1 x Schnellladegerät
- 1 x Carrying Handle
- 1 x Schultergurt
- 1 x Klingenabdeckung.
- 1 x Benutzerhandbuch (dieses Dokument)
3. Produktüberschreitungview
The TaskStar Cordless Pole Hedge Trimmer is designed for efficient and safe trimming of hedges and shrubs, especially at height. It features a powerful motor, dual-action blade, and an adjustable telescopic pole.
Hauptmerkmale:
- 16-Zoll-Doppelklinge: Provides a wider cutting range and smoother finish, capable of trimming branches up to 5/8 inches thick.
- Teleskopstange: Extends from 7 to 8.5 feet, allowing safe trimming of tall hedges and trees from the ground without a ladder.
- Zwei 4.0-Ah-Lithiumbatterien: Two high-capacity batteries provide extended runtime for larger trimming tasks.
- 6-Position Adjustable Rotating Head: The cutting head can be adjusted up to 135° for versatile trimming angles, enabling precise shaping of hedges.
- Ergonomisches Design: Includes a shoulder strap and carrying handle to distribute weight evenly, reducing arm strain and improving comfort during use.
- High-Efficiency 600W Motor: Delivers steady, high-speed performance (1200 RPM) for smooth and efficient trimming through dense hedges.
- Sicherheitsmerkmale: Equipped with a protective blade cover and a safety lock to prevent accidental starts and ensure secure storage.

Image: Close-up of the 16-inch dual-action blade cutting through a hedge, illustrating its 5/8-inch cutting capacity.

Image: A person using the hedge trimmer with the telescopic pole extended to trim the top of a tall hedge, demonstrating its reach.

Image: Two 4.0Ah lithium-ion batteries and the fast charger, indicating extended power for the tool.
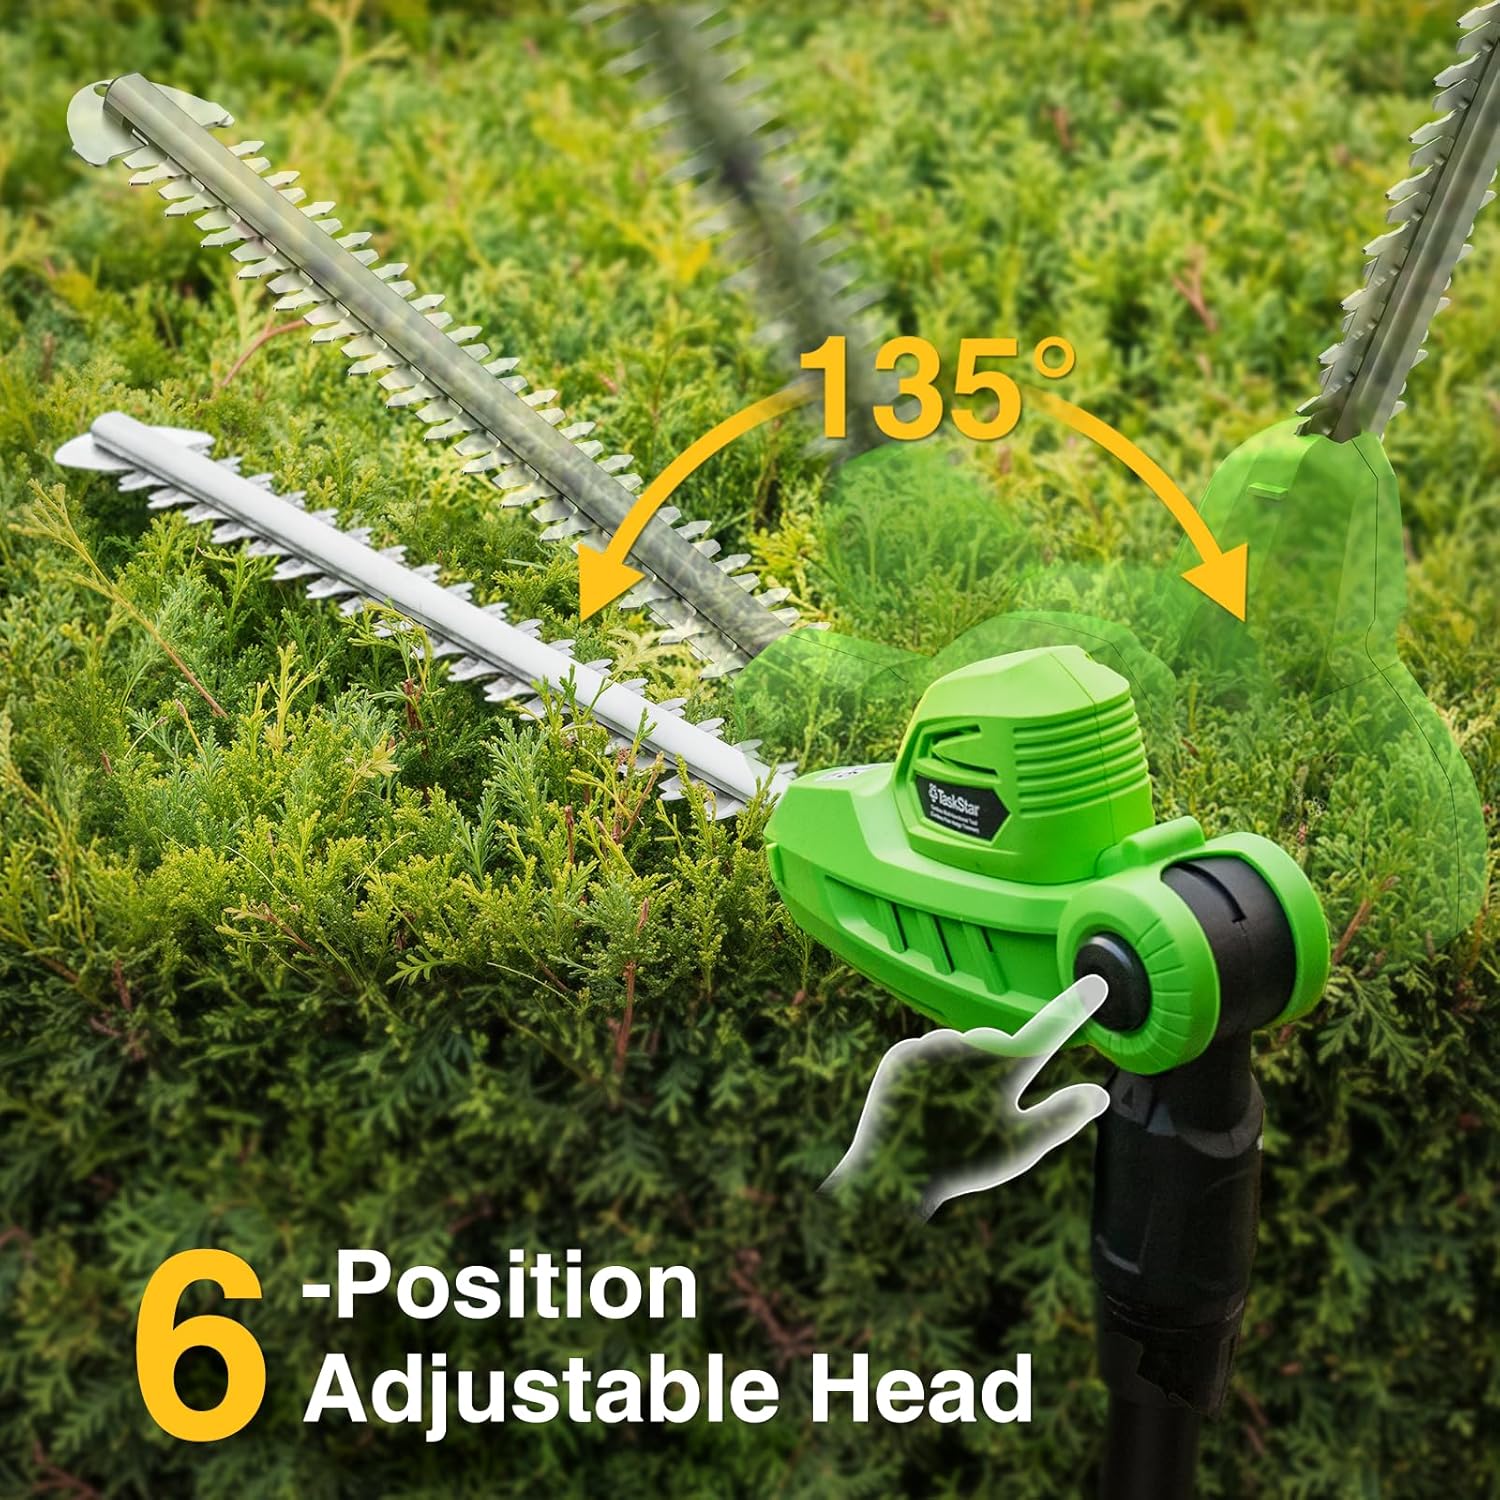
Image: The hedge trimmer head shown rotating up to 135 degrees, highlighting its adjustable positions for various cutting angles.

Image: A person operating the hedge trimmer with the shoulder strap attached and holding the ergonomic handle, demonstrating comfortable use.

Image: A visual representation of the hedge trimmer's motor, indicating its 600W power and 1200 RPM speed for efficient cutting.
4. Aufbau und Montage
Follow these steps to assemble your TaskStar Cordless Pole Hedge Trimmer before first use.
4.1 Aufladen der Akkus
- Schließen Sie das Schnellladegerät an eine normale Steckdose an.
- Insert a 4.0Ah battery into the charger. The indicator light on the charger will show the charging status.
- Allow the battery to fully charge before first use. Charging typically takes approximately 1 hour per battery.
- Sobald der Akku vollständig aufgeladen ist, nehmen Sie ihn aus dem Ladegerät.
4.2 Assembling the Pole and Trimmer Head
- Ensure the trimmer head is switched off and the blade cover is in place.
- Align the trimmer head with the telescopic pole. Push them together until they click securely into place.
- Attach the power grip with the battery slot to the other end of the telescopic pole, ensuring a secure connection.

Image: The hedge trimmer disassembled into its main components (head, pole, power grip), illustrating the detachable design for assembly and storage.
4.3 Attaching the Carrying Handle and Shoulder Strap
- Slide the carrying handle onto the telescopic pole and secure it at a comfortable position using the provided fasteners.
- Attach the shoulder strap to the designated attachment points on the pole. Adjust the strap length to ensure the tool is balanced and comfortable when held.

Image: Close-up of the adjustable carrying handle and shoulder strap attachment points on the telescopic pole, showing how to customize their positions for user comfort.
4.4 Einsetzen des Akkus
- Stellen Sie sicher, dass die Heckenschere ausgeschaltet ist.
- Slide a fully charged 4.0Ah battery into the battery slot on the power grip until it clicks into place.
- Um die Batterie zu entfernen, drücken Sie den Entriegelungsknopf und schieben Sie die Batterie heraus.
5. Bedienungsanleitung
Vor der Inbetriebnahme vergewissern Sie sich, dass Sie alle Sicherheitshinweise gelesen und verstanden haben.
5.1 Vorbetriebliche Prüfungen
- Verify that the battery is fully charged and securely installed.
- Inspect the blade for any damage or dullness.
- Ensure all connections (pole, head, grip) are secure.
- Check that the blade cover is removed.
- Confirm the shoulder strap and handle are adjusted for comfortable and balanced operation.
5.2 Einstellen der Stangenlänge
- Den Verriegelungsmechanismus an der Teleskopstange lösen.
- Extend or retract the pole to the desired length (between 7 and 8.5 feet).
- Ziehen Sie den Verriegelungsmechanismus fest an, um ein Verrutschen der Stange während des Betriebs zu verhindern.
5.3 Adjusting Head Angle
- Press the head adjustment button located near the trimmer head.
- Rotate the trimmer head to one of the 6 available positions, up to 135 degrees.
- Release the button to lock the head into the desired angle.
5.4 Starten und Stoppen des Trimmers
- Drücken und halten Sie zunächst die Sicherheitsverriegelungstaste und betätigen Sie anschließend den Auslöseschalter.
- To stop, release the trigger switch. The safety lock will automatically reset.
5.5 Trimmtechniken
- Allgemeines Trimmen: Hold the trimmer firmly with both hands, using the shoulder strap for support. Move the trimmer in a smooth, sweeping motion.
- Trimming Sides of Hedges: Use a wide, sweeping motion, starting from the bottom and working upwards.
- Trimming Tops of Hedges: Adjust the head angle to a flat position. Walk alongside the hedge, moving the trimmer steadily across the top.
- Branch Capacity: Do not attempt to cut branches thicker than 5/8 inches (1.6 cm). For thicker branches, use appropriate pruning tools.

Image: A collage showing the hedge trimmer being used in various scenarios, including trimming tall hedges, shaping small trees, maintaining garden shrubs, and landscaping bushes.
6. Wartung und Lagerung
Proper maintenance ensures the longevity and safe operation of your hedge trimmer.
6.1 Wartung der Klinge
- Reinigung: After each use, disconnect the battery and use a stiff brush to remove debris, sap, and leaves from the blade.
- Schmierung: Apply a light machine oil or blade lubricant to the cutting blade after cleaning to prevent rust and ensure smooth operation.
- Schärfung: If the blade becomes dull, it can be sharpened by a qualified service technician. Do not attempt to sharpen the blade yourself unless you have proper training and tools.
6.2 Batteriepflege
- Lagern Sie Batterien an einem kühlen, trockenen Ort, geschützt vor direkter Sonneneinstrahlung und extremen Temperaturen.
- Batterien sollten nicht über längere Zeit im entladenen Zustand gelagert werden. Laden Sie sie regelmäßig auf, wenn sie nicht verwendet werden.
- Batterien dürfen weder Wasser noch Feuchtigkeit ausgesetzt werden.
6.3 Allgemeine Reinigung und Lagerung
- Wischen Sie die Außenseite des Werkzeugs mit einem Tuch ab.amp Tuch. Verwenden Sie keine scharfen Chemikalien oder Scheuermittel.
- Always attach the blade cover before storing the hedge trimmer.
- Store the tool in a dry, secure location, out of reach of children. The detachable design allows for compact storage.
7. Fehlerbehebung
Sollten Sie Probleme mit Ihrer Heckenschere haben, beachten Sie bitte die folgenden häufig auftretenden Probleme und Lösungen.
| Problem | Mögliche Ursache | Lösung |
|---|---|---|
| Trimmer startet nicht | Battery not charged or improperly installed; Safety lock not engaged; Tool malfunction. | Ensure battery is fully charged and correctly inserted. Press safety lock button before squeezing trigger. If problem persists, contact support. |
| Schlechte Schnittleistung | Dull or dirty blade; Overloading the tool; Obstruction in blade. | Clean and lubricate the blade. Avoid cutting branches thicker than specified. Remove any debris from the blade (with battery removed). Sharpen blade if necessary. |
| Übermäßige Vibration | Lose Teile; beschädigte Klinge. | Check all connections for tightness. Inspect blade for damage. Discontinue use if vibration is severe and contact support. |
| Akku wird nicht geladen | Ladegerät nicht angeschlossen; Akku oder Ladegerät defekt. | Ensure charger is properly connected to power. Try another battery if available. Contact support if both charger and battery seem faulty. |
8. Technische Daten
| Spezifikation | Detail |
|---|---|
| Marke | TaskStar |
| Modellnummer | CYCPHT01A-410 |
| Stromquelle | Batteriebetrieben |
| Akku-Typ | Lithium-ion, 4.0Ah (2 included) |
| Klingenlänge | 16 Zoll (40.6 cm) |
| Cutting Width / Capacity | 0.63 Inches (5/8 inch, 1.6 cm) |
| Motorleistung | 600 W |
| Motordrehzahl | 1200 U/min |
| Länge der Teleskopstange | 7 bis 8.5 Fuß (2.1 bis 2.6 Meter) |
| Verstellbarer Kopfwinkel | 6 positions, up to 135° |
| Produktabmessungen (montiert) | 36.8"L x 5.9"W x 5.7"H (approximate, compact) |
| Artikelgewicht | 8 Pfund (3.6 kg) |
| Farbe | Grün |
9. Garantie und Kundendienst
For warranty information or technical assistance, please contact TaskStar customer support. Keep your proof of purchase for any warranty claims.
- Kontaktinformationen: Refer to the packaging or the official TaskStar webHier finden Sie die aktuellsten Kontaktdaten des Kundensupports.
- Kaufbeleg: Retain your receipt or invoice as proof of purchase for warranty validation.
- Produktregistrierung: Consider registering your product online to receive updates and facilitate warranty service.