Einführung
This manual provides essential information for the proper installation, operation, and maintenance of your Hobbywing QUICRUN WP 10BL80 G2 Crawler Electronic Speed Controller (ESC). Please read this manual thoroughly before using the product to ensure safe and efficient operation.
Sicherheitsvorkehrungen
Failure to follow these safety guidelines may result in product damage, property damage, or personal injury.
- Always verify the compatibility and reasonable pairing of power devices with your car frame's manual to prevent overloading and motor damage.
- Ensure all equipment connections are secure. Loose connections due to vibration can lead to loss of control of your RC model.
- Niemals Vollgas geben, ohne dass das Ritzel montiert ist. Extrem hohe Drehzahlen ohne Last können den Motor beschädigen.
- Prevent the motor case temperature from exceeding 100°C (212°F), as high temperatures can demagnetize the motor's magnets.
- The ESC has an IP67 rating for protection against splashes, water exposure, and dust under normal use. This protection is not permanent and may degrade over time. Do not submerge the product for extended periods to avoid damage.
Produkteigenschaften
- Kompaktes Design: Despite its small size (36×30×15.5mm), it delivers high-performance output of 4S/80A.
- Optimized for Crawling: Features strong low-speed torque, low startup speed, and smooth operation, ideal for 1/10th scale crawling.
- Real-Time Drag Brake Adjustment: Supports AUX channel control for on-the-fly drag brake force adjustment via your remote control.
- Integrated High-Voltage BEC: Provides up to 11A output current with selectable voltages (6V/7.4V/8.4V) to power high-torque, high-voltage Servos.
- Motorkompatibilität: Compatible with both Brushless and Brushed motors.
- Fan-Unterstützung: Includes mounting holes for an optional cooling fan to maintain optimal operating temperatures (around 60°C on the case).
- Einfache Verbindung: Equipped with integrated 3.5mm female connectors on the output side for seamless, solder-free connection to compatible motors.
- High Level Protection: IP67 rated for outstanding waterproof and dustproof performance in various challenging terrains and weather conditions.
Setup und Installation
Follow these steps for proper installation of your ESC.
1. Kabelverbindungen
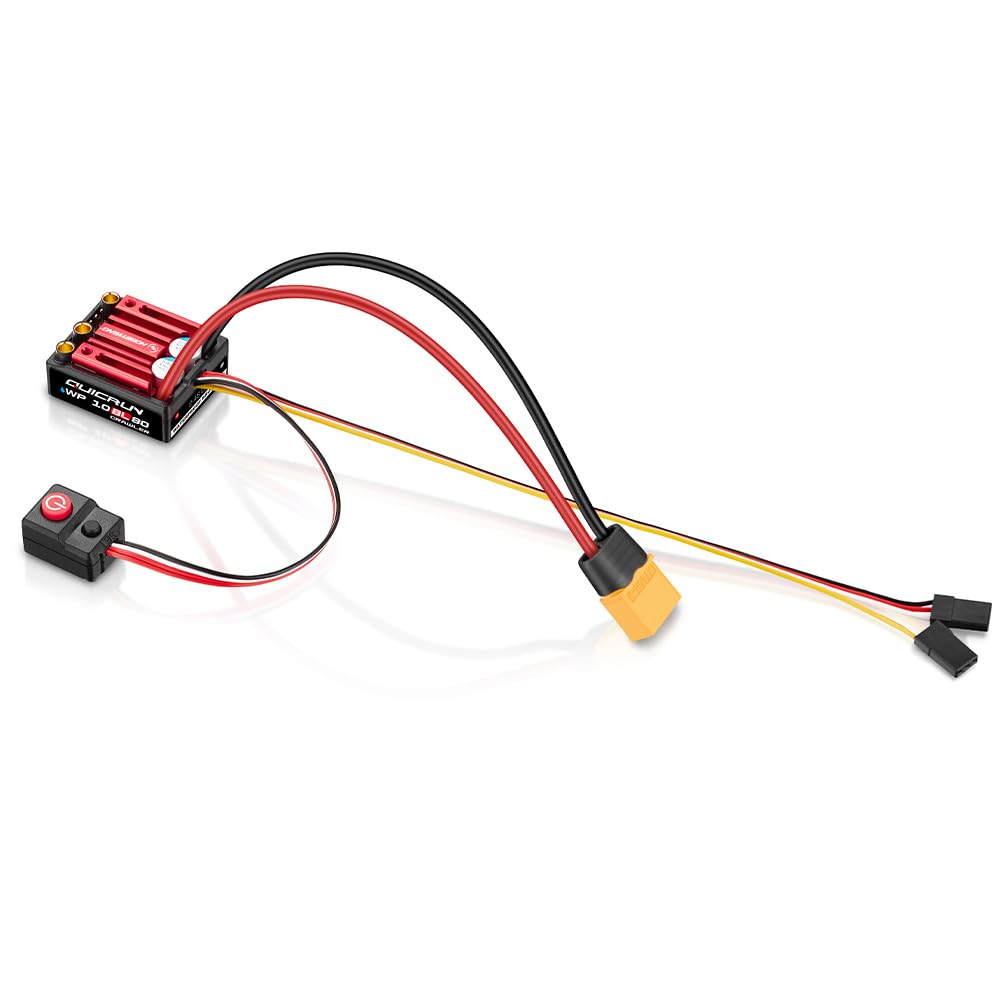
Figure 1: Hobbywing QUICRUN WP 10BL80 G2 Crawler ESC with connected wires and power switch. This image displays the main ESC unit with its red heatsink, integrated capacitors, and various wires connected, including the power input, motor output (A, B, C), and the separate power switch module with a red power button.
- Motoranschluss: Connect the three output wires from the ESC (labeled A, B, C) to the corresponding motor wires. The ESC features integrated 3.5mm female connectors for direct connection to compatible motors without soldering.
- Batterieanschluss: Connect the power input wires (red and black, typically thicker gauge) from the ESC to your battery pack. Ensure correct polarity (red to positive, black to negative).
- Empfängeranschluss: Plug the BEC output cable from the ESC into the throttle channel (usually channel 2) of your RC receiver.
- AUX Channel Connection (Optional): For real-time drag brake adjustment, connect the AUX input signal wire from the ESC to an available AUX channel on your remote control receiver.
- Stromschalter: Connect the separate power switch module to the designated port on the ESC.
2. BEC-Voltage Einstellung
The integrated BEC offers selectable output voltages of 6V, 7.4V, or 8.4V. Refer to the ESC's programming instructions (usually via a program card, sold separately, or button presses) to set the appropriate voltage for your servos. Ensure the selected voltage matches your servo's specifications to prevent damage.
3. Cooling Fan Installation (Optional)
The ESC includes mounting holes for an optional cooling fan. If operating in demanding conditions or to ensure the ESC remains around 60°C, you may choose to install a compatible cooling fan. Connect the fan to the designated fan port on the ESC.
Bedienungsanleitung
1. Ein-/Ausschalten
- So schalten Sie das Gerät ein: Ensure all connections are secure. Turn on your remote control first, then press the power button on the ESC's switch module.
- So schalten Sie das Gerät aus: Press and hold the power button on the ESC's switch module until the ESC powers down. Then, turn off your remote control.
2. Drag Brake Adjustment
If you have connected the AUX input signal wire to an available channel on your remote control, you can adjust the drag brake force in real-time while driving. Consult your remote control's manual for assigning and operating AUX channels.
3. Motor Mode Selection (Brushless/Brushed)
The ESC supports both Brushless and Brushed motor modes. The mode is typically detected automatically upon initial power-up or can be manually configured using a program card or specific button sequences. Refer to the detailed programming guide for your ESC for specific instructions on switching between modes if necessary.
4. Waterproof and Dustproof Performance
The ESC is IP67 rated, providing protection against splashes, water exposure, and dust. This allows for operation in muddy, sandy, icy, snowy, or wet conditions. Wichtiger Hinweis: The IP67 rating is not permanent and may degrade over time. Do not submerge the product for extended periods, as this can cause damage. Always ensure the product is dry before storing or charging batteries.
Wartung
- Reinigung: After use, especially in wet or dusty conditions, gently clean the ESC with a soft brush or compressed air. If it gets wet, ensure it is thoroughly dried before storage or next use.
- Inspektion: Überprüfen Sie regelmäßig alle Kabel und Steckverbinder auf Anzeichen von Verschleiß, Beschädigung oder Korrosion. Ersetzen Sie beschädigte Bauteile umgehend.
- Lagerung: Lagern Sie den ESC an einem kühlen, trockenen Ort, geschützt vor direkter Sonneneinstrahlung und extremen Temperaturen.
Fehlerbehebung
Sollten Probleme auftreten, beachten Sie bitte die folgenden gängigen Schritte zur Fehlerbehebung:
- Kein Strom: Check battery connections, ensure the battery is charged, and verify the power switch is functioning correctly.
- Motor reagiert nicht: Check motor connections, ensure the receiver is powered and bound to the transmitter, and verify throttle trim settings.
- Unregelmäßiger Betrieb: Inspect all wiring for loose connections or damage. Ensure there is no radio interference.
- Überhitzung: Check for proper motor gearing, ensure the cooling fan (if installed) is working, and avoid continuous heavy loads.
- Wasserschaden: If the ESC has been submerged or exposed to excessive moisture, dry it thoroughly. If issues persist, contact support.
Technische Daten
| Besonderheit | Detail |
|---|---|
| Modellnummer | WP 10BL80 |
| Abmessungen (L x B x H) | 36 x 30 x 15.5 mm (ESC unit) |
| Artikelgewicht | 3.84 Unzen (ca. 108.8 Gramm) |
| Dauerstrom | 80 A |
| Eingangslautstärketage | Up to 4S LiPo |
| BEC-Ausgang | 11A, selectable 6V/7.4V/8.4V |
| Motorkompatibilität | Brushless and Brushed motors |
| Anschlüsse | Integrated 3.5mm female connectors (output side) |
| Schutzklasse | IP67 (wasser- und staubdicht) |
| Hersteller | Hobbywing Technology |
Garantie und Support
For warranty information, technical support, or service inquiries, please contact Hobbywing Technology directly or refer to their official webBewahren Sie Ihren Kaufbeleg als Kaufnachweis für Garantieansprüche auf.