1. Einleitung
This manual provides detailed instructions for the installation, operation, and maintenance of your darkFlash DS900 Air ATX Mid-Tower PC Gaming Case. Please read this manual thoroughly before beginning assembly to ensure proper setup and safe usage. The DS900 Air is designed to offer a clear view of your components with its 270° full-view tempered glass and provides excellent cooling capabilities for high-performance systems.

Figure 1.1: darkFlash DS900 Air ATX Mid-Tower PC Gaming Case with internal components and RGB lighting.
2. Sicherheitshinweise
Beachten Sie bei der Installation und dem Betrieb stets die folgenden Sicherheitsvorkehrungen:
- Vor dem Einbau oder Ausbau von Komponenten muss die Stromversorgung von der Steckdose getrennt werden.
- Tragen Sie ein antistatisches Armband, um Schäden an empfindlichen Bauteilen durch elektrostatische Entladung (ESD) zu verhindern.
- Handle tempered glass panels with care. Avoid impacts or dropping them, as they can shatter.
- Kleinteile und Schrauben von Kindern fernhalten.
- Sorgen Sie für ausreichende Belüftung rund um das Gehäuse, um eine Überhitzung zu vermeiden.
- Versuchen Sie nicht, die Gehäusestruktur zu verändern, da dies zum Erlöschen der Garantie führen und Sicherheitsrisiken bergen kann.
3. Spezifikationen
| Besonderheit | Spezifikation |
|---|---|
| Modellname | DS900 Air |
| Gehäusetyp | ATX-Mid-Tower |
| Motherboard-Unterstützung | ATX, Mikro-ATX, Mini-ITX |
| GPU-Längenabstand | Bis zu 425 mm |
| CPU-Kühler-Höhenabstand | Bis zu 170 mm |
| Netzteiltyp | ATX (Bottom-mounted) |
| Laufwerksschächte | 2x 3.5" HDD or 2x 2.5" SSD, 2x 2.5" SSD |
| Erweiterungssteckplätze | 7 PCIe-Steckplätze |
| E/A-Anschlüsse | 1x USB-C, 1x USB 3.0, Audio (HD Audio) |
| Fan-Unterstützung | Bottom: 3x 120mm; Top: 3x 120mm or 2x 140mm; Rear: 1x 120mm; Right Side: 2x 120mm |
| Kühlerhalterung | Top: Up to 360mm; Side: Up to 240mm |
| Materialien | Stahl, gehärtetes Glas |
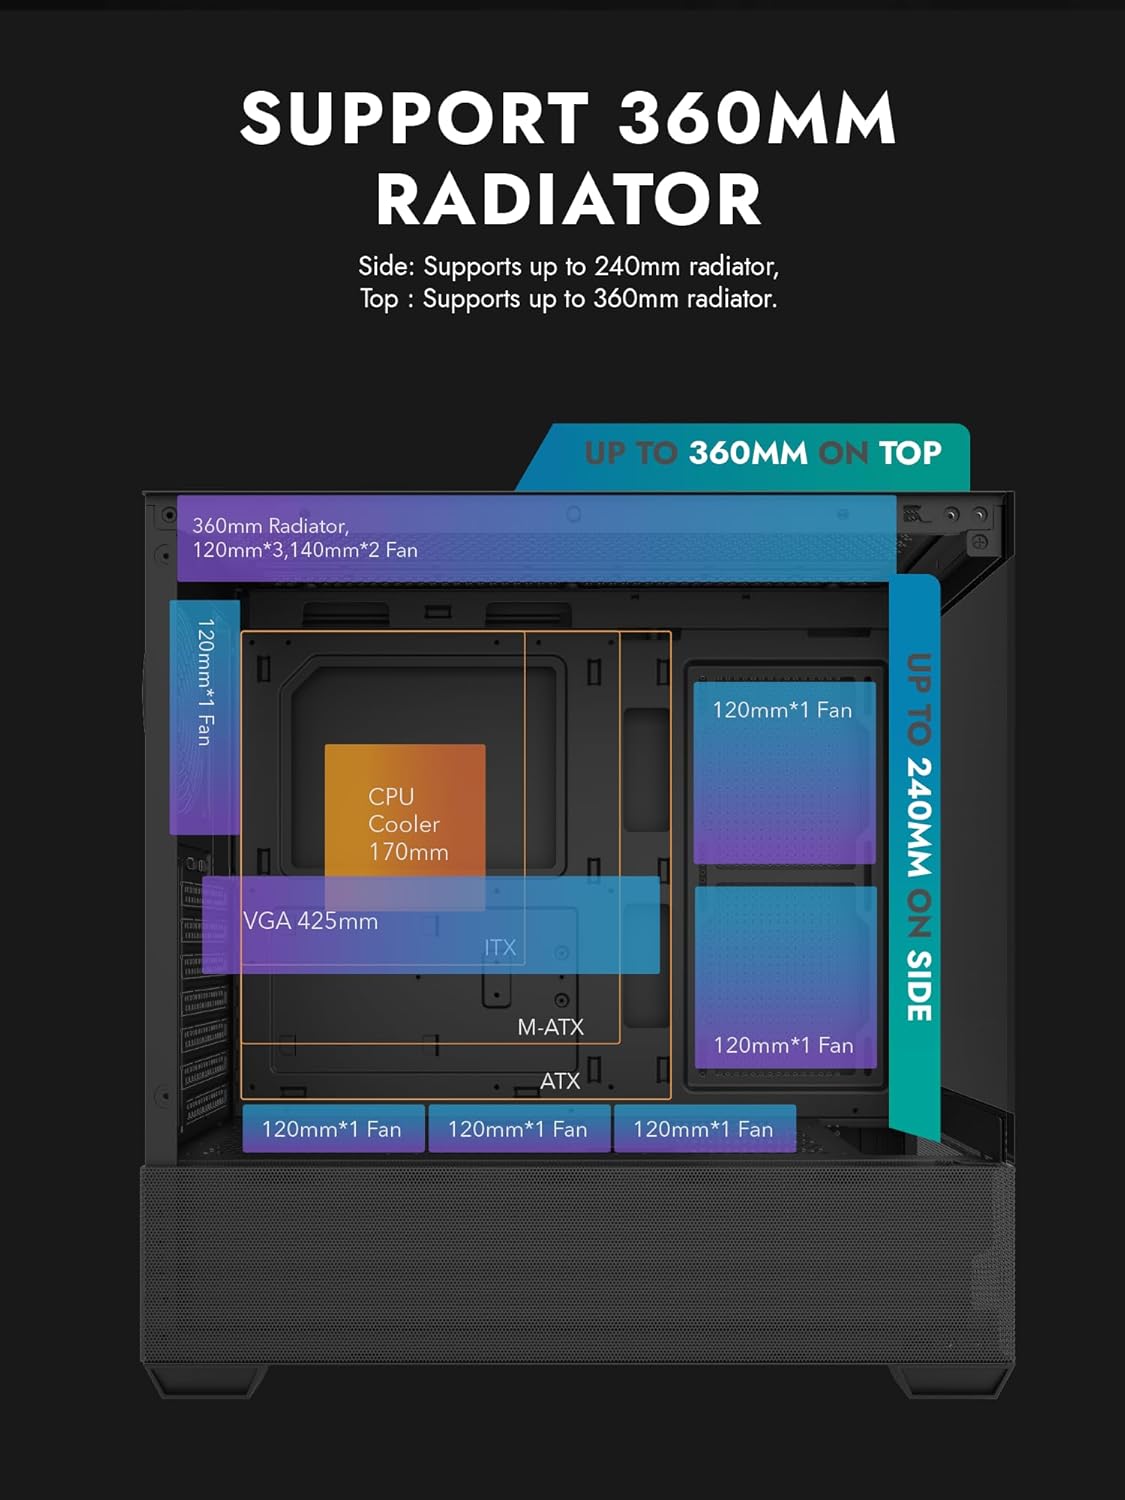
Figure 3.1: Radiator and fan support diagram for the DS900 Air case, illustrating maximum component dimensions.
4. Einrichtung und Installation
Follow these steps to assemble your PC components within the darkFlash DS900 Air case.
4.1. Vorbereitung des Falls
- Seitenteile entfernen: The DS900 Air features a tool-free clamshell side panel. Gently pull the top edge of the tempered glass side panel to unlatch it, then lift it off. Repeat for the other side panel if necessary.
- Zubehörbox: Locate the accessory box inside the case, which contains screws, cable ties, and other mounting hardware.
4.2. Motherboard-Installation
- Montieren Sie die I/O-Blende in die hintere Öffnung des Gehäuses.
- Align your ATX, Micro-ATX, or Mini-ITX motherboard with the standoffs inside the case. Ensure the I/O ports align with the I/O shield.
- Befestigen Sie das Motherboard mit den mitgelieferten Schrauben.
4.3. Installation des Netzteils (PSU)
- The DS900 Air has a dedicated bottom PSU chamber. Slide your ATX power supply into the chamber from the rear of the case.
- Befestigen Sie das Netzteil mit Schrauben von der Rückseite des Gehäuses.
- Route necessary power cables through the cutouts into the main compartment.
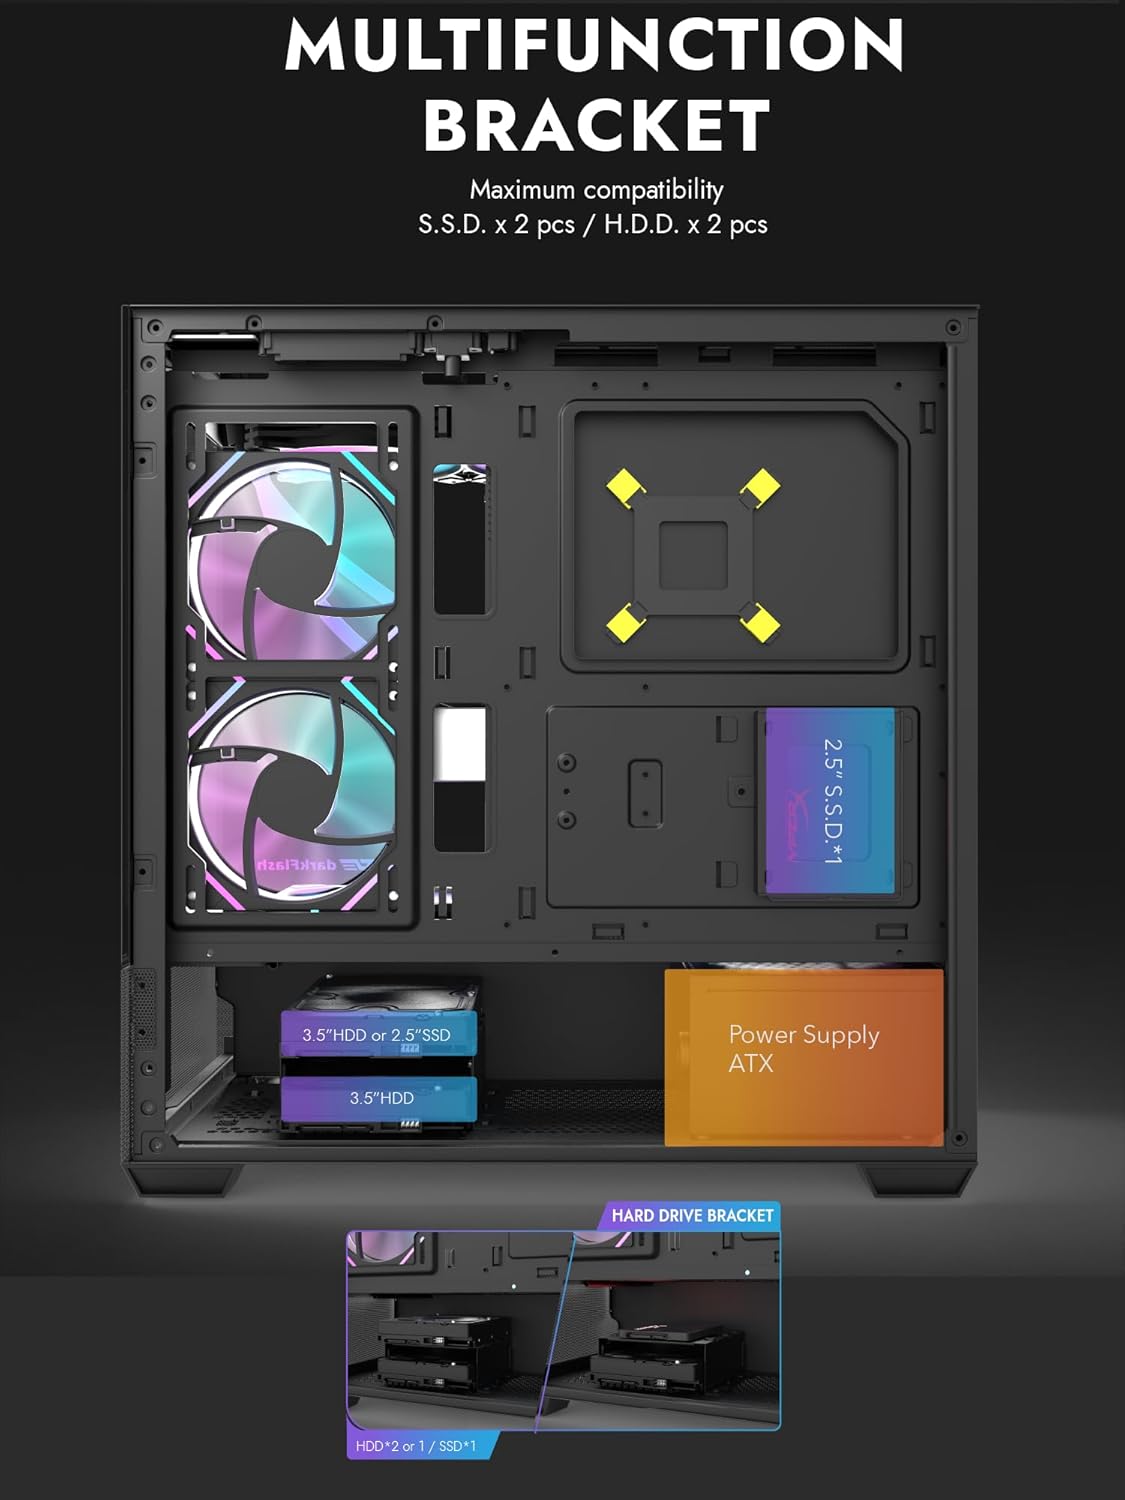
Figure 4.1: Internal layout showing the multifunction drive bracket and the bottom-mounted PSU chamber.
4.4. Installation des Speichermediums
The case supports up to two 3.5" HDDs or 2.5" SSDs in the hard drive bracket, and two additional 2.5" SSDs on the multifunction bracket.
- 3.5"-HDD / 2.5"-SSD: Install drives into the removable hard drive bracket located in the PSU chamber. Secure with screws.
- 2.5"-SSD: Mount 2.5" SSDs onto the multifunction bracket located on the motherboard tray. Secure with screws.
4.5. Installation der Grafikkarte (GPU)
- Entfernen Sie die erforderlichen PCIe-Steckplatzabdeckungen von der Rückseite des Gehäuses.
- Stecken Sie Ihre Grafikkarte in den entsprechenden PCIe-Steckplatz auf dem Motherboard.
- Befestigen Sie die Grafikkarte mit Schrauben. Das Gehäuse unterstützt GPUs mit einer Länge von bis zu 425 mm.
4.6. Cooling System Installation (Fans/Radiators)
The DS900 Air offers extensive cooling options:
- Spitze: Supports up to 3x 120mm fans or 2x 140mm fans, or a 360mm radiator.
- Unten: Unterstützt bis zu 3x 120-mm-Lüfter.
- Hinteren: Unterstützt 1x 120-mm-Lüfter.
- Rechte Seite: Supports 2x 120mm fans or a 240mm radiator.
Install fans and radiators using the appropriate screws and mounting points. Ensure correct airflow direction for optimal cooling.

Figure 4.2: Fan support locations and quantities within the DS900 Air chassis.

Figure 4.3: Airflow diagram demonstrating optimal cooling paths through the case.
4.7. Anschließen der Front-I/O-Kabel
Connect the front panel cables (USB-C, USB 3.0, HD Audio, Power, Reset, LED) to their corresponding headers on your motherboard. Refer to your motherboard manual for exact header locations.

Figure 4.4: Top-right I/O panel featuring USB-C and USB 3.0 ports.
4.8. Kabelmanagement
Nutzen Sie die Kabeldurchführungen und Befestigungspunkte hinter dem Mainboard-Tray, um die Kabel ordentlich zu verlegen. Dies verbessert die Luftzirkulation und die Optik.
5. Bedienung Ihres PCs
Once all components are installed and cables are connected, replace the side panels. Connect your monitor, keyboard, mouse, and power cable. Press the power button on the case to start your system. Ensure all fans are spinning and components are receiving power.
6. Wartung
Regelmäßige Wartung trägt dazu bei, die optimale Leistung und Langlebigkeit Ihrer PC-Komponenten zu gewährleisten.
- Staubreinigung: Periodically clean dust filters and internal components using compressed air. The DS900 Air features mesh panels that help filter dust.
- Luftstrom: Ensure no obstructions block the intake or exhaust vents of the case.
- Kabelmanagement: Re-evaluate cable routing periodically to ensure no cables are interfering with fan blades or airflow.
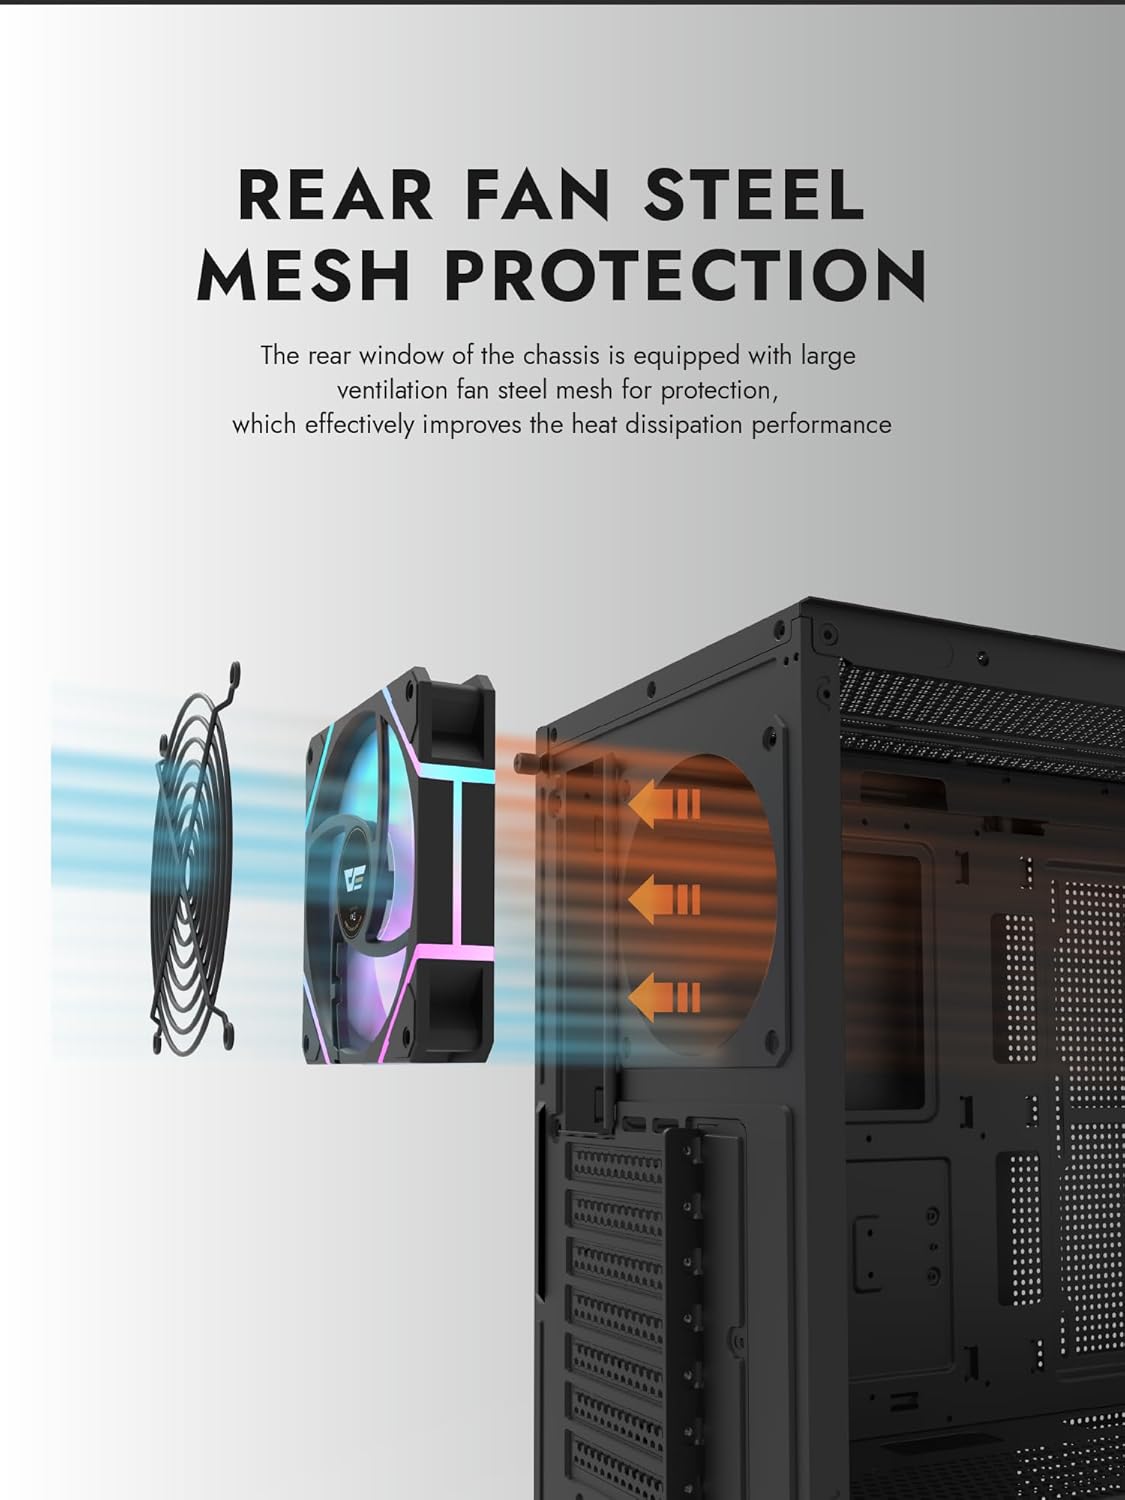
Figure 6.1: Rear fan steel mesh protection, designed to improve heat dissipation.
7. Fehlerbehebung
Sollten Sie Probleme mit Ihrem PC-Bau feststellen, beachten Sie die folgenden gängigen Schritte zur Fehlerbehebung:
- Kein Strom: Überprüfen Sie alle Stromanschlüsse, einschließlich der Verbindung des Netzteils zur Wandsteckdose, der Verbindung des Netzteils zum Motherboard und des Kabels des Netzschalters an der Vorderseite zum Motherboard.
- Kein Bildschirm: Ensure your monitor is connected to the graphics card (not the motherboard I/O unless using integrated graphics). Reseat the graphics card and RAM.
- Überhitzung: Verify all fans are spinning correctly and are oriented for proper airflow. Check CPU cooler installation.
- Komponente nicht erkannt: Reseat the component (e.g., RAM, GPU, storage drive) and check its power and data connections.
8. Garantie und Support
darkFlash products are manufactured to high-quality standards. For warranty information or technical support, please refer to the official darkFlash webBesuchen Sie unsere Website oder kontaktieren Sie Ihren Händler. Bewahren Sie Ihren Kaufbeleg für Garantieansprüche auf.