
1. Einleitung
This manual provides detailed instructions for the installation, setup, and operation of your JOYING JY-TT163N4 Android 13 Car Stereo. This unit is designed specifically for Toyota Corolla models manufactured between 2008 and 2013, offering advanced features such as Android 13 operating system, 9-inch touch screen, CarPlay, Android Auto, GPS navigation, and Bluetooth connectivity.
Bitte lesen Sie diese Bedienungsanleitung vor der Installation und Inbetriebnahme sorgfältig durch, um eine einwandfreie Funktion und Sicherheit zu gewährleisten.
2. Packungsinhalt
Bitte überprüfen Sie, ob alle unten aufgeführten Artikel in Ihrem Paket enthalten sind:
- 9" Radio Unit (x1)
- Single Din Cage (x1)
- Left & Right Bracket (x1)
- WLAN-Antenne (x1)
- GPS-Antenne (x1)
- 4G-Antenne (x2)
- External Mic (x1)
- USB-Kabel (x2)
- AR Cable (x1)
- Screen Ribbon Cable (x1)
- Stromkabel (x1)
- Benutzerhandbuch (x1)

Figure 2.1: All included accessories for the JOYING JY-TT163N4 car stereo.
3. Installationsanleitung
Eine Installation durch einen Fachmann wird empfohlen. Stellen Sie sicher, dass die Stromversorgung des Fahrzeugs vor Beginn der Installation unterbrochen ist.
3.1. Kompatibilitätsprüfung
This unit is designed for Toyota Corolla 2008-2013. Please verify your car's dashboard configuration to ensure compatibility, especially regarding JBL amplifier systems and screen sizes.

Figure 3.1: Dashboard compatibility for models without factory JBL amplifier (Option A).
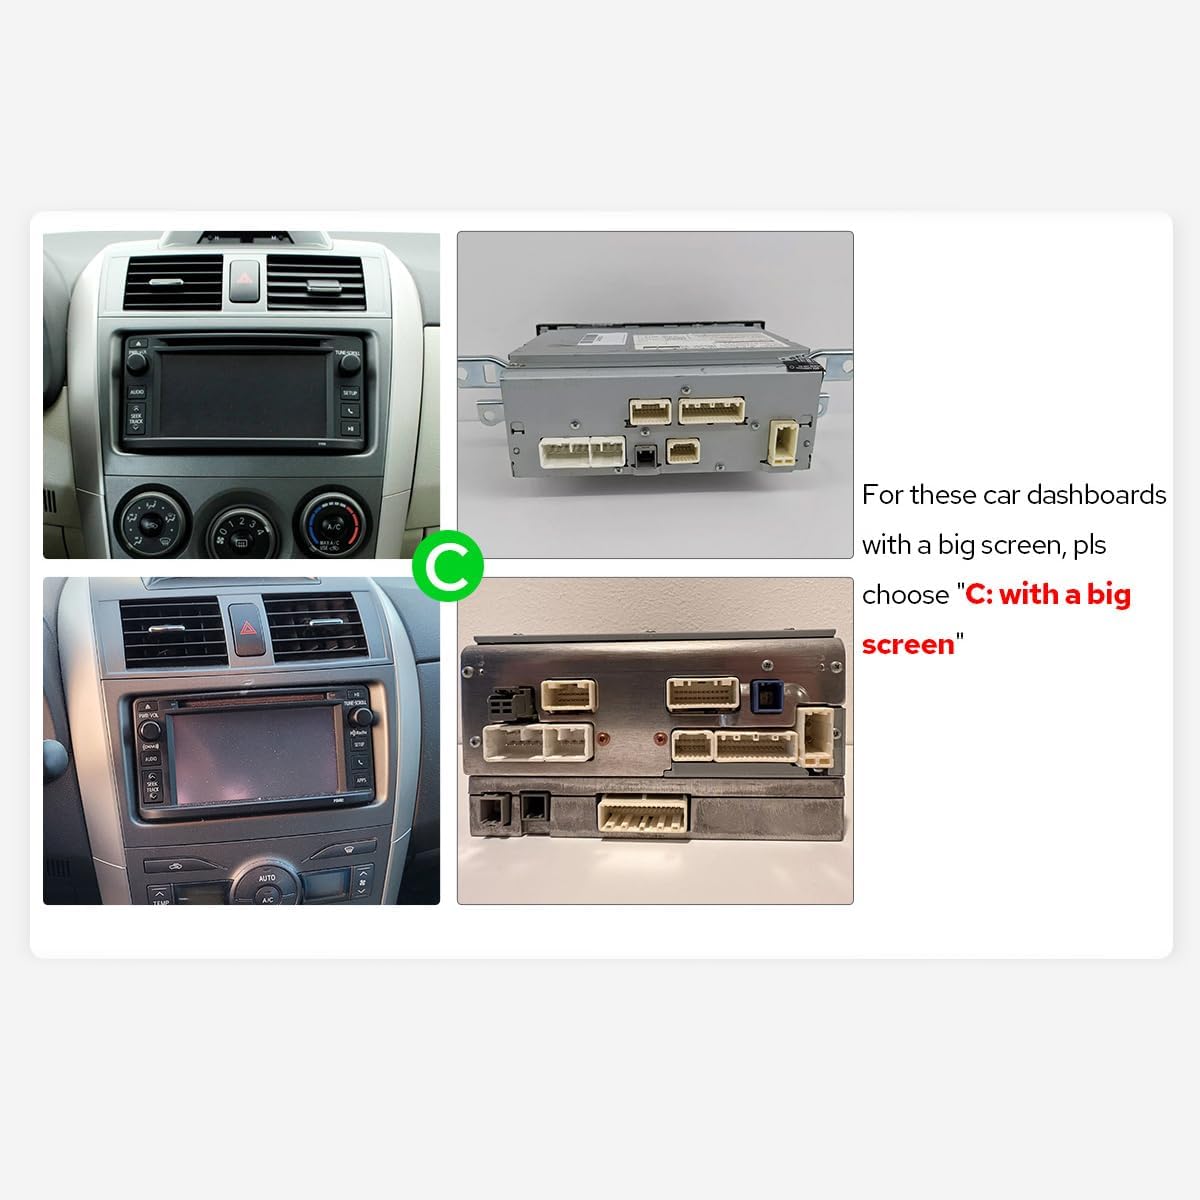
Figure 3.2: Dashboard compatibility for models with a big screen (Option C).
3.2. Kabelverbindungen
Connect the provided cables to the corresponding ports on the car stereo and your vehicle's harness. Ensure all connections are secure.

Abbildung 3.3: Rückseite view of the car stereo with labeled connection ports.
Video 3.1: This video demonstrates the general wiring operation for car stereo installation. It shows how to connect the power cable, RCA harness, USB adapter cables, radio antenna, and GPS antenna to the head unit.
Video 3.2: This video illustrates the installation effect of a car stereo in a Toyota Corolla 2009-2013 model, providing a visual reference for the final appearance.
4. Ersteinrichtung
4.1. Erster Start
Upon inserting the car key, the unit will start up and enter the user interface within 2 seconds (initial boot may take 30-40 seconds).
4.2. AC Settings
To adjust AC settings, including temperature units (Fahrenheit) and display options:
- Navigate to the main home screen.
- Tap on 'My Car'.
- Select 'Setting'.
- Choose 'AC setting'.
- Toggle the 'Fahrenheit' option to your preference.
- Ensure 'Display large Air' is enabled for full AC display.
- Click 'Confirm' to save changes.
Video 4.1: This video demonstrates how to access and adjust the AC settings on your car stereo, including switching between Celsius and Fahrenheit and enabling the large air display option.
5. Bedienungsanleitung
5.1. CarPlay & Android Auto
Connect your mobile phone via USB cable or Bluetooth to share apps, navigation, make calls, and listen to music on the larger screen.

Figure 5.1: Built-in CarPlay and Android Auto interfaces.
Video 5.1: This video demonstrates the main functions of the car stereo, including how to connect and use CarPlay, Android Auto, and Mirror Link features.
Video 5.2: This video provides instructions on how to set up and use Wireless CarPlay and Android Auto with the car stereo.
Video 5.3: This video guides users through the process of connecting their smartphone to the car stereo for CarPlay and Android Auto functionality.
Video 5.4: This video demonstrates the steps to connect your device to the car stereo for CarPlay functionality.
5.2. Spiegel-Link
Mirror your smartphone screen directly onto the car stereo display for enhanced viewBereitstellung von Apps und Inhalten.
Video 5.5: Diese kurze Vorredeview video demonstrates the wireless mirroring feature, showing a smartphone screen duplicated on the car stereo display.
5.3. GPS-Navigation
The unit features precise GPS engines and includes GPS antennas for accurate positioning and faster real-time navigation. Offline maps are supported in areas where data download is available.
5.4. Bluetooth 5.0
Supports audio streaming, automatic phone book transfer, and hands-free calling. Note: It primarily supports phone and OBD dongle connections.
5.5. Medienwiedergabe
Enjoy music and videos from various sources. The unit supports split-screen multitasking, allowing you to run two applications simultaneously.
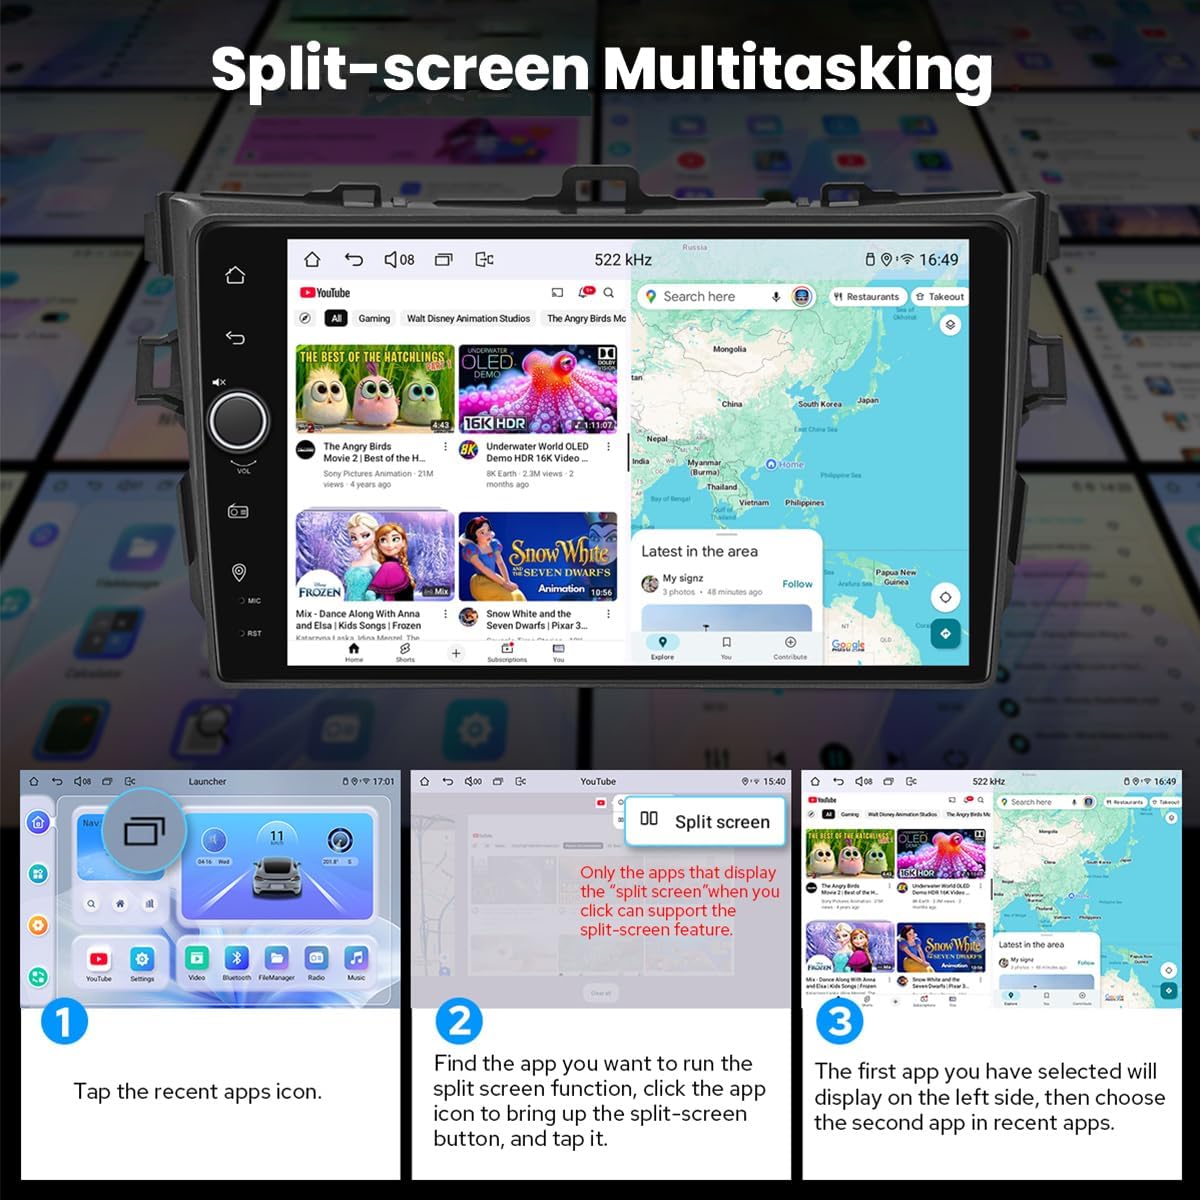
Figure 5.2: Split-screen multitasking interface.
5.6. Personalisierte Einstellungen
Customize your stereo with various options including car boot logos, wallpapers, and changeable button colors.

Figure 5.3: Personalized settings options.
5.7. Sound Enjoyment
Equipped with a TDA7851 DSP chip, a 48-Band Graphic Equalizer, and 4x50W Max Output Power. Supports aftermarket amplifiers with 4 Audio Outputs, 1 SUB Output, Fiber Optical Output, SPDIF Coaxial Output, and Center Channel Output.

Figure 5.4: High-quality sound features.
5.8. Built-in 4G Module
Insert a SIM card for internet access. Supports FDD-LTE: B2/B4/B5/B7/B12/B13/B14/B17/B25/B26/B38/B66/B71 and TDD-LTE: B41. Does not support phone calls or SMS.
5.9. HDMI-Ausgang
Provides full digital image and sound output for external displays like headrest monitors, offering 1080P clear picture without stuttering. HDMI cable is not included.
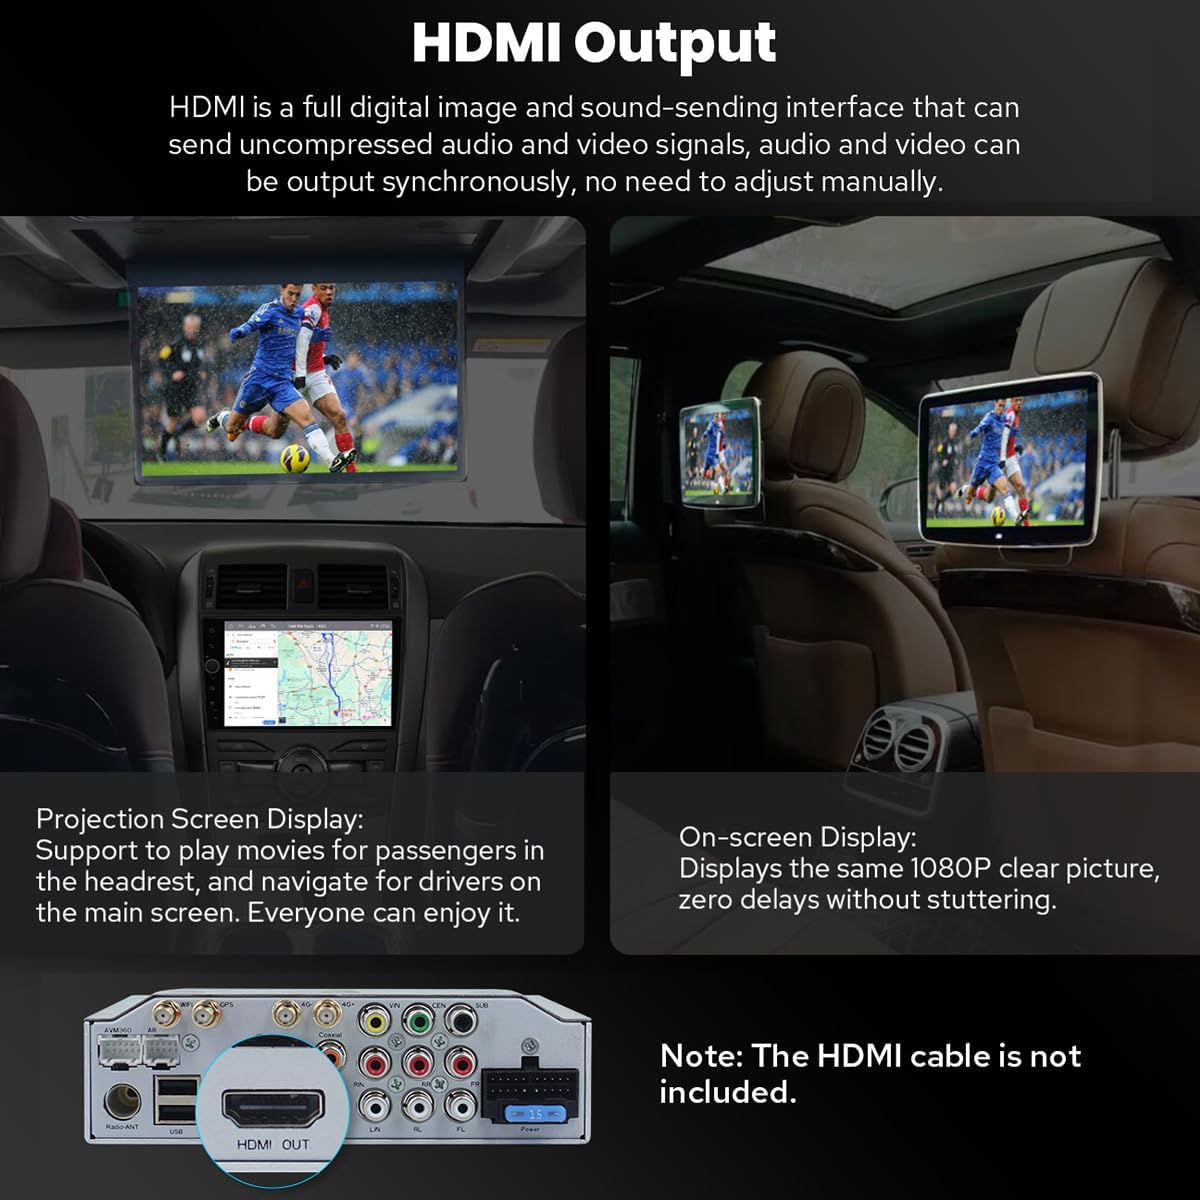
Figure 5.5: HDMI Output functionality.
5.10. Weitere Funktionen
Includes Picture-in-Picture, 3 USB Ports, Micro SD Card Slot, and 4G SIM Card Slot.

Abbildung 5.6: Überview zusätzliche Funktionen.
6. Wartung
6.1. Reinigen des Bildschirms
Verwenden Sie ein weiches, fusselfreies Tuch, um den Bildschirm vorsichtig abzuwischen. Bei hartnäckigen Flecken leicht andrücken.ampReinigen Sie das Tuch mit Wasser oder einem für Bildschirme geeigneten Reiniger. Vermeiden Sie aggressive Chemikalien oder Scheuermittel.
6.2. Kühlsystem
The unit features a dual heat sink design for superior heat dissipation and improved temperature control. A warning value can be set for volume or CPU temperature; if exceeded, the fan will automatically activate to prevent overheating.

Figure 6.1: Cooling system features.
6.3. WiFi Signal
An independent WiFi antenna ensures stable signal quality and provides fast and smooth internet access, supporting 802.11a/b/g/n/AC standards across 2.4GHz/5GHz spectral bands.

Figure 6.2: WiFi signal features.
7. Fehlerbehebung
If you encounter any issues, please refer to the following general troubleshooting steps:
- Kein Strom: Überprüfen Sie alle Stromanschlüsse und Sicherungen. Stellen Sie sicher, dass die Zündung eingeschaltet ist.
- Kein Ton: Überprüfen Sie die Lautsprecheranschlüsse, die Lautstärkepegel und die Audioausgabeeinstellungen.
- Probleme mit der Bluetooth-Verbindung: Stellen Sie sicher, dass Bluetooth sowohl auf der Stereoanlage als auch auf Ihrem Gerät aktiviert ist. Versuchen Sie, die Geräte zu entkoppeln und erneut zu koppeln.
- GPS-Signalverlust: Stellen Sie sicher, dass die GPS-Antenne ordnungsgemäß installiert ist und eine freie Sicht hat. view des Himmels.
- Touchscreen reagiert nicht: Versuchen Sie, das Gerät neu zu starten. Sollte das Problem weiterhin bestehen, wenden Sie sich bitte an den Support.
For more specific issues, consult the detailed troubleshooting section in the full user manual or contact JOYING customer support.
8. Spezifikationen
| Besonderheit | Spezifikation |
|---|---|
| Artikelmodellnummer | JY-TT163N4 |
| Anzeigegröße | 9 Zoll |
| Bildschirmgröße | 9 Zoll |
| Touchscreen-Typ | Kapazitiv |
| Betriebssystem | Android, iOS (via CarPlay/Android Auto) |
| Speicherkapazität | 64 GB |
| Konnektivitätstechnologie | Bluetooth, Ethernet, USB, WLAN |
| Besonderheit | Bluetooth, Touchscreen |
| Audioausgabemodus | Stereo |
| Kartentyp | Nordamerika |
| Hersteller | FREUDE |
9. Garantie und Support
9.1. Garantieinformationen
This JOYING car stereo comes with a 2 Jahr Garantie ab Kaufdatum. Bitte bewahren Sie Ihren Kaufbeleg für Garantieansprüche auf.
9.2. Kundendienst
For technical assistance, troubleshooting, or warranty inquiries, please contact JOYING customer support through the retailer where the product was purchased or visit the official JOYING webWebsite für Kontaktinformationen.