
1. Einleitung
The Skyking WORKZONE 36TRMS Digital Clamp Meter is a portable, stable, and versatile instrument designed for accurate electrical measurements. Featuring a 6000-count LCD display, auto-ranging capabilities, and overload protection, this meter is suitable for a wide range of applications, from home electrical needs to professional use. It can measure AC/DC Voltage, AC/DC Current, Resistance, Capacitance, Frequency, Duty Cycle, Temperature, and includes Non-Contact AC Voltage (NCV) detection, diode, and continuity test functions.
2. Sicherheitshinweise
Beachten Sie beim Umgang mit elektrischen Prüfgeräten stets die Sicherheitsvorkehrungen. Andernfalls kann es zu Stromschlägen, Verletzungen oder Schäden am Messgerät oder dem Prüfling kommen.
- Vergewissern Sie sich vor der Verwendung, dass das Messgerät einwandfrei funktioniert.
- Die maximalen Eingangswerte dürfen in keinem Bereich überschritten werden.
- Verwenden Sie geeignete persönliche Schutzausrüstung (PSA), wie z. B. Schutzbrille und isolierende Handschuhe.
- Disconnect power to the circuit before making resistance, capacitance, or continuity measurements.
- Be cautious when working with live circuits. Avoid contact with bare conductors.
- Verwenden Sie das Messgerät nicht, wenn es beschädigt erscheint oder der Batteriedeckel nicht ordnungsgemäß geschlossen ist.
3. Packungsinhalt
Überprüfen Sie, ob alle Artikel im Paket vorhanden sind:
- WORKZONE 36TRMS Digital Clamp Meter
- Messleitungen (rot und schwarz)
- Temperaturfühler
- AAA Batteries (Pre-installed or separate)
- Benutzerhandbuch (dieses Dokument)

This image displays the Skyking WORKZONE 36TRMS Digital Clamp Meter along with its included test leads (red and black) and a white temperature probe. The clamp meter itself is red and black, showing the rotary dial, LCD screen, and input jacks.
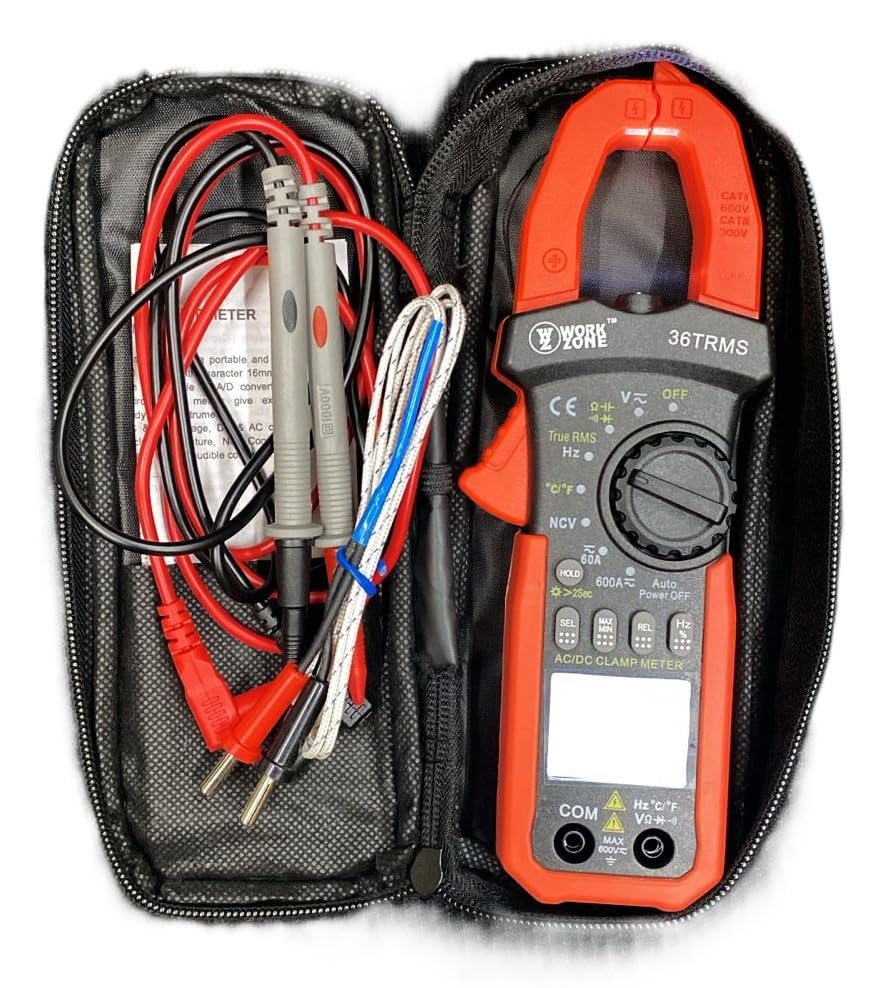
The Skyking WORKZONE 36TRMS Digital Clamp Meter, test leads, and temperature probe neatly organized within a black zippered carrying case. This illustrates how the product and its accessories are stored and transported.
4. Produktüberschreitungview
The WORKZONE 36TRMS Digital Clamp Meter offers a range of features for comprehensive electrical testing:
- 6000 counts digit LCD monitor with 16mm character height.
- Auto-range and auto power-off function (after 15 minutes of inactivity).
- Clamp opening size: 26mm for non-invasive current measurement.
- Maßnahmen DC Voltage (600mV~600V) and AC Voltage (6V~600V).
- Measures DC Current (60A~600A) and AC Current (True RMS) (60A~600A).
- Measures Resistance (600Ω~60MΩ) and Capacitance (6nF~60mF).
- Measures Frequency (9.999Hz~9.999MHz) and Duty Cycle (0.1%~99.9%).
- Temperature measurement: -20~1000°C / -4~1832°F.
- Berührungsloser Wechselstrom Voltage (NCV) detection for safety.
- Dioden- und akustische Durchgangsprüffunktionen.
- Datenhaltefunktion zum Einfrieren von Messwerten.
- Backlight for easy reading in dark environments.
- Relative measurement (REL) function for zeroing readings.

A detailed close-up of the Skyking WORKZONE 36TRMS Digital Clamp Meter. The image highlights the rotary switch with various measurement functions, the LCD display showing '0.000', function buttons (HOLD, SEL, MAX/MIN, REL, Hz), and the input jacks at the bottom.
5. Einrichtung
5.1 Einlegen der Batterie
- The meter requires 2x 1.5V 'AAA' batteries.
- Suchen Sie den Batteriefachdeckel auf der Rückseite des Messgeräts.
- Open the cover, insert the batteries observing correct polarity (+ and - markings).
- Schließen Sie den Batteriefachdeckel fest.
5.2 Ein-/Ausschalten
- To power on the meter, rotate the rotary switch from the 'OFF' position to any desired measurement function.
- To power off, rotate the switch back to the 'OFF' position.
- Das Messgerät verfügt über eine automatische Abschaltfunktion nach etwa 15 Minuten Inaktivität, um die Batterielebensdauer zu verlängern.
5.3 Testleitungsanschluss
- Für voltage, resistance, capacitance, frequency, duty cycle, diode, and continuity measurements, insert the red test lead into the 'VΩHz°C' input jack.
- Stecken Sie die schwarze Messleitung in die Eingangsbuchse „COM“.
- Ensure test leads are fully inserted and securely connected.
6. Bedienungsanleitung
6.1 DC/AC-Voltage Messung
- Rotate the rotary switch to 'V~' for AC Voltage or 'V-' for DC Voltage.
- Schließen Sie die Messleitungen parallel an den zu prüfenden Stromkreis oder das zu prüfende Bauteil an.
- Lesen Sie den Bandtage-Wert auf dem LCD-Display.
6.2 Wechsel-/Gleichstrommessung (Clamp Kiefer)
- Rotate the rotary switch to '60A~' or '600A~' for AC Current, or '60A-' or '600A-' for DC Current.
- Drücken Sie die Tasteamp trigger to open the jaws and clamp around a single conductor. Ensure the conductor is centered within the jaws.
- Lesen Sie den aktuellen Wert auf dem LCD-Display ab.
6.3 Widerstandsmessung
- Rotate the rotary switch to 'Ω'.
- Ensure the circuit or component is de-energized before measurement.
- Schließen Sie die Messleitungen an das zu messende Bauteil an.
- Lesen Sie den Widerstandswert auf dem LCD-Display ab.
6.4 Kapazitätsmessung
- Rotate the rotary switch to 'F'.
- Um Schäden am Messgerät zu vermeiden, muss der Kondensator vor dem Test vollständig entladen sein.
- Schließen Sie die Messleitungen an die Kondensatoranschlüsse an.
- Lesen Sie den Kapazitätswert auf dem LCD-Display ab.
6.5 Frequenz-/Tastverhältnismessung
- Rotate the rotary switch to 'Hz'.
- Schließen Sie die Testleitungen an die Signalquelle an.
- Press the 'Hz' button to toggle between Frequency (Hz) and Duty Cycle (%) display.
6.6 Temperaturmessung
- Rotate the rotary switch to '°C/°F'.
- Connect the temperature probe to the input jacks.
- Setzen Sie die Sondenspitze auf das Objekt, dessen Temperatur gemessen werden soll.
- Press the '°C/°F' button to switch between Celsius and Fahrenheit units.
6.7 Diodentest
- Rotate the rotary switch to 'Diode/Continuity'.
- Schließen Sie die rote Messleitung an die Anode und die schwarze Messleitung an die Kathode der Diode an.
- Das Display zeigt die Vorwärtslautstärke an.tage drop. Reverse the leads; the display should show 'OL' for an open circuit.
6.8 Durchgangstest
- Rotate the rotary switch to 'Diode/Continuity'.
- Schließen Sie die Messleitungen an den Stromkreis oder das Bauteil an.
- An audible buzzer will sound if continuity is detected (typically resistance below approximately 50Ω).
6.9 Berührungsloses AC-Voltage (NCV) Erkennung
- Rotate the rotary switch to 'NCV'.
- Bringen Sie den NCV-Sensor (oben am Cl) mit.amp meter) close to an AC voltagDie Quelle.
- The meter will emit an audible beep and the NCV indicator light will flash if AC voltage wird erkannt.
6.10 Datenhaltefunktion
- Press the 'HOLD' button to freeze the current reading on the display. Press again to release the hold.
- Long press the 'HOLD' button to activate the backlight for improved visibility in low-light conditions.
6.11 Relative Messung (REL)
- In a measurement mode, press the 'REL' button to zero the current reading. Subsequent measurements will be displayed relative to this zero point.
- Press the 'REL' button again to exit relative mode.
7. Wartung
7.1 Reinigung
- Wischen Sie den Zähler ab.asing mit einem weichen, damp Tuch.
- Do not use abrasive cleaners, solvents, or harsh chemicals, as these may damage the casing oder Anzeige.
7.2 Batteriewechsel
- When the low battery indicator appears on the LCD, replace the batteries promptly to ensure accurate readings.
- Befolgen Sie die in Abschnitt 5.1 beschriebenen Schritte zur Installation der Batterie.
- Entsorgen Sie gebrauchte Batterien gemäß den örtlichen Vorschriften.
7.3 Speicherung
- Bei längerer Nichtbenutzung sollte das Messgerät an einem kühlen, trockenen Ort aufbewahrt werden.
- Vermeiden Sie direkte Sonneneinstrahlung, extreme Temperaturen und hohe Luftfeuchtigkeit.
- It is recommended to remove batteries if storing for a very long time to prevent leakage.
8. Fehlerbehebung
- Keine oder nur schwache Anzeige: Check battery installation. If the low battery indicator is on, replace the batteries.
- Falsche Messwerte: Ensure the correct function is selected for the measurement. Verify test lead connections are secure and in the correct input jacks. For resistance or capacitance, ensure the circuit is de-energized. For current, ensure only a single conductor is clamped within the jaws.
- "OL"-Anzeige: This indicates an over-range condition or an open circuit. If measuring resistance, it means the resistance is too high or the circuit is open. If measuring voltage or current, the value exceeds the selected range; switch to a higher range if available.
- Kein Kontinuitätssignal: The resistance of the circuit or component is too high, or there is an open circuit.
9. Spezifikationen
| Parameter | Wert |
|---|---|
| Marke | Skyking |
| Modellnummer | Workzone 36 TRMS |
| Messtyp | Digitale Clamp Meter |
| Anzeige | 6000 counts digit LCD |
| Clamp Öffnungsgröße | 26 mm |
| DC-Voltage Reichweite | 600 mV ~ 600 V |
| AC-Lautstärketage Reichweite | 6V ~ 600V |
| Gleichstrombereich | 60A ~ 600A |
| AC Current Range (True RMS) | 60A ~ 600A |
| Widerstandsbereich | 600 Ω ~ 60 MΩ |
| Kapazitätsbereich | 6nF bis 60mF |
| Frequenzbereich | 9.999 Hz ~ 9.999 MHz |
| Arbeitszyklus | 0.1 % bis 99.9 % |
| Temperaturbereich | -20°C bis 1000°C / -4°F bis 1832°F |
| Bereichsüberschreitungsanzeige | "OL" |
| Anzeige der negativen Polarität | Automatische "-"-Anzeige |
| Anzeige für niedrigen Batteriestand | Ja |
| Automatische Abschaltung | Ca. 15 Minuten |
| Stromversorgung | 2 x 1.5V "AAA" batteries |
| Betriebstemperatur | 0°C ~ 40°C (relative humidity <85%) |
| Lagertemperatur | -10°C ~ 50°C (relative humidity <85%) |
| Guaranteed Precision Temp. | 23±5°C (relative humidity <70%) |
| Abmessungen (H x B x T) | 207 x 75 x 37 mm |
| Gewicht | Ca. 280g (einschließlich Akku) |
| Sicherheitsbewertung | CAT II 600 V oder CAT III 300 V |
10. Garantie und Support
For warranty information or technical support regarding your Skyking WORKZONE 36TRMS Digital Clamp Meter, please contact Skyking Instruments directly. Refer to your purchase documentation or the manufacturer's official website for specific warranty terms, conditions, and contact details.