1. Produktüberschreitungview
The Mars Gaming MC-Pulsar is an ATX gaming case designed for optimal performance and aesthetics. It features a panoramic tempered glass design and a front LCD display for real-time system monitoring. The chassis includes a Cablehatch system for efficient cable management and offers versatile connectivity options.
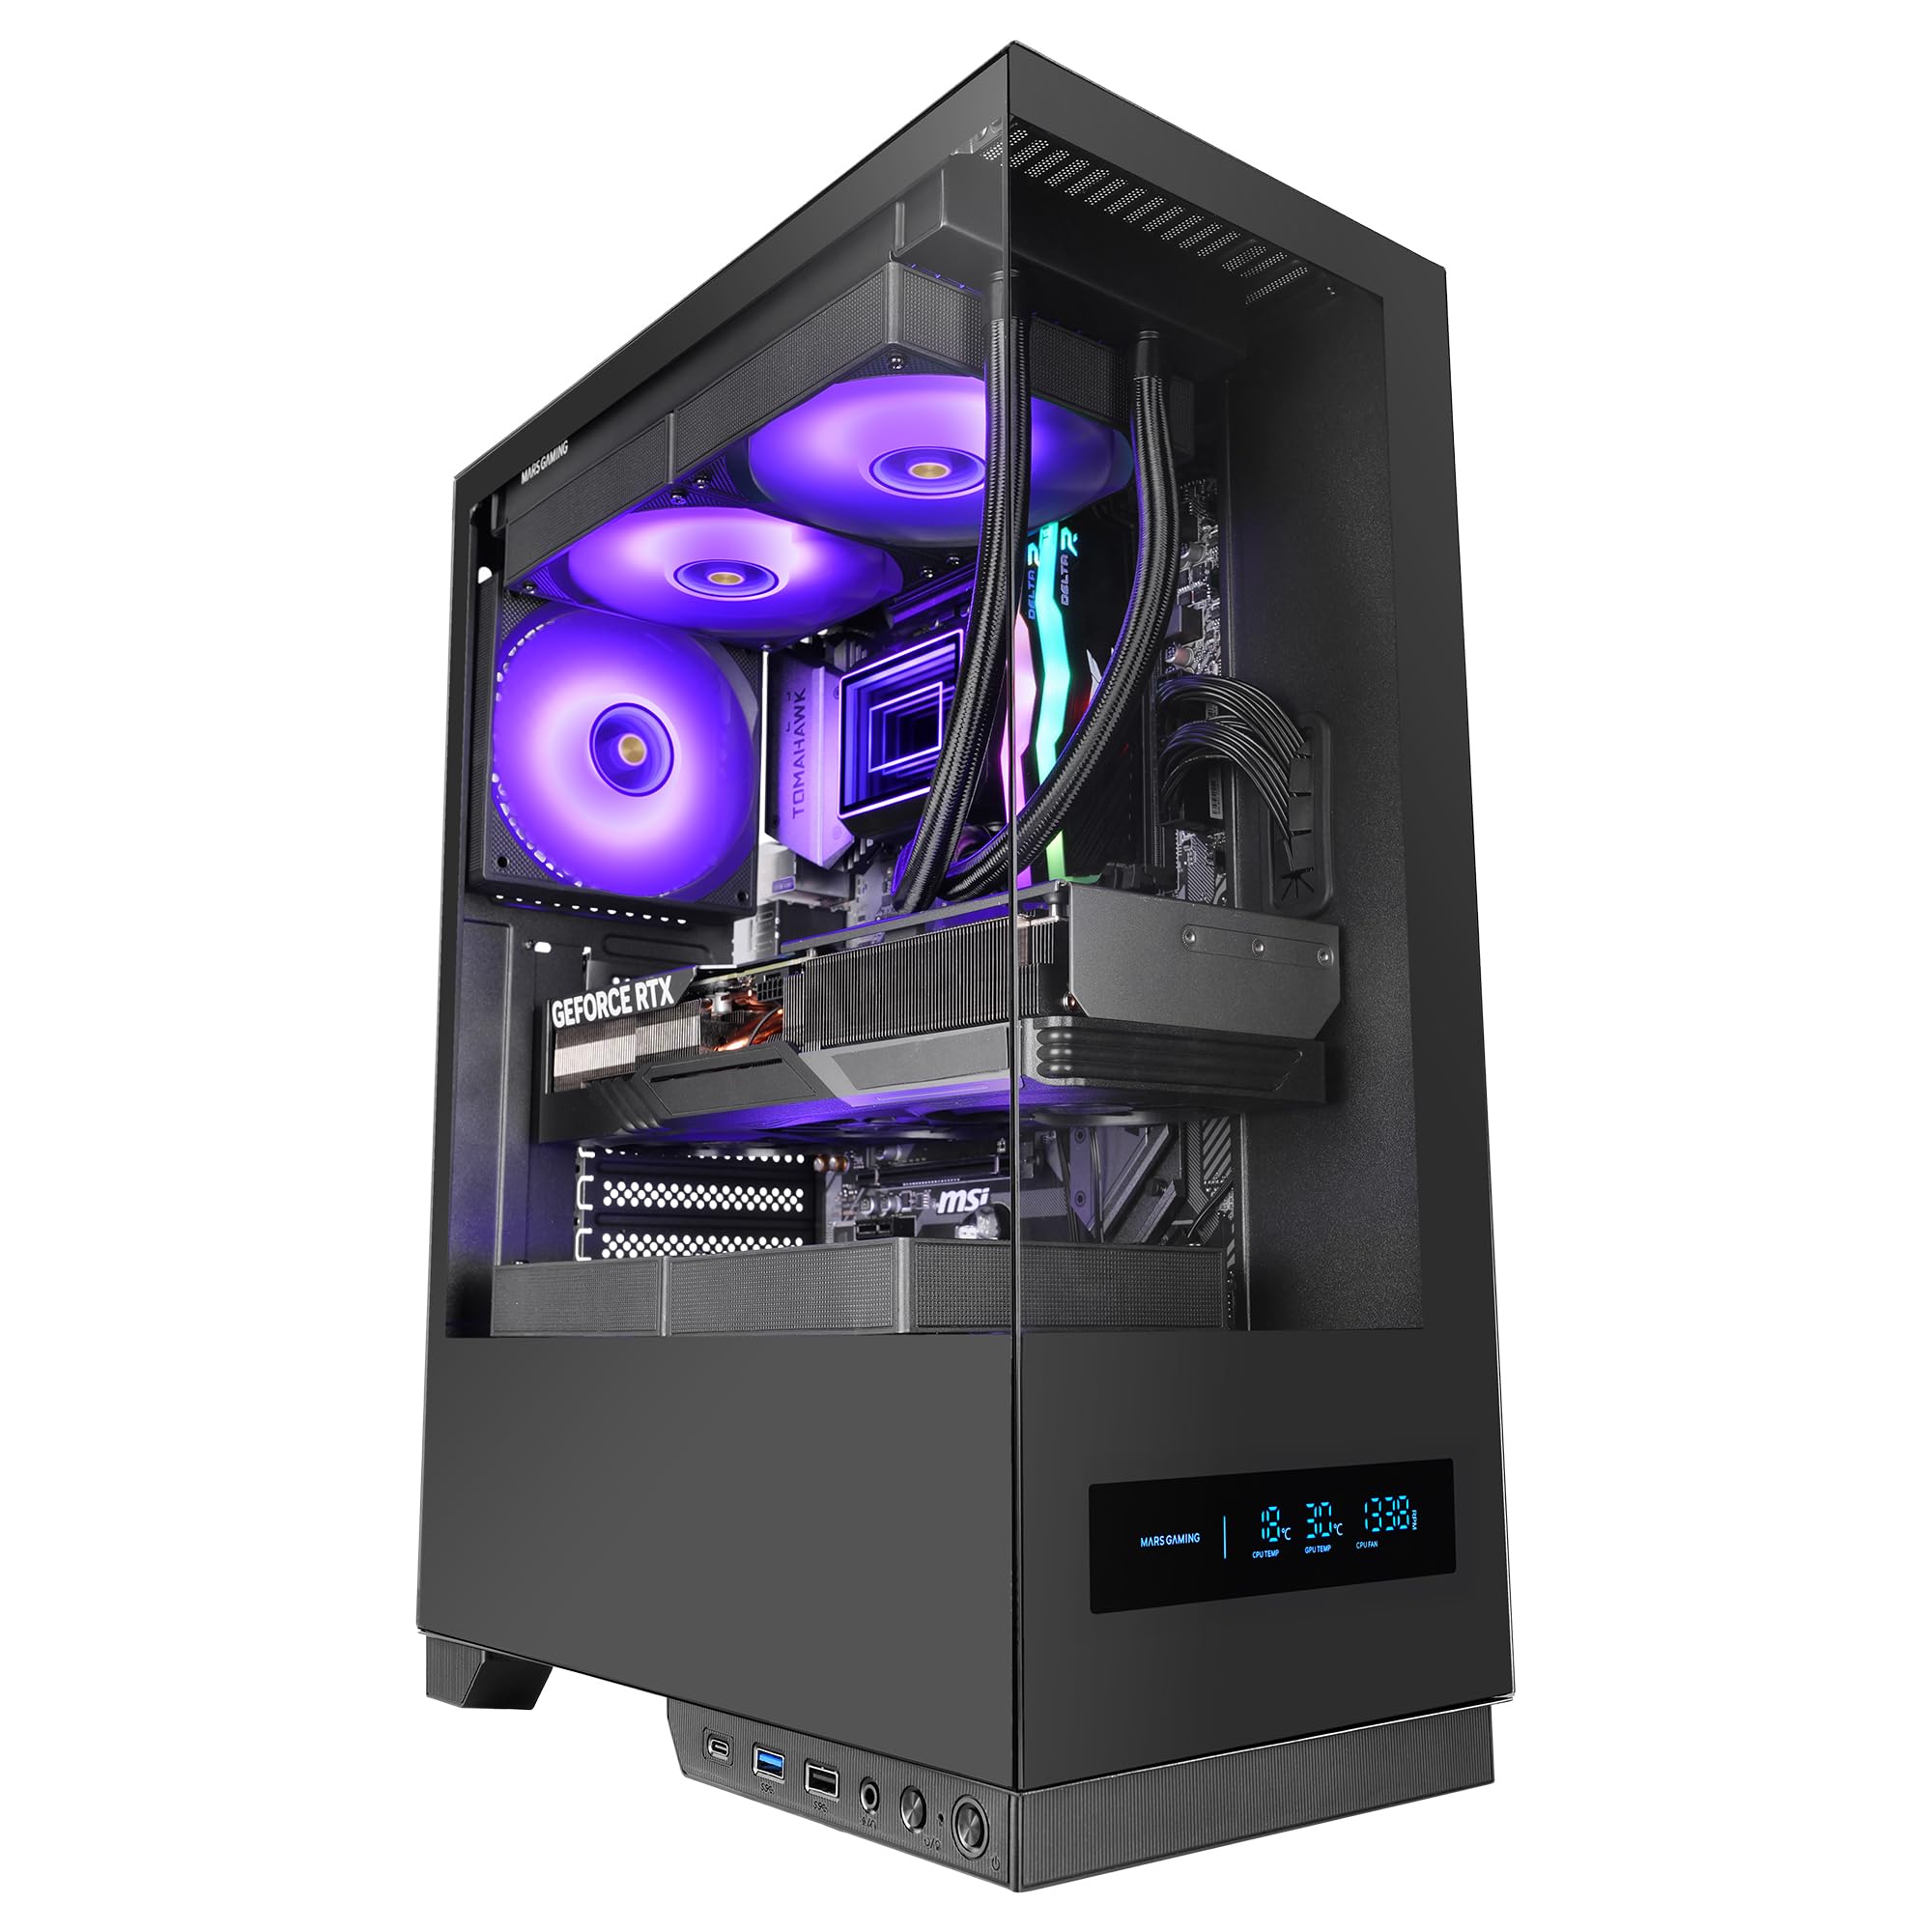
Figure 1: Mars Gaming MC-Pulsar ATX Gaming Case, front view.
Hauptmerkmale:
- Real-Time Front LCD Display: Monitor CPU/GPU temperatures and fan RPM directly on the case.
- Double Tempered Glass: Front and side panels provide a clear view von internen Komponenten.
- Cablehatch System: Side cable bay with tool-free quick access for simplified cable management.
- Optimized Interior: Supports ATX, MicroATX, and Mini-ITX motherboards, with ample space for graphics cards and CPU coolers.
- Unterstützung der Flüssigkeitskühlung: Accommodates liquid cooling radiators up to 240mm at the top and bottom, and 120mm at the rear.
- Moderne Konnektivität: Includes USB-C, USB 3.0, USB 2.0, and HD audio ports on the I/O panel.

Figure 2: The MC-Pulsar case features dual tempered glass panels on the front and side.
2. Einrichtung und Installation
Follow these steps for proper installation of your computer components into the MC-Pulsar case.
2.1 Vorbereitung des Falls
- Unpack the MC-Pulsar case and place it on a stable, flat surface.
- Carefully remove the tempered glass side panel by unscrewing the thumb screws, if present, or by releasing der Verriegelungsmechanismus.
- Identify the internal layout for motherboard, power supply, and drive installation.

Figure 3: Internal layout showing maximum CPU cooler height (162mm), VGA length (332mm), and VGA width (152mm) clearances, along with fan and radiator mounting points.
2.2 Motherboard-Installation
- Install the necessary standoffs for your ATX, MicroATX, or Mini-ITX motherboard.
- Place the motherboard into the case, aligning it with the standoffs and the I/O shield opening.
- Befestigen Sie das Motherboard mit Schrauben.
2.3 Installation der Stromversorgung
- The power supply mounts at the bottom of the case. Slide the ATX power supply into its designated bay.
- Befestigen Sie das Netzteil mit Schrauben von der Rückseite des Gehäuses.
2.4 Installation des Speicherlaufwerks
- Install 3.5" HDDs in the designated drive cage.
- Install 2.5" SSDs in their respective mounting points. The case supports 1x 3.5" HDD and 2x 2.5" SSDs.
2.5 Grafikkarten und Erweiterungskarten
- Entfernen Sie die erforderlichen Abdeckungen der Erweiterungssteckplätze.
- Insert your graphics card (up to 332mm length, 152mm width) and other expansion cards into the PCIe slots on the motherboard.
- Befestigen Sie die Karten mit Schrauben.
2.6 Installation des Kühlsystems
- Install CPU coolers (up to 162mm height).
- For liquid cooling, radiators up to 240mm can be installed at the top and bottom, and a 120mm radiator at the rear.
- Install additional fans as needed: top (2x 120mm or 2x 140mm), bottom (2x 120mm), rear (1x 120mm).
2.7 Kabelmanagement
Utilize the Cablehatch system for organized cable routing. This side cable bay offers tool-free quick access to manage and hide cables, ensuring optimal airflow and a clean interior.

Figure 4: The Cablehatch system provides convenient side access for cable management without tools.
3. Bedienung
This section details the operational aspects of your MC-Pulsar gaming case.
3.1 Anschlüsse an der Vorderseite
Das vordere I/O-Panel bietet bequemen Zugriff auf verschiedene Anschlüsse:
- USB-C-Anschluss: For modern peripherals and fast data transfer.
- USB 3.0 Ports: Two ports for high-speed USB devices.
- USB 2.0 Ports: Standard-USB-Anschluss.
- HD-Audioanschlüsse: Separate Anschlüsse für Mikrofon und Kopfhörer.
- Netzschalter: Zum Ein-/Ausschalten des Systems.
- Reset-Taste: Um das System neu zu starten.
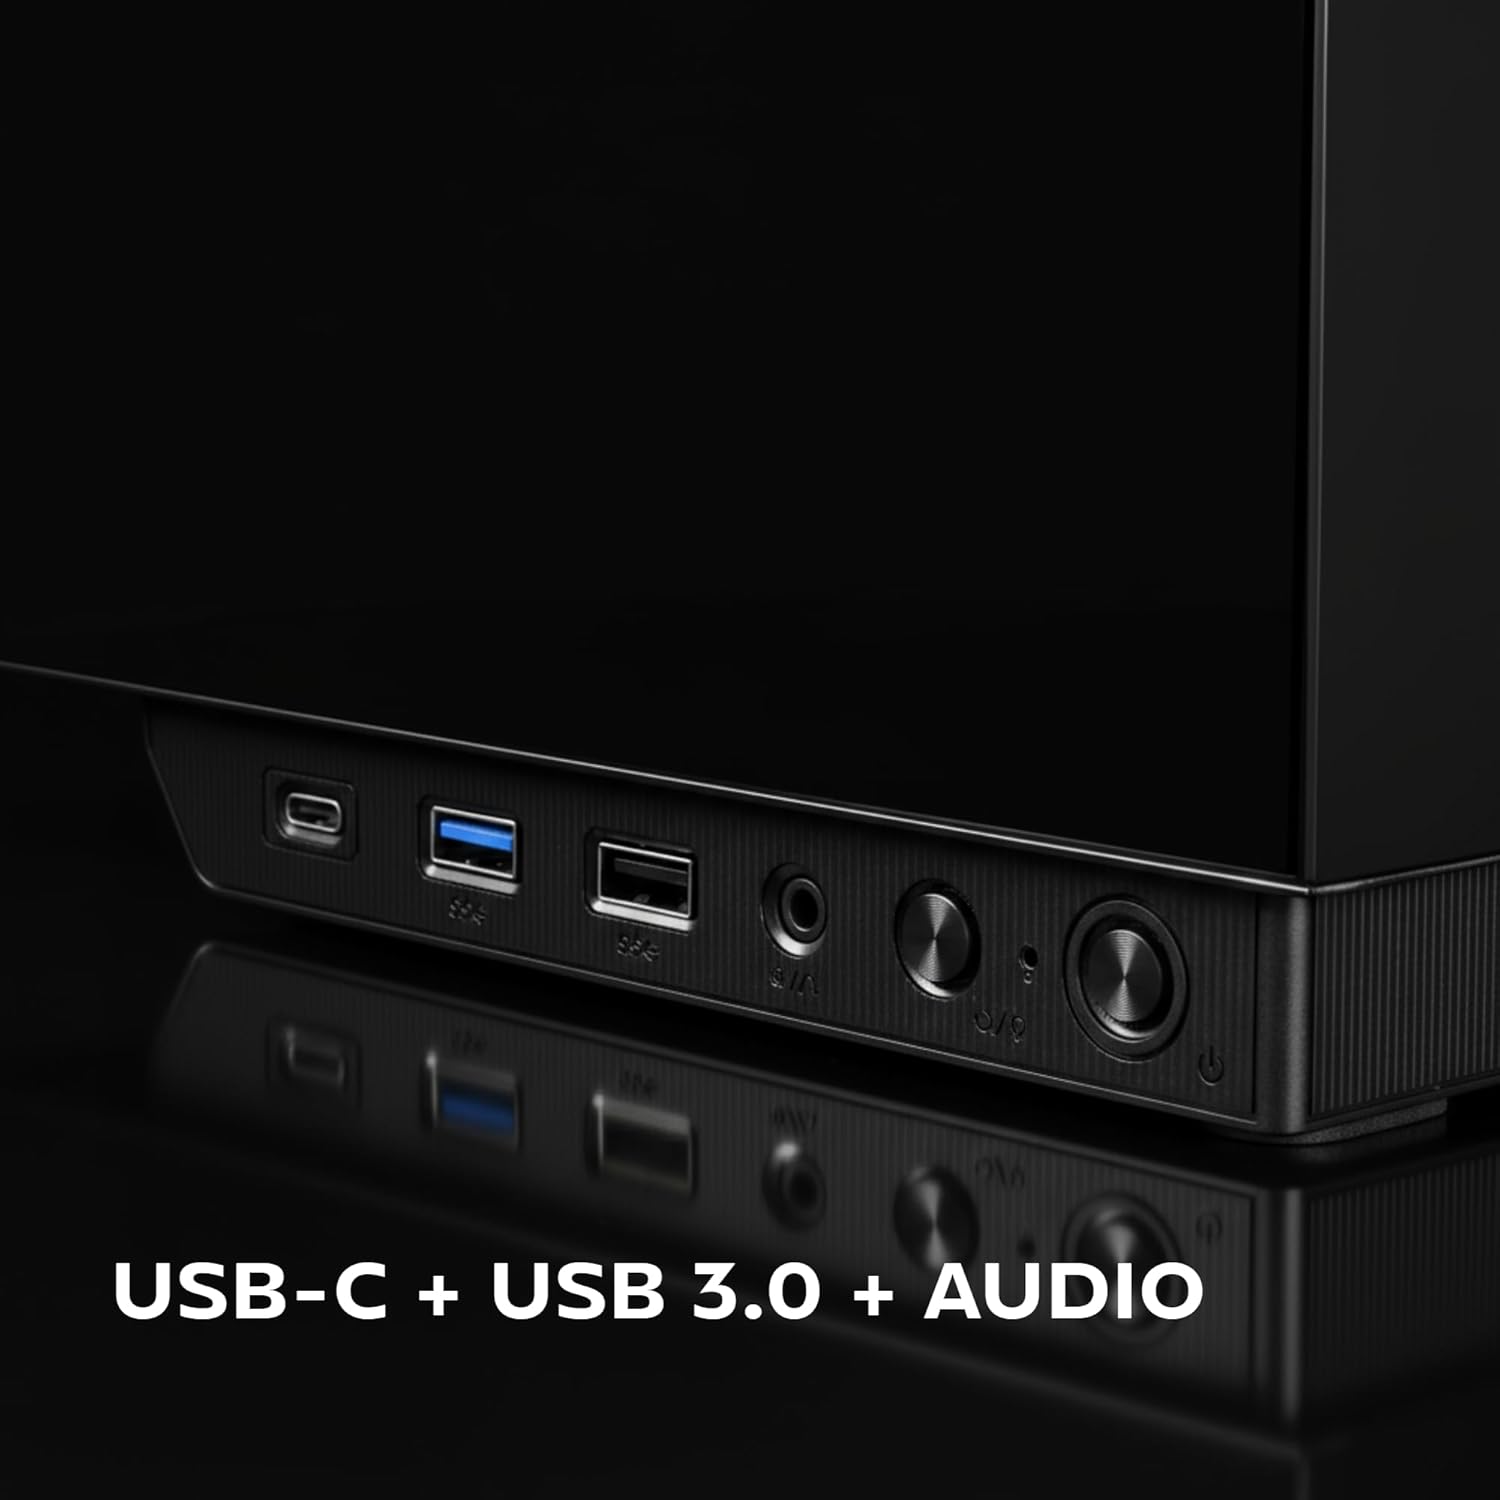
Figure 5: Close-up of the front I/O panel, showing USB-C, USB 3.0, and audio ports.
3.2 Front LCD Display
The integrated rectangular LCD display on the front panel provides real-time monitoring of critical system parameters. This includes:
- CPU-Temperatur: Zeigt die aktuelle Temperatur Ihrer Zentraleinheit an.
- GPU-Temperatur: Zeigt die aktuelle Temperatur Ihrer Grafikprozessoreinheit an.
- Lüfterdrehzahl: Shows the rotational speed of your system fans.
Ensure the necessary internal connections from the case to your motherboard are made for the LCD display to function correctly. Refer to your motherboard manual for specific header locations.
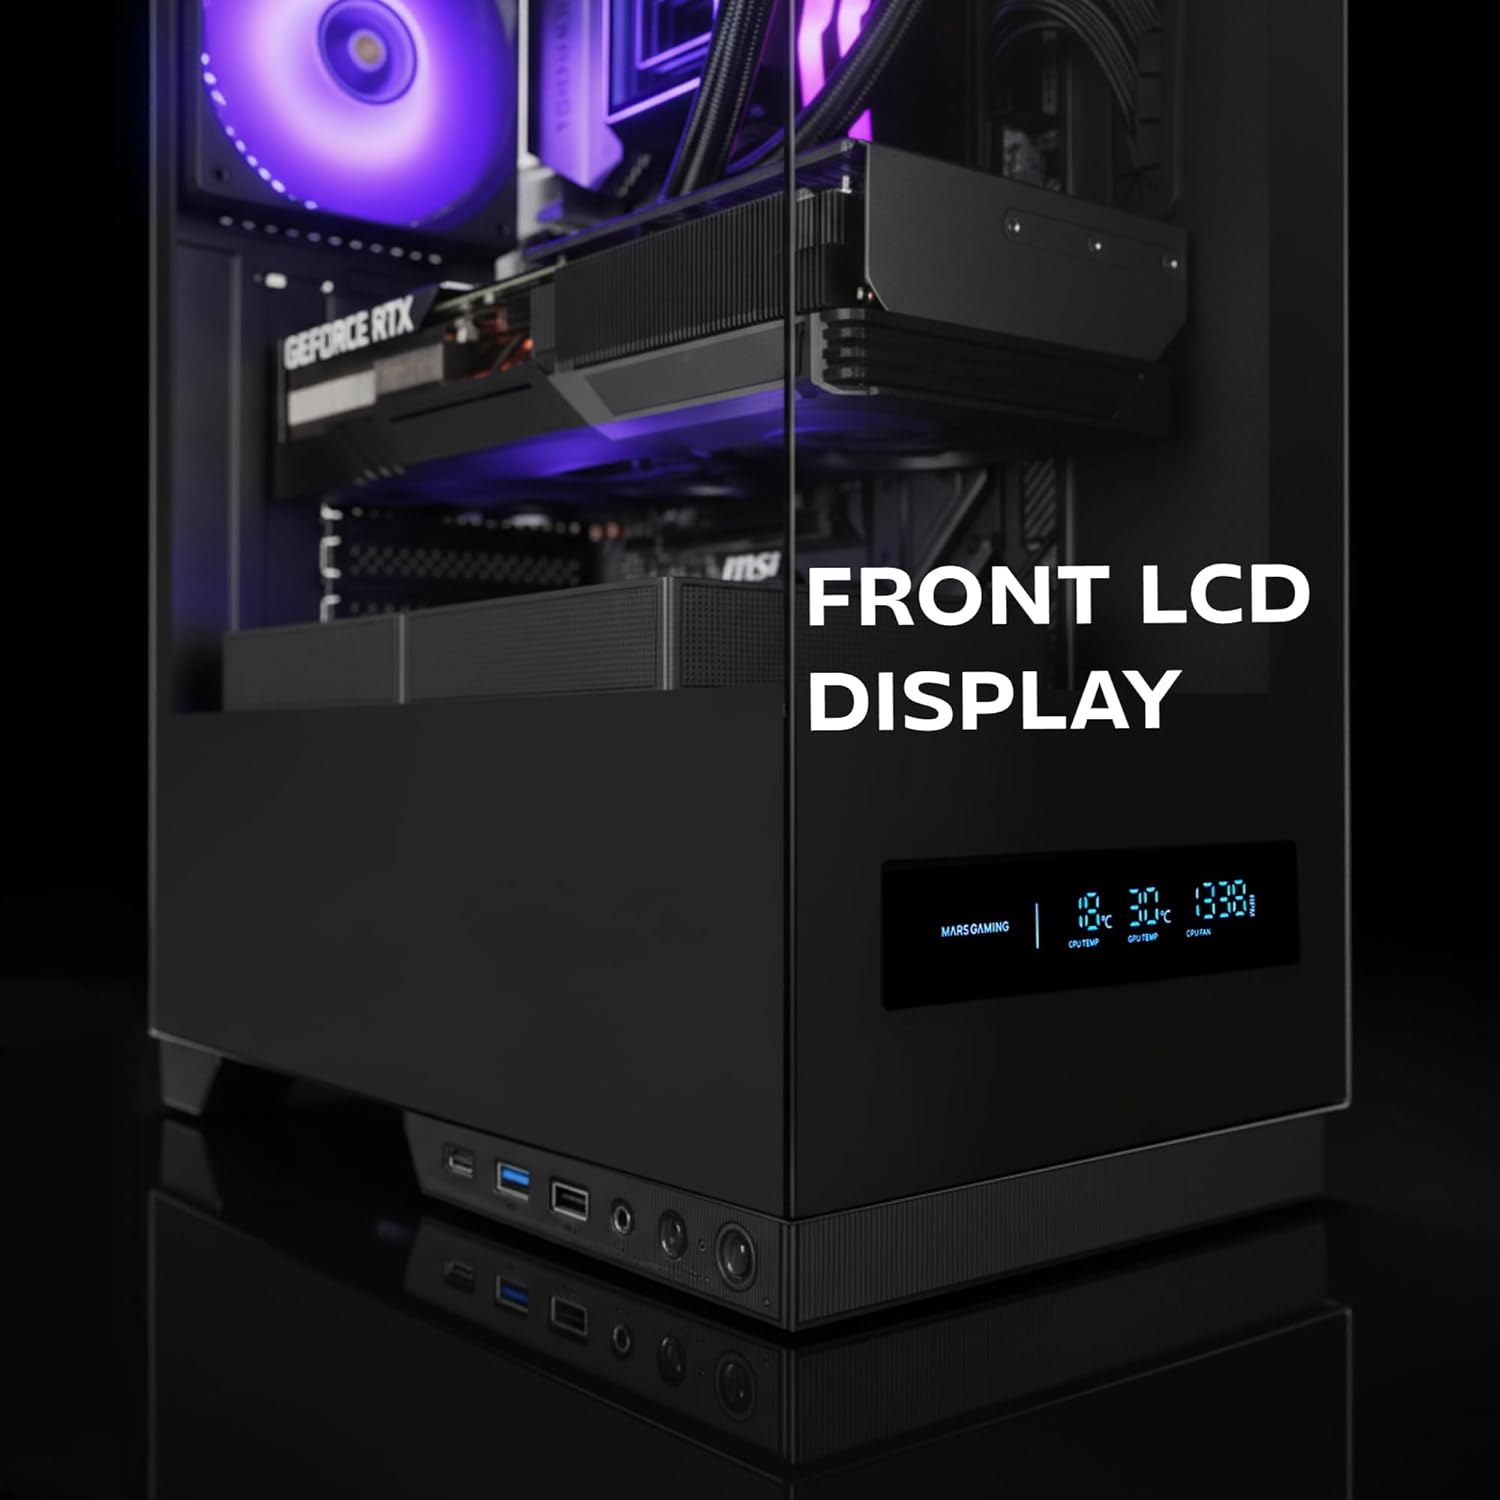
Figure 6: The front LCD display provides real-time system information.
4. Wartung
Regular maintenance helps ensure the longevity and optimal performance of your MC-Pulsar case and its components.
4.1 Reinigung des Staubfilters
- The MC-Pulsar case includes a magnetic dust filter at the top.
- Periodically remove and clean this filter to prevent dust buildup inside the case, which can impede airflow and component cooling.
- Mit Druckluft oder einer weichen Bürste reinigen.
4.2 Innenreinigung
- With the system powered off and unplugged, carefully open the side panel.
- Use compressed air to remove dust from internal components and surfaces.
- Ensure all cables remain neatly managed using the Cablehatch system to maintain good airflow.
4.3 Pflege von gehärtetem Glas
- Clean tempered glass panels with a soft, lint-free cloth and a non-abrasive glass cleaner.
- Avoid harsh chemicals or abrasive materials that could scratch the glass.
5. Fehlerbehebung
This section provides solutions to common issues you might encounter with your MC-Pulsar case.
5.1 System lässt sich nicht einschalten
- Stromanschlüsse prüfen: Stellen Sie sicher, dass das Netzteil ordnungsgemäß an die Wandsteckdose und das Motherboard angeschlossen ist.
- Frontplattenanschlüsse: Verify that the power button cable from the case is correctly connected to the motherboard's front panel header. Refer to your motherboard manual.
- Netzteilschalter: Confirm the power supply's main switch is in the "ON" position.
5.2 Front LCD Display Not Working
- Interne Verbindungen: Ensure all necessary data and power cables for the LCD display are securely connected from the case to the motherboard or power supply.
- Software/Treiber: Check if any specific software or drivers are required for the display and install them if necessary (refer to Mars Gaming webSeite? ˅).
5.3 USB Ports or Audio Jacks Not Functioning
- Internal Header Connections: Verify that the USB and audio cables from the front I/O panel are correctly connected to the corresponding headers on your motherboard.
- Motherboard-Treiber: Ensure your motherboard's USB and audio drivers are up to date.
5.4 Schlechte Luftzirkulation oder Überhitzung
- Staubfilter: Clean the magnetic dust filter and any other mesh areas regularly.
- Fanorientierung: Ensure case fans are installed with correct airflow direction (intake/exhaust).
- Kabelmanagement: Improve cable routing using the Cablehatch system to reduce obstructions to airflow.
- Bauteilabstand: Verify that large components like CPU coolers or GPUs are not blocking critical airflow paths.
6. Technische Daten
Below are the detailed specifications for the Mars Gaming MC-Pulsar ATX Gaming Case.
| Besonderheit | Detail |
|---|---|
| Marke | Mars Gaming |
| Modellname | MCPULSAR |
| Gehäusetyp | Mittlerer Turm |
| Motherboard-Kompatibilität | ATX, MicroATX, Mini-ITX |
| Material | Gehärtetes Glas, Stahl |
| Farbe | Schwarz |
| Artikelgewicht | 4.21 Kilogramm |
| Artikelabmessungen (T x B x H) | 45.3T x 35B x 19.6H Zentimeter |
| Maximale VGA-Länge | 332 mm |
| Maximale VGA-Breite | 152 mm |
| Maximale Höhe des CPU-Kühlers | 162 mm |
| Unterstützung für flüssige Kühlung | Top: 240mm, Bottom: 240mm, Rear: 120mm |
| Lüfterkapazität | Top: 2x 120mm or 2x 140mm, Bottom: 2x 120mm, Rear: 1x 120mm |
| Interne Laufwerksschächte | 1x 3.5"-HDD, 2x 2.5"-SSD |
| Front I / O Ports | 1x USB-C, 2x USB 3.0, 1x USB 2.0, HD Audio (Mic/Headphone) |
| Besondere Merkmale | Front LCD Display, Cablehatch System, Magnetic Dust Filter |

Figure 7: External dimensions of the MC-Pulsar case.
7. Garantie und Support
7.1 Garantieinformationen
Mars Gaming products are manufactured to high quality standards. For specific warranty terms and conditions, please refer to the warranty card included with your product or visit the official Mars Gaming webBewahren Sie Ihren Kaufbeleg für Garantieansprüche auf.
Note: A 30-day return policy may be available through your retailer. This is separate from the manufacturer's warranty.
7.2 Technischer Support
If you encounter any issues not covered in this manual or require further assistance, please contact Mars Gaming customer support through their official website. You may need to provide your product model (MCPULSAR) and serial number.
Offiziell WebWebsite: www.marsgaming.eu