1. Produktüberschreitungview
The LLAVETOR 41-Piece Torque Wrench Set is designed for precision fastening in various applications, including automotive, motorcycle, and bicycle maintenance, as well as general industrial use. This comprehensive kit features three torque wrenches with different drive sizes, a wide array of sockets, bits, and extension bars, all housed in a durable plastic case for portability and organization.
Packungsinhalt:
- 1/4" Drive Torque Wrench (4-20 ft.lb / 5.4-27.2 N.m)
- 3/8" Drive Torque Wrench (5-45 ft.lb / 6.8-61.2 N.m)
- 1/2" Drive Torque Wrench (15-165 ft.lb / 20-224.4 N.m)
- 24-piece 1/4" Bit Socket Set:
- 9 Hex bits (H2-H10)
- 5 Torx bits (T10-T30)
- 3 Phillips bits (PH1, PH2, PH3)
- 3 Pozi bits (PZ1, PZ2, PZ3)
- 3 Slotted bits (SL4, SL5.5, SL7)
- 1/2" Deep Sockets (17mm, 19mm, 21mm)
- CR-V Universal Magnetic Sockets (14mm, 16mm)
- Universal Joints: 1/4", 3/8", 1/2" drives
- Extension Bars: 2" for 1/4" drive, 3" for 3/8" drive, 5" for 1/2" drive
- Durable Plastic Storage Case

Bild 1.1: Überview of the LLAVETOR 41-Piece Torque Wrench Set and its components in the storage case.
2. Sicherheitshinweise
- Tragen Sie beim Umgang mit Werkzeugen stets geeignete persönliche Schutzausrüstung, wie z. B. eine Schutzbrille.
- Ensure the correct torque wrench size and socket are selected for the task.
- Do not exceed the maximum torque rating of the wrench.
- Avoid using extension bars or "cheater pipes" on the torque wrench handle, as this can damage the tool and compromise accuracy.
- Keep the torque wrench clean and free from oil or grease to maintain a secure grip.
- Um Beschädigungen zu vermeiden, bewahren Sie den Drehmomentschlüssel bei Nichtgebrauch in seinem Schutzkoffer auf.
- After use, always return the torque wrench to its lowest torque setting (but not below the minimum) to relieve spring tension and maintain calibration accuracy.
- Do not use the torque wrench as a standard ratchet for breaking loose fasteners.
3. Einrichtung und Vorbereitung
3.1 Attaching Sockets and Bits
To attach a socket or bit, press the quick-release button on the head of the torque wrench, insert the desired socket or bit onto the square drive, and release the button. Ensure the socket or bit is securely locked in place before use.

Image 3.1: Quick-release mechanism and reversible rotation feature of the torque wrench head.
3.2 Using Extension Bars and Universal Joints
Extension bars and universal joints can be used to reach fasteners in confined spaces. Attach them between the torque wrench and the socket. The universal joints provide 360° access for angled applications.
4. Bedienungsanleitung
4.1 Einstellen des Drehmomentwerts
The LLAVETOR torque wrenches feature a dual scale (Ft.Lb and N.m) for precise adjustments. To set the desired torque:
- Freischalten: Pull down the green locking collar at the base of the handle.
- Anpassen: Rotate the handle to align the desired main torque value on the main scale with the indicator line. Then, fine-tune the setting by rotating the handle further until the desired fractional value on the micrometer scale aligns with the main scale's indicator line.
- Sperren: Release the green locking collar. It should rebound and lock into place, securing your torque setting.
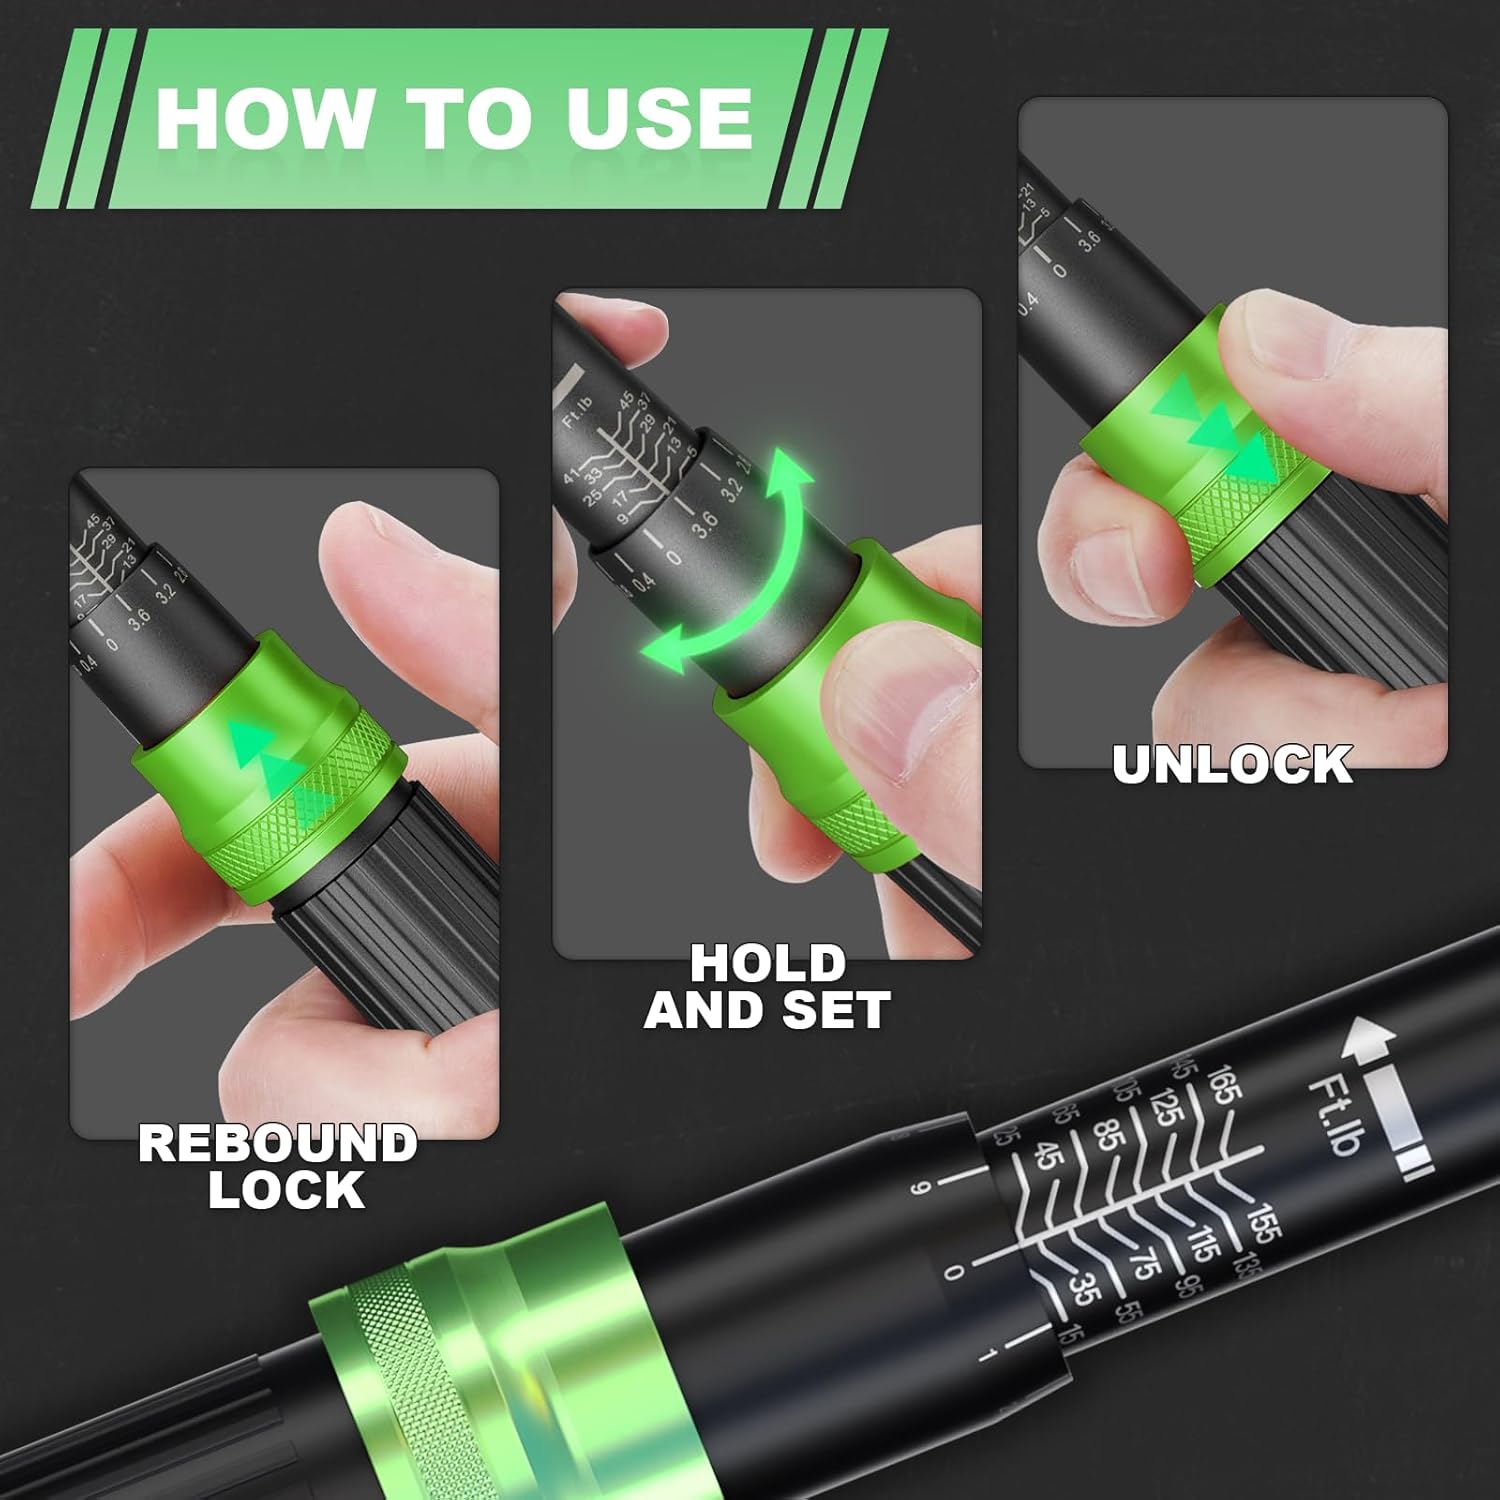
Image 4.1: Step-by-step guide for setting the torque value on the wrench.
4.2 Anlegen eines Drehmoments
Once the torque value is set and locked, place the socket onto the fastener. Apply steady, increasing pressure to the handle in a smooth motion. Continue applying pressure until you feel and hear a distinct "click" from the wrench. This "click" indicates that the preset torque has been reached. Stop applying force immediately after the click.

Image 4.2: The "click" sound indicates that the preset torque has been achieved.
4.3 Anwendungen
The LLAVETOR Torque Wrench Set is suitable for a wide range of applications:
- Automobilindustrie: Lug nuts, engine components, suspension systems.
- Motorrad: Engine bolts, chain adjustments, general maintenance.
- Fahrrad: Handlebar stems, seat posts, crank arms, and other components requiring precise torque.
- Industrie: Various machinery and equipment assembly where specific torque values are critical.

Abbildung 4.3: Beispielamples of torque wrench applications on vehicles and machinery.
4.4 Videodemonstrationen
Video 4.4.1: Auspacken und überview of the LLAVETOR Torque Wrench Set, demonstrating its components and initial setup.
Video 4.4.2: Demonstration of the LLAVETOR 41-piece torque wrench set in various applications, including setting torque and usage.
5. Wartung
- Reinigung: Wipe the torque wrench and accessories with a clean, dry cloth after each use. Do not use harsh chemicals or solvents that could damage the finish or internal mechanisms.
- Lagerung: Always store the torque wrench in its original protective case in a dry, clean environment. Ensure the torque setting is returned to its lowest value (but not below the minimum) before storage to relieve spring tension.
- Kalibrierung: Torque wrenches are precision instruments and should be calibrated periodically to ensure accuracy. The manufacturer recommends professional calibration every 12 months or after 5,000 cycles, whichever comes first.
6. Fehlerbehebung
- Schraubenschlüssel klickt nicht: Ensure the torque setting is above the minimum value. Apply steady, increasing pressure; a quick jerk might not allow the mechanism to click. If the issue persists, the wrench may require recalibration or service.
- Ungenaue Messwerte: This can be caused by improper handling (e.g., dropping the wrench), exceeding the maximum torque, or lack of regular calibration. Refer to the maintenance section for calibration recommendations.
- Socket/bit not fitting: Verify that the correct drive size (1/4", 3/8", or 1/2") is being used for the wrench and that the socket/bit is clean and free of debris.
7. Spezifikationen
| Besonderheit | Detail |
|---|---|
| Marke | LLAVETOR |
| Modellnummer | LP3C41U |
| Material | Chromium Molybdenum Steel (CR-V Steel for sockets) |
| Torque Range (1/4" Drive) | 4-20 ft.lb (5.4-27.2 N.m) |
| Torque Range (3/8" Drive) | 5-45 ft.lb (6.8-61.2 N.m) |
| Torque Range (1/2" Drive) | 15-165 ft.lb (20-224.4 N.m) |
| Genauigkeit | ±3 % |
| Ratschenzähne | 72 Zähne |
| Kopfform | Festes Quadrat |
| Artikelgewicht | 4.86 Kilogramm |
| Im Lieferumfang enthaltene Komponenten | Torque Wrenches, Sockets, Bits, Extension Bars, Universal Joints, Storage Case |

Image 7.1: The torque wrench is calibrated for ±3% accuracy.
8. Garantie und Support
For warranty information, technical support, or service inquiries regarding your LLAVETOR Torque Wrench Set, please contact the manufacturer directly through their official website or the retailer where the product was purchased. Please have your model number (LP3C41U) and purchase date available when contacting support.