1. Einleitung
This manual provides essential information for the safe assembly, operation, and maintenance of your Generic Garden Shed model 3188275. Please read these instructions carefully before beginning assembly and retain them for future reference. This outdoor storage shed is designed to provide a secure and organized space for your tools and garden equipment.
The shed features a light brown finish, constructed from galvanized steel for durability and weather resistance, and includes integrated ventilation.
2. Sicherheitshinweise
Sicherheit hat bei Montage und Verwendung stets oberste Priorität. Die Nichtbeachtung dieser Sicherheitsrichtlinien kann zu Verletzungen oder Produktschäden führen.
- Lies alle Anweisungen: Ensure you understand all assembly steps before starting.
- Schutzausrüstung tragen: Gloves and eye protection are recommended during assembly to prevent cuts or scrapes from metal edges.
- Zwei-Personen-Besprechung: Assembly often requires two or more people for safety and ease, especially when handling large panels.
- Wählen Sie einen ebenen Standort: Install the shed on a firm, level surface to ensure stability and proper door operation.
- Sichern Sie den Schuppen: Anchor the shed securely to the ground to prevent wind damage. Anchoring hardware may not be included and should be purchased separately based on your foundation type.
- Belüftung: Ensure the integrated air vents are not obstructed to maintain proper airflow and prevent moisture buildup.
- Kinder und Haustiere: Halten Sie Kinder und Haustiere vom Montagebereich fern. Lassen Sie Kinder nicht unbeaufsichtigt im oder um den Schuppen spielen.
- Scharfe Kanten: Be aware of sharp edges on metal components during handling and assembly.
3. Aufbau und Montage
The following steps outline the general assembly process. Refer to the included hardware and panel identification for specific component matching.
3.1 Standortvorbereitung
- Select a flat, level, and well-drained area for your shed.
- Entfernen Sie jeglichen Schutt, Steine oder Vegetation aus dem Bereich.
- Consider a concrete slab, wooden platform, or gravel base for optimal stability and longevity.
3.2 Rahmenmontage
Begin by assembling the base frame and vertical supports. Ensure all connections are secure but do not fully tighten bolts until the entire frame is aligned.

Image: Partially assembled shed frame, showing the initial structure with one side panel in place. This illustrates the foundational steps of connecting the base and vertical supports before adding all wall panels.
3.3 Wandpaneelmontage
- Attach the side and rear wall panels to the assembled frame. Ensure panels are correctly oriented and aligned.
- Secure each panel using the provided fasteners. Work systematically around the shed.
3.4 Dachmontage
- Assemble the roof frame components according to the diagrams.
- Carefully lift and attach the roof panels. Ensure proper overlap for water shedding.
- Install the roof ridge and any decorative caps.
3.5 Türmontage
- Attach the door hinges to the door frame and the shed opening.
- Mount the doors, ensuring they swing freely and close properly.
- Install the door handles and any locking mechanisms.
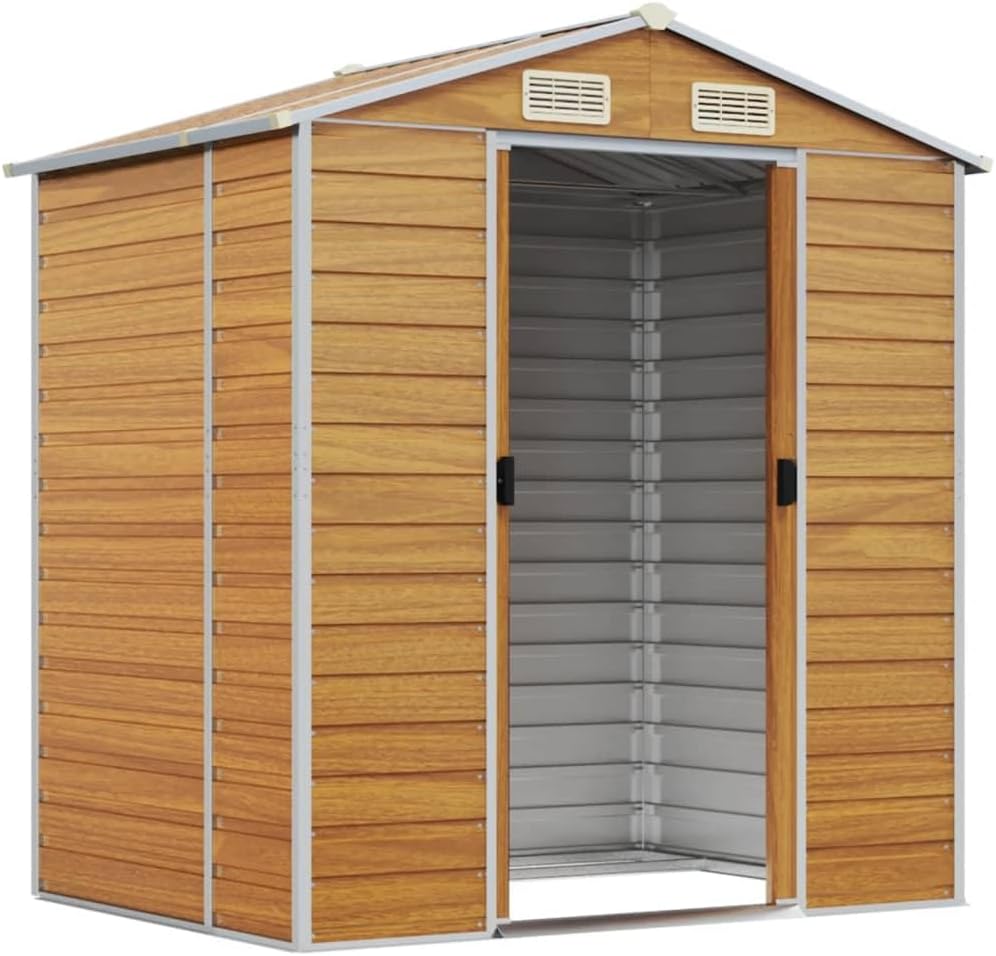
Image: The garden shed with its door open, revealing the interior storage space. This view demonstrates the functionality of the door and the capacity of the shed.
3.6 Endkontrolle
- Ziehen Sie alle Befestigungselemente fest an.
- Ensure doors operate smoothly and latch correctly.
- Verify that all ventilation openings are clear.
- Anchor the shed to the ground using appropriate hardware for your foundation.
4. Bedienungsanleitung
Using your garden shed is straightforward. Follow these guidelines for optimal use:
- Türbetrieb: To open, turn the handle and pull the door outwards. To close, push the door firmly until it latches. For sheds with double doors, ensure both doors are properly aligned when closing.
- Belüftung: The shed is equipped with air vents to promote circulation. Ensure these vents remain unobstructed to prevent moisture buildup and maintain air quality inside the shed.
- Lagerung: Store items evenly to maintain the shed's balance. Avoid leaning heavy objects against the walls.
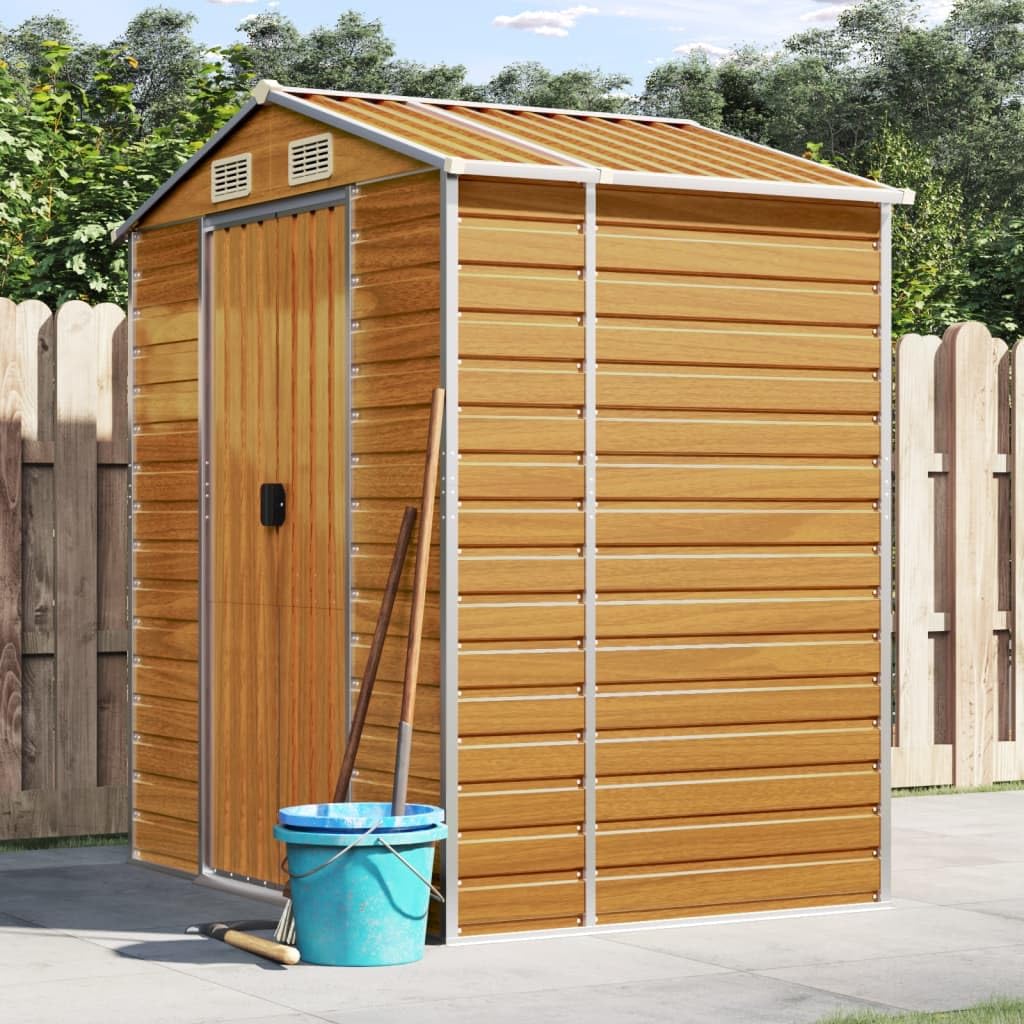
Image: The Generic Garden Shed 3188275 in its fully assembled state, featuring closed doors and visible roof vents. This image represents the shed ready for use.
5. Wartung
Regelmäßige Wartung verlängert die Lebensdauer und erhält das Aussehen Ihres Gartenhäuschens.
- Reinigung: Clean the exterior surfaces periodically with mild soap and water. Avoid abrasive cleaners or harsh chemicals that could damage the finish. Rinse thoroughly with clean water.
- Rostschutz: Although made from galvanized steel, inspect for any scratches or damage to the coating that could lead to rust. Touch up any damaged areas with rust-inhibiting paint if necessary.
- Überprüfung der Befestigungselemente: Periodically check all bolts and screws for tightness. Re-tighten as needed to ensure structural integrity.
- Belüftung: Ensure the air vents remain clear of debris (leaves, dust, etc.) to maintain proper airflow and prevent condensation inside the shed.
- Türbetrieb: Um einen reibungslosen Betrieb zu gewährleisten, sollten Türscharniere und -riegel jährlich mit einem silikonbasierten Spray geschmiert werden.
- Schneeräumung: In areas with heavy snowfall, remove excessive snow from the roof to prevent structural strain.
6. Fehlerbehebung
Hier finden Sie Lösungen für häufig auftretende Probleme:
| Problem | Mögliche Ursache | Lösung |
|---|---|---|
| Die Türen schließen nicht richtig oder sind falsch ausgerichtet. | Uneven foundation; loose hinges; frame not square. | Ensure the shed is on a level surface. Check and tighten hinge screws. Verify the frame is square during assembly. |
| Wasseraustritt im Schuppen. | Unsachgemäß abgedichtete Nähte; beschädigte Dachplatten; verstopfte Entwässerung. | Inspect all seams and panel overlaps. Apply silicone sealant if necessary. Clear any debris from the roof and around the base. |
| Kondensation im Inneren des Schuppens. | Schlechte Belüftung; hohe Luftfeuchtigkeit. | Ensure all air vents are clear and unobstructed. Avoid storing wet items inside. Consider adding a dehumidifier in very humid climates. |
| Der Schuppen wirkt instabil oder wackelig. | Nicht ordnungsgemäß verankert; lose Befestigungselemente; unebener Untergrund. | Anchor the shed securely to the ground. Check and tighten all assembly fasteners. Ensure the foundation is level. |
7. Spezifikationen
- Modell: 3188275
- Material: Verzinkter Stahl
- Farbe: Hellbraun
- Merkmale: Integrated Air Vents, Sloping Roof
- ASIN: B0FZ5NXTLS
- Datum der Erstveröffentlichung: 25. August 2025
8. Garantie und Support
Informationen zur Garantie oder technische Unterstützung erhalten Sie beim Händler oder beim Hersteller. webDie Website, auf der das Produkt gekauft wurde. Bewahren Sie Ihren Kaufbeleg für eventuelle Garantieansprüche auf.
If you have questions regarding assembly or parts, please contact customer service through the provided channels by your retailer.

