1. Sicherheitshinweise
Bitte lesen Sie vor der Montage und Inbetriebnahme alle Anweisungen sorgfältig durch. Bewahren Sie diese Anleitung zum späteren Nachschlagen auf.
- Vor der Montage sicherstellen, dass alle Komponenten vorhanden und unbeschädigt sind. Nicht verwenden, wenn Teile fehlen oder beschädigt sind.
- Um Kratzer zu vermeiden, montieren Sie den Stuhl auf einer weichen, sauberen Oberfläche.
- Die Schrauben dürfen beim Zusammenbau nicht zu fest angezogen werden, da dies die Bauteile beschädigen kann.
- Halten Sie Kinder und Haustiere während der Montage fern. Kleinteile können verschluckt werden und eine Erstickungsgefahr darstellen.
- Stellen Sie sich nicht auf den Stuhl und benutzen Sie ihn nicht als Trittschemel.
- Die maximale Belastbarkeit dieses Stuhls beträgt 180 kg. Überschreiten Sie diese Grenze nicht.
- Um eine Materialbeeinträchtigung zu vermeiden, sollte der Stuhl weder direkter Sonneneinstrahlung noch extremen Temperaturen ausgesetzt werden.
- Überprüfen Sie regelmäßig alle Schrauben und Bolzen auf festen Sitz. Ziehen Sie sie gegebenenfalls nach.
2. Packungsinhalt
Verify that all parts are included in your package before beginning assembly. If any parts are missing or damaged, please contact customer support.
- Rückenlehne
- Sitzfläche
- Armlehnen (2)
- Gasdruckfeder
- Gasheber-Abdeckung
- Sternbasis
- Rollen (5)
- Mechanismusplatte
- Lendenkissen
- Kopfstützenkissen
- Hardware-Set (Schrauben, Unterlegscheiben, Inbusschlüssel)
3. Aufbau- und Montageanleitung
Follow these steps to assemble your Devoko Ergonomic Gaming Chair. It is recommended to have two people for assembly.
Schritt 1: Rollen an der Sternbasis befestigen
Setzen Sie die fünf Rollen jeweils in die Löcher am Ende des Sternfußes ein, bis sie hörbar einrasten.
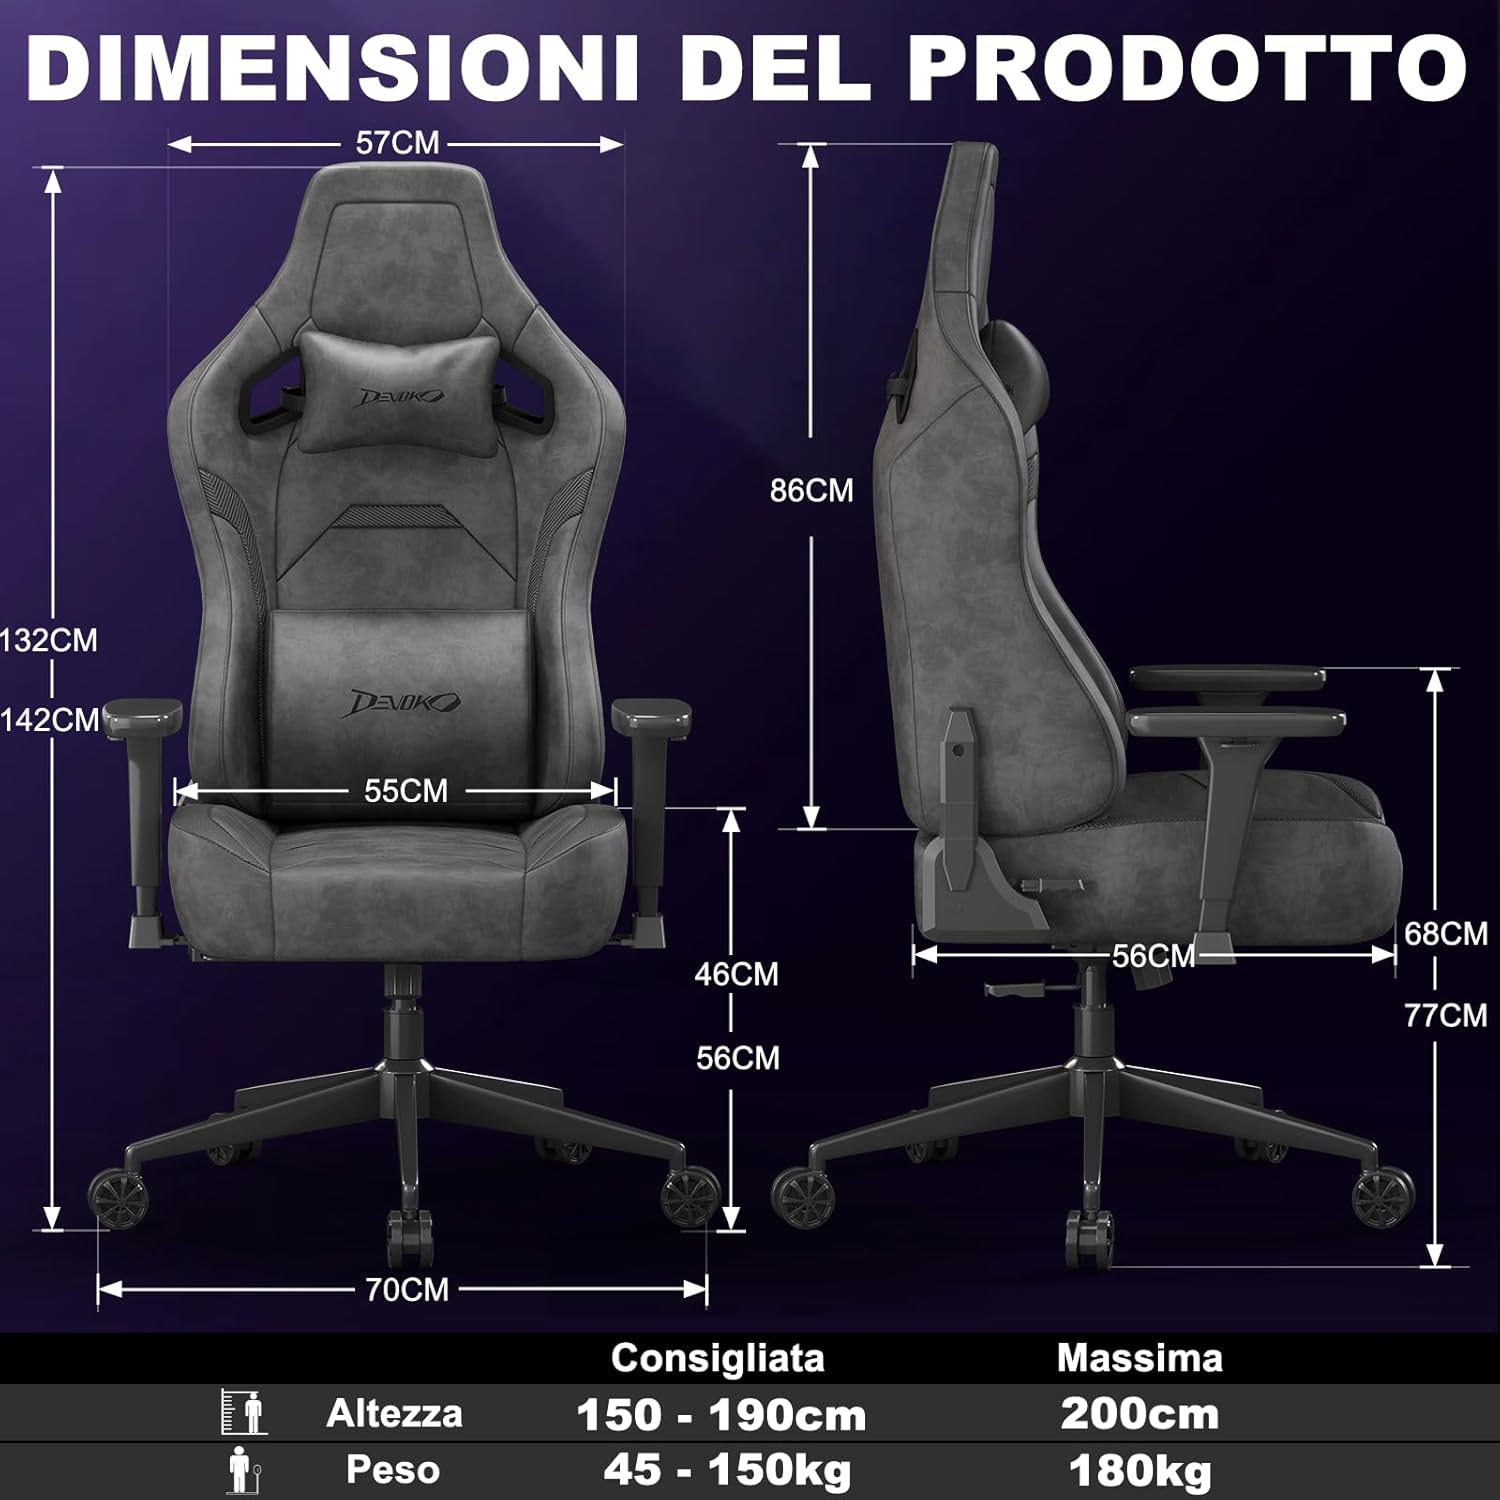
Image: A fully assembled Devoko gaming chair, showcasing its overall design and key features. This image provides a visual reference for the completed product.
Schritt 2: Gasdruckfeder einbauen
Place the gas lift cylinder into the center hole of the star base. Then, slide the gas lift cover over the cylinder.
Schritt 3: Befestigen Sie die Mechanismusplatte an der Sitzbasis
Align the mechanism plate with the pre-drilled holes on the underside of the seat base. Secure it with the provided screws, ensuring the front of the mechanism faces the front of the seat. Do not overtighten.
Step 4: Attach Armrests to Seat Base
Attach the armrests to the seat base using the designated screws. Pay attention to the "L" (left) and "R" (right) markings on the armrests.

Bild: Eine Nahaufnahme view of the chair's 3D adjustable armrests, illustrating their rotational, height, and forward/backward adjustment capabilities. This highlights a key feature for personalized comfort.
Step 5: Connect Backrest to Seat Base
Align the backrest with the brackets on the seat base and secure it with screws. Ensure a firm connection.
Step 6: Attach Seat Assembly to Gas Lift
Setzen Sie den montierten Sitz vorsichtig auf den Gasdruckfederzylinder und achten Sie darauf, dass er zentriert und stabil sitzt.
Step 7: Install Cushions
Attach the headrest and lumbar cushions using their integrated straps. Adjust their positions for optimal comfort.

Bild: Eine Röntgenaufnahme view of the chair's adaptive lumbar support, showing how the movable cushion adjusts to support the upper, central, or lower back. This illustrates the ergonomic design for back comfort.
4. Bedienungsanleitung
4.1 Sitzhöhenverstellung
To adjust the seat height, pull the lever located on the right side of the seat upwards. While seated, lift the lever to lower the seat. To raise the seat, lift the lever while standing or with minimal weight on the seat.
4.2 Backrest Recline Adjustment
To recline the backrest, pull the recline lever located on the right side of the chair (below the seat). Lean back to your desired angle (between 90° and 135°). Release the lever to lock the backrest in position. To return to an upright position, pull the lever and lean forward.

Image: A visual representation of the chair's recline functionality, showing three common angles: 90° for work/gaming, 110° for movies/series, and 135° for relaxation. This demonstrates the versatility of the recline feature.
4.3 Armrest Adjustments (3D)
- Höhenverstellung: Press the button on the side of the armrest and move it up or down to your preferred height. Release the button to lock.
- Vorwärts-/Rückwärtsverstellung: Slide the armrest pad forward or backward to find the optimal position for your arms.
- Drehung: Rotate the armrest pad left or right (up to 360°) to support your arms during various activities.
4.4 Lumbar and Headrest Cushion Adjustment
The lumbar and headrest cushions are adjustable. Slide them up or down along the backrest straps to find the most comfortable and supportive position for your back and neck.
5. Wartung
- Cleaning Suede/Carbon Fiber Leather: For general cleaning, wipe with a soft, damp cloth. For tougher stains, use a mild soap solution and wipe gently, then dry immediately with a clean cloth. Avoid harsh chemicals or abrasive cleaners.
- Rahmen und Basis: Metallteile mit einem weichen, trockenen Tuch abwischen.
- Rollen: Um eine reibungslose Bewegung zu gewährleisten, sollten Haare und Schmutz regelmäßig von den Rollen entfernt werden.
- Befestigungsmaterial: Regularly check all screws and bolts and tighten them if they have loosened over time.
- Vermeiden Sie direktes Sonnenlicht: Prolonged exposure to direct sunlight can cause fading and damage to the upholstery.
6. Fehlerbehebung
| Problem | Mögliche Ursache | Lösung |
|---|---|---|
| Der Stuhl wackelt oder ist instabil. | Lose Schrauben oder ungleichmäßige Montage. | Check and tighten all screws. Ensure the chair is assembled on a flat surface. |
| Die Sitzhöhenverstellung funktioniert nicht. | Gas lift cylinder issue or lever mechanism stuck. | Stellen Sie sicher, dass der Hebel vollständig eingerastet ist. Sollte das Problem weiterhin bestehen, wenden Sie sich bitte an den Kundendienst. |
| Die Rückenlehne lässt sich weder verstellen noch arretieren. | Recline mechanism stuck or damaged. | Check for obstructions. Ensure the recline lever is fully operated. If damaged, contact support. |
| Die Rollen laufen nicht reibungslos. | In den Rollen verfangene Trümmer. | Entfernen Sie Haare, Staub und Schmutz von den Lenkrollen. |
| Quietschgeräusche. | Lose Verbindungen oder Reibung zwischen den Teilen. | Tighten all screws. Apply a small amount of silicone lubricant to moving parts if necessary (avoiding upholstery). |
7. Spezifikationen

Image: A comprehensive diagram illustrating the various dimensions of the Devoko Ergonomic Gaming Chair, including height, width, depth, and recommended user height and weight.
- Marke: Devoko
- Modell: Ergonomischer Spielstuhl
- Material: Suede leather, Carbon fiber leather, High-density shaped foam, Metal base
- Farbe: Anthracite Grey (Note: Other colors may be available for different models)
- Overall Dimensions (Max Height): Ungefähr 70 cm (T) x 70 cm (B) x 143 cm (H)
- Maße der Rückenlehne: 57 cm (B) x 86 cm (H)
- Sitzabmessungen: 55 cm (W) x 56 cm (D) x 12 cm (Thickness)
- Einstellbare Sitzhöhe: 10 cm range (e.g., 46 cm to 56 cm from floor)
- Neigungswinkel: 90° bis 135°
- Armlehnen: 3D Adjustable (Height, Forward/Backward, Rotation)
- Gaslift: Klasse 4
- Gewichtskapazität: Bis zu 180 kg (396 lbs)
- Empfohlene Körpergröße des Benutzers: 150 cm - 200 cm
- Rollen: Silent, floor-friendly wheels
8. Garantie und Support
Devoko products are designed for quality and durability. For specific warranty information regarding your purchase, please refer to the documentation included with your product or contact your retailer.
If you encounter any issues or have questions about your Devoko Ergonomic Gaming Chair, please contact Devoko customer support through the retailer where you purchased the product or visit the official Devoko webWebsite für Kontaktdaten.
Kundendienst: Bitte beachten Sie Ihren Kaufbeleg oder die Angaben des Händlers. webWebsite für direkte Kontaktinformationen.
Online-Ressourcen: Für weitere Informationen und Unterstützung besuchen Sie bitte die Devoko Store auf Amazon.