
1. Einleitung
This manual provides detailed instructions for the safe and effective use of the HABOTEST HT821A Thermal Imager. The HT821A is a professional-grade handheld thermal imaging camera designed for fast, accurate, and intuitive temperature detection across various applications. It features a temperature measurement range of -20°C to 550°C (-4°F to 1022°F) and an infrared resolution of 96x96, which can be enhanced to 240x240 using super-resolution technology. Please read this manual thoroughly before operating the device.
2. Sicherheitshinweise
Um einen sicheren Betrieb zu gewährleisten und Schäden am Gerät zu vermeiden, beachten Sie bitte die folgenden Sicherheitsvorkehrungen:
- Do not point the thermal imager directly at strong energy sources, such as the sun or high-power lasers, as this may damage the detector.
- Vermeiden Sie es, das Gerät extremen Temperaturen, hoher Luftfeuchtigkeit oder korrosiven Umgebungen auszusetzen.
- Das Gerät darf nicht auseinandergenommen oder verändert werden. Reparaturen dürfen nur von autorisiertem Servicepersonal durchgeführt werden.
- Verwenden Sie ausschließlich das angegebene Ladekabel und Netzteil.
- Halten Sie das Gerät von Wasser und anderen Flüssigkeiten fern.
- Ensure the device is securely held during operation to prevent accidental drops.
- Batterie und Gerät sind gemäß den örtlichen Vorschriften zu entsorgen.
3. Produktüberschreitungview und Komponenten
The HABOTEST HT821A Thermal Imager package includes the following items:
- HABOTEST HT821A Thermal Imager
- USB-Datenkabel
- Benutzerhandbuch (dieses Dokument)
Familiarize yourself with the main parts of the thermal imager:

Abbildung 3.1: Front view of the HABOTEST HT821A Thermal Imager, showing the display screen and control buttons.
4. Einrichtung
4.1 Aufladen des Geräts
The HT821A Thermal Imager is equipped with a built-in 2000mAh Lithium battery. Before initial use, ensure the device is fully charged.
- Connect the provided USB-C data cable to the USB-C port on the thermal imager.
- Verbinden Sie das andere Ende des USB-C-Kabels mit einem kompatiblen USB-Netzteil (nicht im Lieferumfang enthalten) oder einem USB-Anschluss Ihres Computers.
- The charging indicator on the device will illuminate, indicating that charging is in progress.
- Once fully charged, the indicator light will change (refer to device display for battery status).
4.2 Ein-/Ausschalten
- So schalten Sie das Gerät ein: Halten Sie den Ein-/Ausschalter (normalerweise mit einem Ein-/Ausschaltersymbol gekennzeichnet) gedrückt, bis der Bildschirm aufleuchtet.
- So schalten Sie das Gerät aus: Halten Sie die Einschalttaste gedrückt, bis das Gerät herunterfährt.
5. Bedienungsanleitung
5.1 Grundlegende Temperaturmessung
The HT821A provides real-time temperature readings with automatic tracking of the highest, lowest, and center temperatures on the screen.

Abbildung 5.1: Display showing automatic tracking of highest and lowest temperature points.
The device automatically identifies and displays the maximum, minimum, and center point temperatures within the field of view, providing immediate insights into temperature distribution.
5.2 Super-Resolution Mode
Enhance the clarity of thermal images by activating the super-resolution mode. This technology increases the infrared resolution from 96x96 to 240x240.
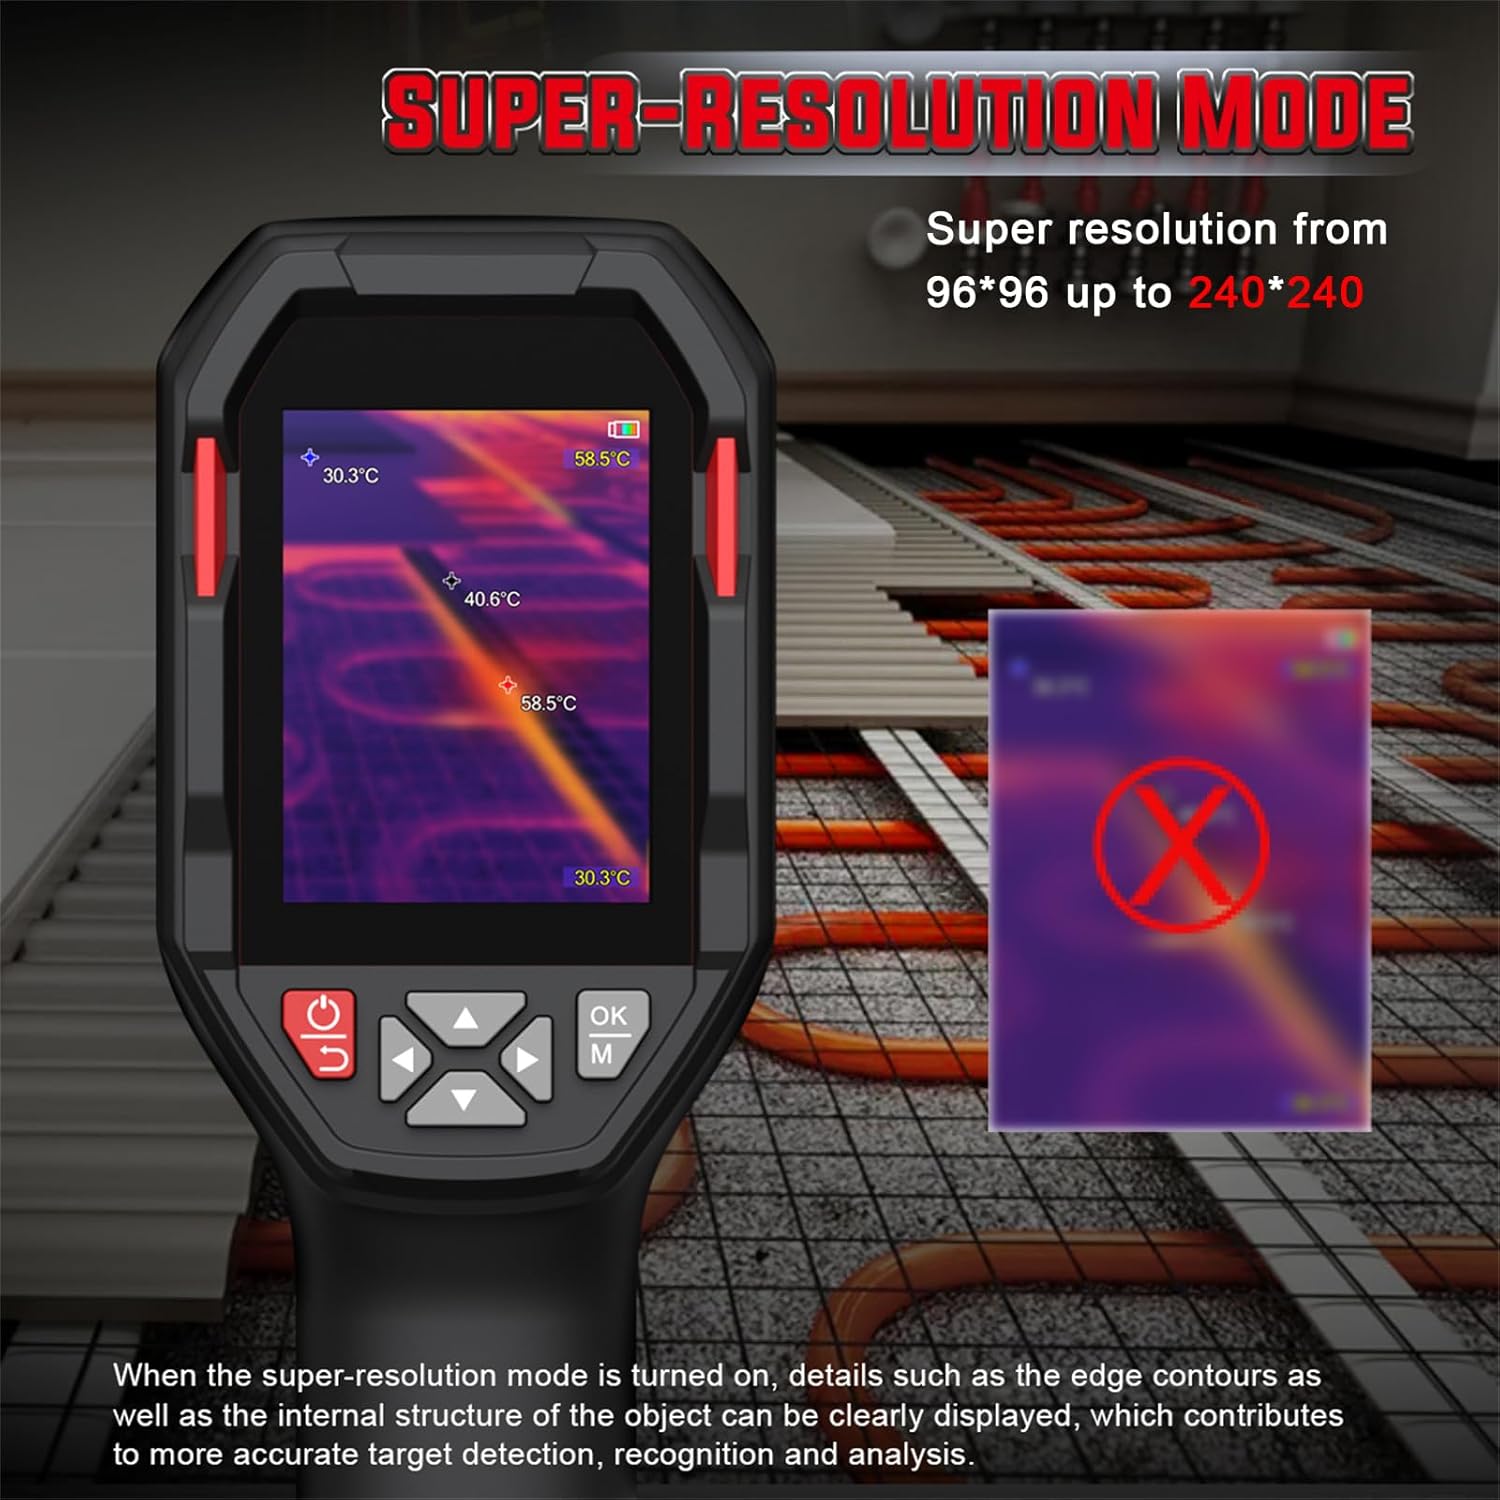
Abbildung 5.2: Comparison of standard and super-resolution thermal images, showing enhanced detail.
- Refer to the device menu for activating or deactivating the super-resolution feature.
- When active, details such as edge contours and internal structures of objects become clearer, aiding in precise target detection and analysis.
5.3 Mehrere Farbpaletten
The HT821A offers 8 pseudocolor palettes to visualize temperature differences. Different palettes can highlight specific temperature ranges or details, making them suitable for various inspection scenarios.
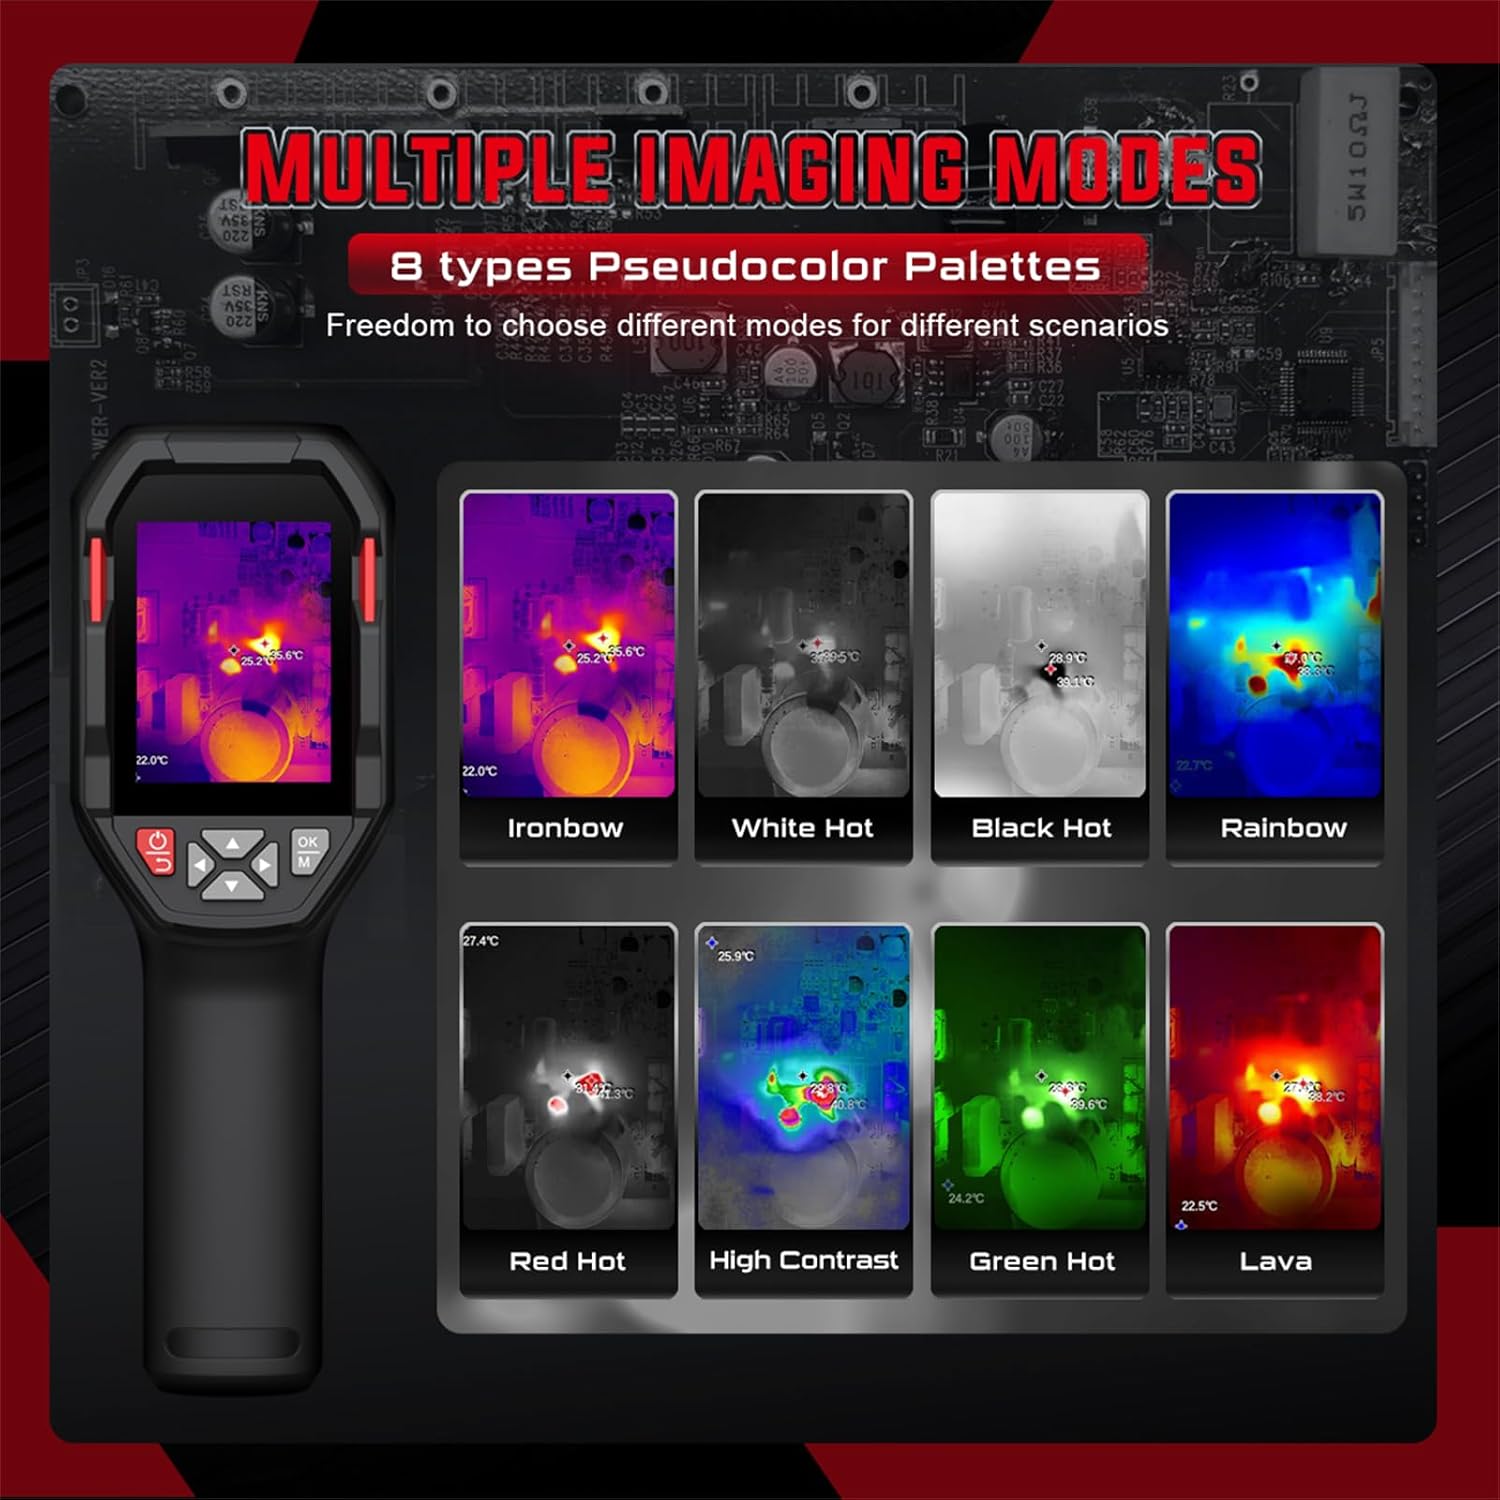
Abbildung 5.3: Examples of different pseudocolor palettes available on the HT821A.
- Common palettes include Ironbow, White Hot, Black Hot, Rainbow, Red Hot, High Contrast, Green Hot, and Lava.
- Navigate through the device menu to select the desired color palette.
5.4 Alarm bei hohen und niedrigen Temperaturen
Set custom temperature limits to trigger an alarm when measured temperatures exceed or fall below the defined thresholds.

Abbildung 5.4: Visual representation of high and low temperature alarm functionality.
- Access the alarm settings in the device menu.
- Define the upper and lower temperature limits.
- The device will provide a visual or audible alert when temperatures fall outside the set range.
5.5 Area Temperature Measurement
The device allows for fixed-area temperature measurement, enabling you to analyze temperatures within a specific region of interest.

Abbildung 5.5: Display with a fixed-area measuring frame, showing center, maximum, and minimum temperatures within that frame.
- Activate the area measurement function through the menu.
- A frame will appear on the screen, and the device will measure the center, maximum, and minimum temperatures exclusively within this frame.
5.6 Distance Compensation and Emissivity
- Entfernungsausgleich: The HT821A supports distance compensation for improved accuracy, with settings for 0.5 M, 1 M, 2 M, and 3 M. Adjust this setting based on your distance to the target object.
- Einstellbarer Emissionsgrad: The device features adjustable emissivity to ensure accurate readings across different material surfaces. Consult a table of common material emissivities and adjust the setting in the menu accordingly.
5.7 Spracheinstellungen
The HT821A supports multiple languages for user interface navigation.
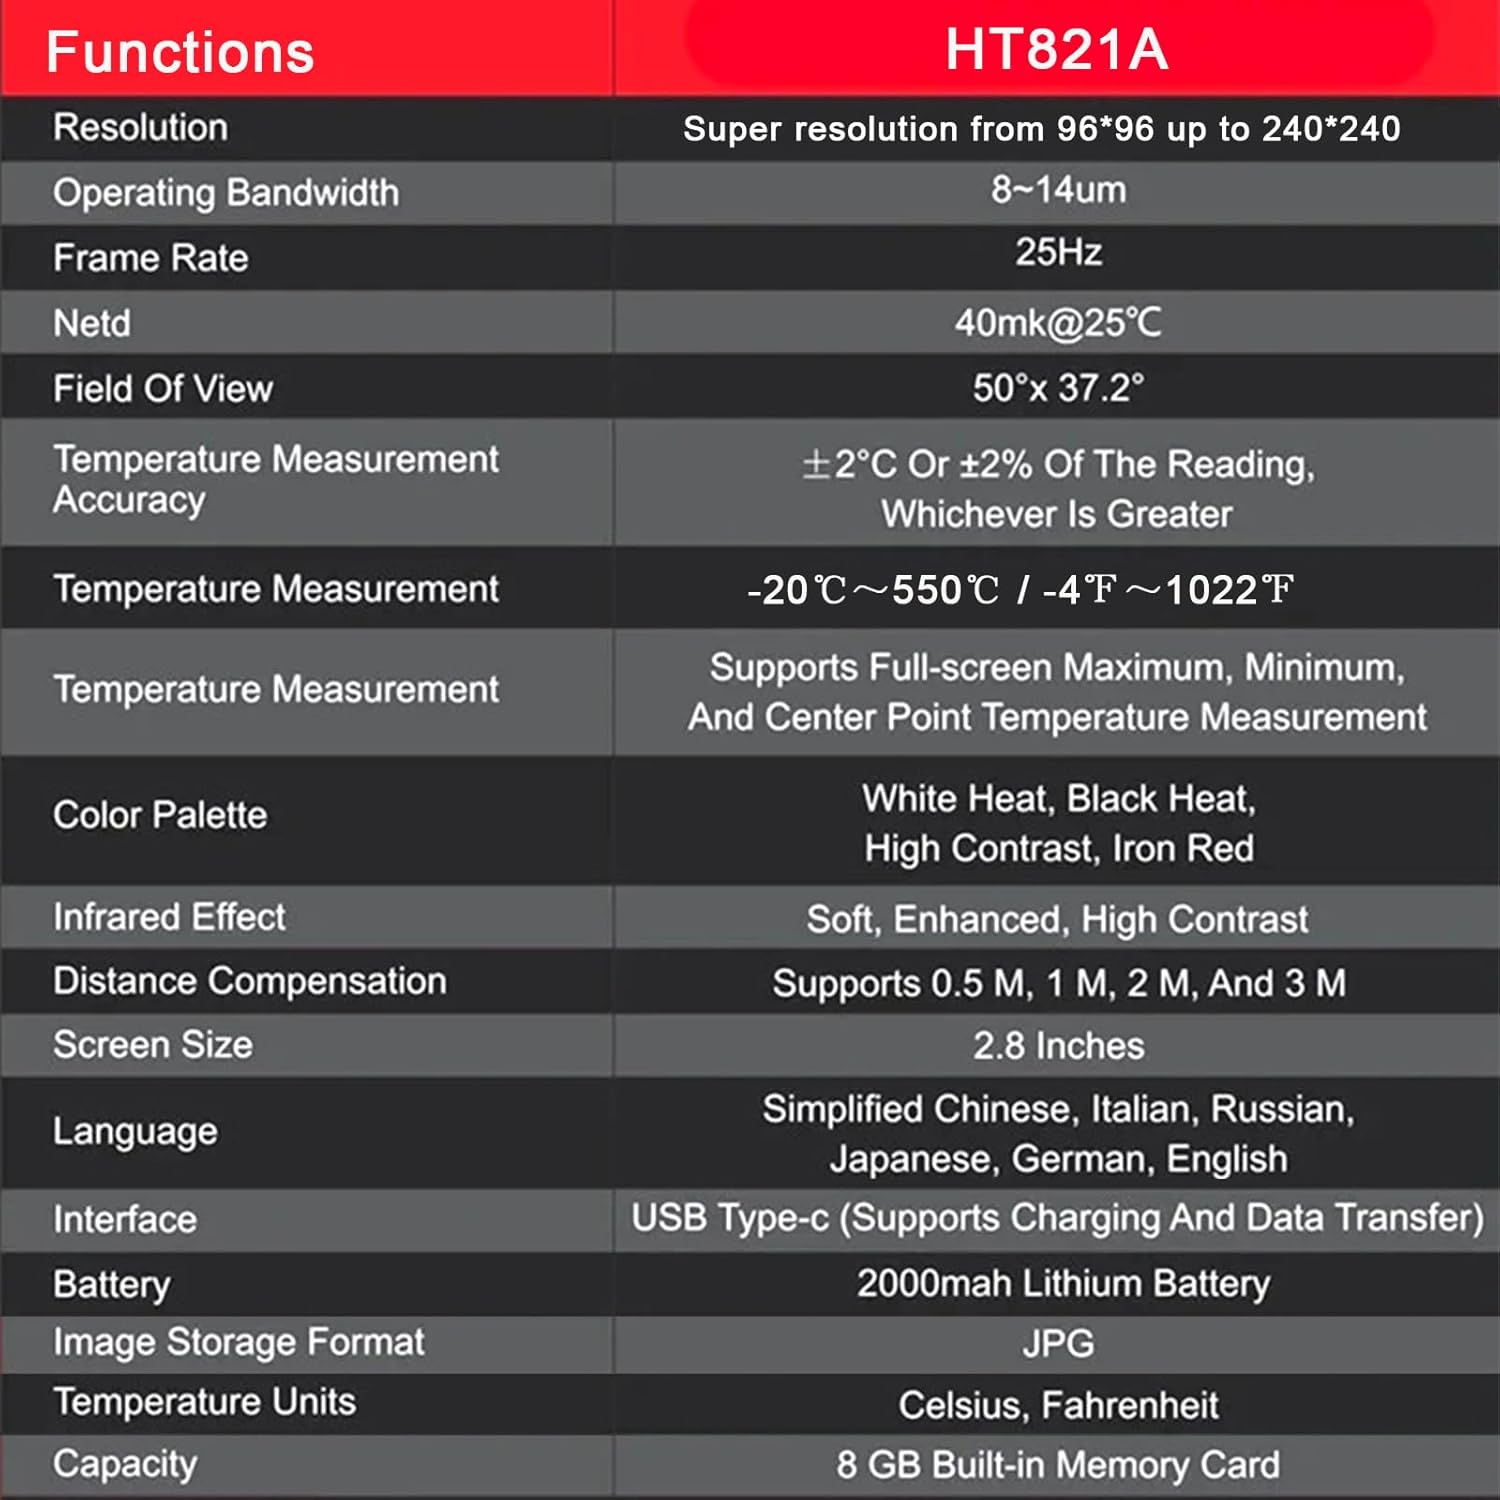
Abbildung 5.6: Language selection menu on the HT821A.
- Navigate to the language settings in the device menu.
- Select from available languages including English, Spanish, French, German, Dutch, Japanese, Korean, Russian, Arabic, Simplified Chinese, and Traditional Chinese.
5.8 Image Storage and Data Transfer
- Bildspeicherung: The device has built-in memory to store thermal images in JPG format. Press the capture button (refer to device layout) to save an image.
- Datenübertragung: Connect the thermal imager to a computer using the provided USB-C cable. The device will appear as a removable storage device, allowing you to transfer stored images for further analysis.
5.9 Taschenlampenfunktion
The HT821A includes a built-in flashlight for reliable operation in dark or low-light environments. Activate the flashlight through the device menu or a dedicated button (refer to device layout).
6. Anwendungen
The HABOTEST HT821A Thermal Imager is a versatile tool suitable for a wide range of professional and home inspection scenarios.

Abbildung 6.1: Examples of the HT821A in use for various inspection tasks.
- Building Inspection: Detecting insulation deficiencies, moisture issues, and air leaks.
- Elektrische Wartung: Identifying overheating components in electrical panels, circuits, and motors.
- HVAC Performance: Inspecting heating and cooling systems for blockages or inefficiencies.
- Mechanical Equipment: Monitoring machinery for abnormal heat signatures indicating wear or malfunction.
- Sanitär: Locating hidden water leaks behind walls or under floors.
- Automotive Inspection: Diagnosing engine overheating, brake issues, or HVAC system problems.
7. Wartung
7.1 Gerät reinigen
- Use a soft, dry cloth to clean the exterior of the thermal imager.
- For the lens and screen, use a lens cleaning cloth and a specialized lens cleaning solution. Do not use abrasive materials or harsh chemicals.
- Achten Sie darauf, dass keine Feuchtigkeit in die Geräteöffnungen eindringt.
7.2 Batteriepflege
- Um die Batterieleistung zu erhalten, laden Sie den Akku regelmäßig auf, auch wenn das Gerät nicht benutzt wird.
- Vermeiden Sie häufiges vollständiges Entladen des Akkus.
- Bewahren Sie das Gerät an einem kühlen, trockenen Ort auf, wenn es längere Zeit nicht benutzt wird.
7.3 Speicherung
When storing the thermal imager, ensure it is kept in its protective packaging or a suitable case to prevent damage from impacts or dust. Avoid storing it in direct sunlight or areas with extreme temperature fluctuations.
8. Fehlerbehebung
If you encounter issues with your HT821A Thermal Imager, refer to the following common problems and solutions:
| Problem | Mögliche Ursache | Lösung |
|---|---|---|
| Gerät lässt sich nicht einschalten. | Niedriger Batteriestand oder Gerätefehlfunktion. | Charge the device for at least 2 hours. If it still doesn't power on, contact customer support. |
| Das Bild ist unscharf oder undeutlich. | Dirty lens, incorrect focus (if applicable), or environmental factors. | Clean the lens with a soft cloth. Ensure the object is within the optimal measurement range. Activate Super-Resolution mode for enhanced clarity. |
| Ungenaue Temperaturmessungen. | Incorrect emissivity setting, distance compensation, or environmental interference. | Adjust the emissivity setting to match the target material. Verify distance compensation is set correctly. Avoid measuring through reflective surfaces. |
| Bilder können nicht auf den Computer übertragen werden. | Faulty USB cable, incorrect connection, or driver issue. | Ensure the USB-C cable is securely connected to both the device and the computer. Try a different USB port or cable. Restart both devices. |
If the problem persists after attempting these solutions, please contact HABOTEST customer support for further assistance.
9. Spezifikationen
The following table outlines the key technical specifications of the HABOTEST HT821A Thermal Imager:
| Besonderheit | Detail |
|---|---|
| Modell | HT821A |
| Auflösung | 96x96 (Super resolution up to 240x240) |
| Betriebsbandbreite | 8-14µm |
| Bildfrequenz | 25 Hz |
| Netto | 40mk@25°C |
| Bereich View | 50 ° × 37.2 ° |
| Genauigkeit der Temperaturmessung | ±2°C or ±2% of the reading, whichever is greater |
| Temperaturmessbereich | -20 °C bis 550 °C (-4 °F bis 1022 °F) |
| Temperaturmessfunktionen | Supports Full-screen Maximum, Minimum, and Center Point Measurement |
| Farbpaletten | White Heat, Black Heat, High Contrast, Iron Red (and others) |
| Infrared Effect | Soft, Enhanced, High Contrast |
| Entfernungsausgleich | Supports 0.5 M, 1 M, 2 M, and 3 M |
| Bildschirmgröße | 2.8 Zoll |
| Sprachunterstützung | Simplified Chinese, Italian, Russian, Japanese, German, English, Spanish, French, Dutch, Korean, Arabic, Traditional Chinese |
| Schnittstelle | USB Type-C (Supports Charging and Data Transfer) |
| Batterie | 2000mAh Lithiumbatterie |
| Bildspeicherformat | JPG |
| Temperatureinheiten | Celsius Fahrenheit |
| Interner Speicher | 8 GB Built-in Memory Card |
| Außenmaterial | Plastik |
10. Garantie und Support
10.1 Garantieinformationen
HABOTEST products are manufactured to high-quality standards. For specific warranty terms and conditions, please refer to the warranty card included with your product or visit the official HABOTEST webDie Garantie deckt in der Regel Material- und Verarbeitungsfehler bei normalem Gebrauch ab.
10.2 Kundendienst
If you have any questions, require technical assistance, or need to report a problem with your HABOTEST HT821A Thermal Imager, please contact HABOTEST customer support.
- Online-Hilfe: Visit the official HABOTEST webWebsite mit FAQs, Produktregistrierung und Kontaktformularen.
- E-Mail-Support: Beachten Sie die Angaben auf Ihrer Produktverpackung oder die offizielle Kennzeichnung. webWebsite für die E-Mail-Adresse des Kundensupports.
Please have your product model number (HT821A) and purchase information ready when contacting support.