
1. Einleitung
This manual provides essential information for the safe and efficient operation of your PowMr 4000W Hybrid Solar Inverter. This device is designed to convert 24VDC battery power into 110/120VAC pure sine wave electricity, integrating a 140A MPPT charge controller for optimal solar energy utilization. It supports various battery types and off-grid system configurations. Please read this manual thoroughly before installation and use, and retain it for future reference.
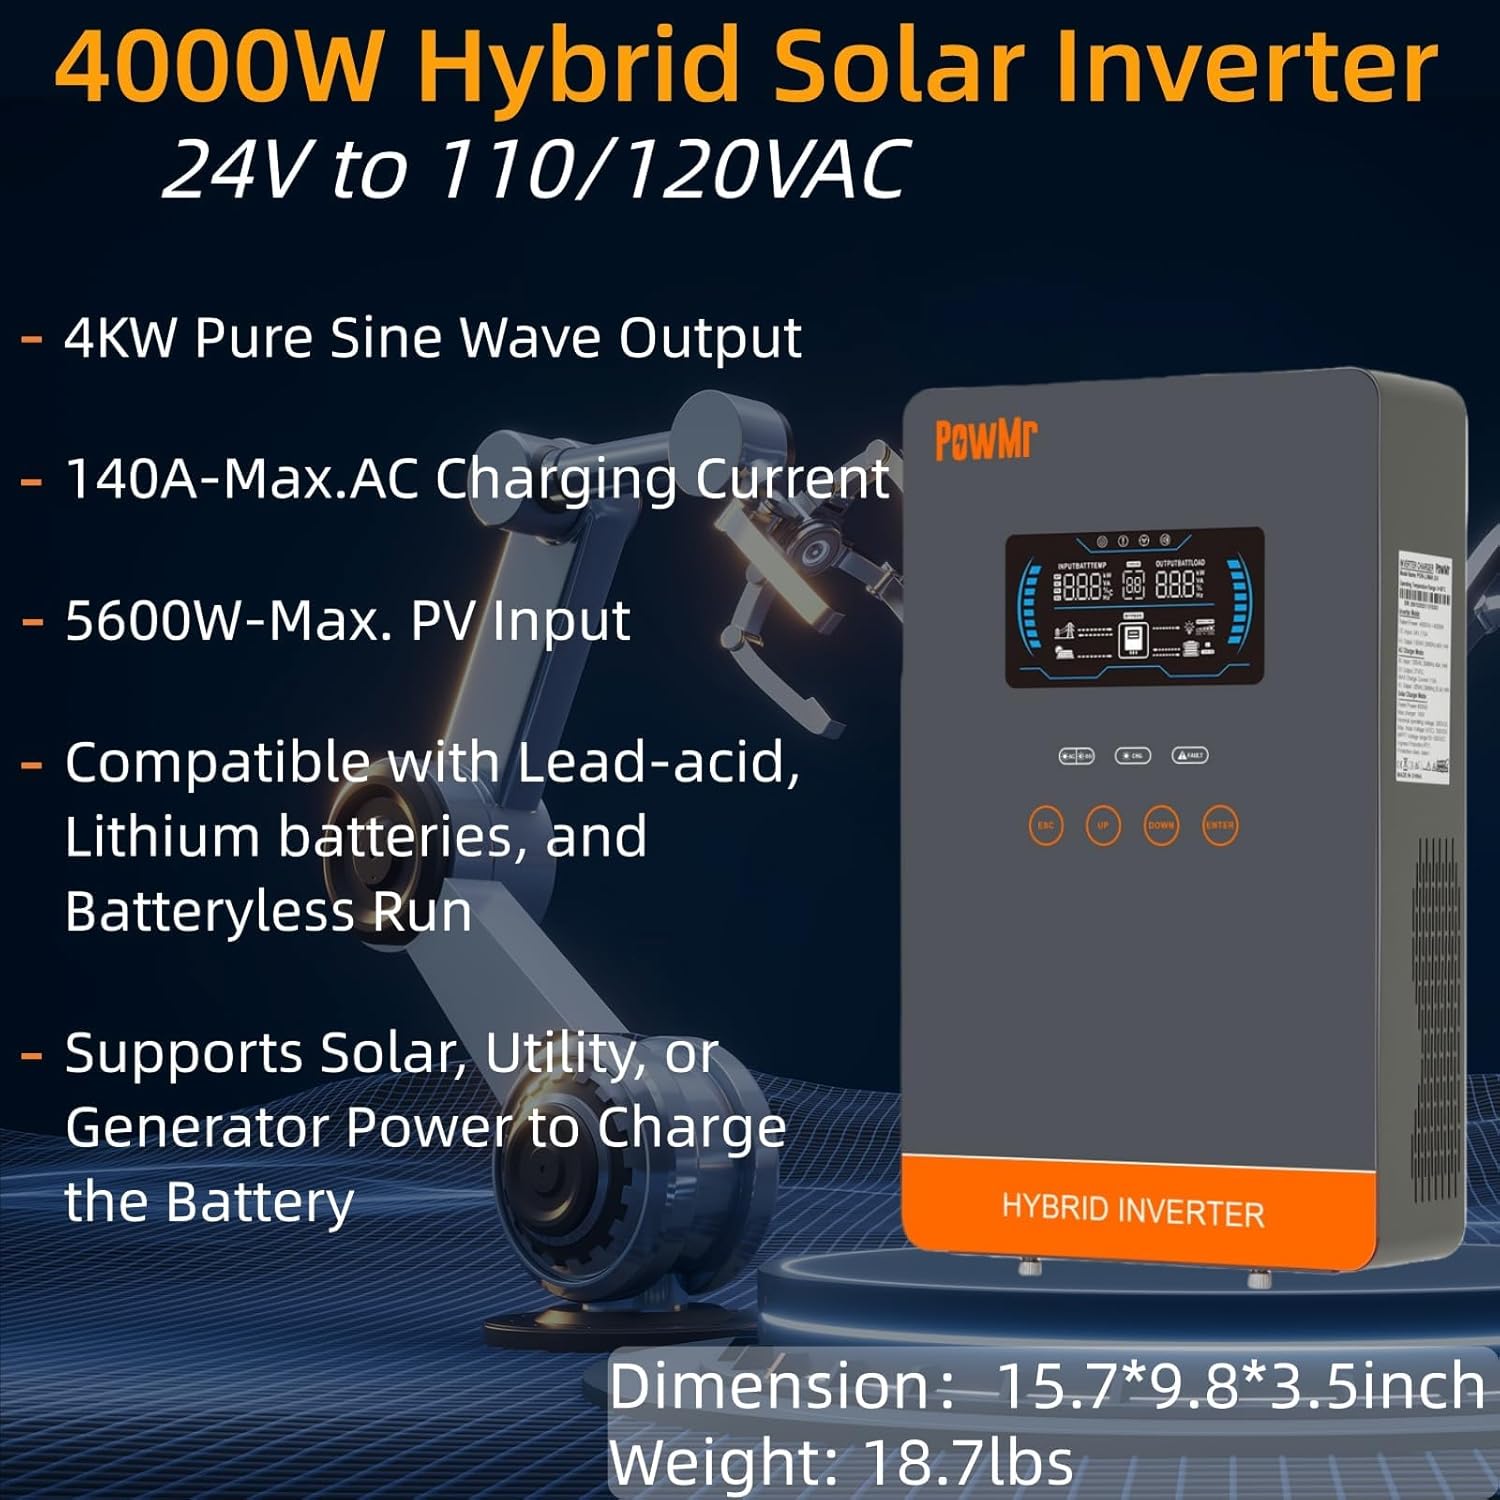
Image: The PowMr 4000W Hybrid Solar Inverter, highlighting its 4KW pure sine wave output, 140A max AC charging current, 5600W max PV input, compatibility with various batteries, and support for solar, utility, or generator power to charge the battery. Dimensions are 15.7"L x 9.8"W x 3.5"H and weight is 18.7lbs.
2. Sicherheitshinweise
Beachten Sie stets die folgenden Sicherheitsvorkehrungen, um das Risiko von Stromschlag, Brand oder Verletzungen zu verringern:
- Die Installation muss durch qualifiziertes Personal durchgeführt werden.
- Stellen Sie sicher, dass alle Kabel die richtige Dimensionierung haben und ordnungsgemäß isoliert sind.
- Der Wechselrichter darf nicht zerlegt werden. Er enthält keine vom Benutzer wartbaren Teile.
- Halten Sie den Wechselrichter von brennbaren Materialien, Feuchtigkeit und direkter Sonneneinstrahlung fern.
- Sorgen Sie für ausreichende Belüftung rund um den Wechselrichter, um eine Überhitzung zu vermeiden.
- Vor jeglichen Wartungs- oder Verkabelungsarbeiten müssen stets alle Stromquellen (PV, Batterie, Wechselstromeingang) getrennt werden.
- Tragen Sie während der Installation und Wartung geeignete persönliche Schutzausrüstung (PSA).
3. Produktüberschreitungview
3.1. Funktionen
- Reine Sinuswellenausgabe: Bietet eine stabile und saubere Stromversorgung, die für empfindliche Elektronik geeignet ist.
- Integrierter MPPT-Laderegler: 140A MPPT for efficient solar charging.
- Breite Akkukompatibilität: Supports AGM, Gel, Lead-acid, Lithium-ion, and LiFePO4 batteries.
- Batterieloser Modus: Can power loads directly from PV/AC grid without a connected battery.
- Mehrere Lademodi: Solar Only, Mains Only, Mains & Solar Hybrid.
- Mehrere Lastausgangsmodi: Utility Priority, Solar Priority, Solar and SBU Priority.
- Erweiterter Schutz: Kurzschluss, über voltage, unter voltage, overload, reverse polarity, over-temperature, and backfill protection.
- Benutzerfreundliche Oberfläche: 6.25-inch LCD screen with touch controls for real-time data display.
- Kommunikationsanschlüsse: RS485 and RS232 for monitoring and control.
3.2. Komponentenidentifikation

Image: A detailed diagram of the PowMr Hybrid Solar Inverter, showing its front panel and connection ports. Key components labeled include: 1. LCD display, 2. Status indicator, 3. Charging indicator, 4. Fault indicator, 5. Function touch buttons, 6. On/off switch, 7. AC input, 8. AC output, 9. PV input, 10. Battery input, 11. RS485/RS232 communication port.
3.3. Schutzfunktionen

Image: An illustration detailing the comprehensive protection features of the inverter, including Short Circuit Protection, Over-Load Protection, Over Current Protection, Backfill Protection, Over VoltagSchutz vor Überhitzung, Schutz vor Unterspannungtage-Schutz und Überladeschutz.
4. Packungsinhalt
Bitte überprüfen Sie beim Auspacken, ob alle Artikel vorhanden und unbeschädigt sind:
- PowMr 4000W Hybrid Solar Inverter
- Bedienungsanleitung (dieses Dokument)
- Communication Cables (if applicable, check packaging)
- Montagezubehör (falls zutreffend, Verpackung prüfen)
5. Installation und Einrichtung
5.1. Montage des Wechselrichters
Select a suitable location for mounting the inverter. It should be:
- Im Innenbereich, geschützt vor direkter Sonneneinstrahlung, Regen und Staub.
- Gute Belüftung zur Wärmeableitung.
- Close to the battery bank to minimize cable length and voltage fallen.
- Auf einer festen, nicht brennbaren Oberfläche.
5.2. Schaltplan
Follow the wiring diagram carefully. Incorrect wiring can cause damage to the inverter, batteries, or connected loads, and may pose a safety hazard.

Image: A comprehensive wiring diagram illustrating connections for PV input, Mains/Generator input, AC output, and Battery input. It specifies voltage ranges, current ratings, and recommended wire gauges for each connection point.
5.3. Batterieanschluss
The inverter is compatible with various 24V battery types. Ensure your battery bank matches the inverter's voltage-Anforderungen.

Image: An illustration showing the inverter's compatibility with various battery types including AGM, GEL, FLD (Flooded), LI (Lithium-ion), SLD (Sealed Lead-Acid), and USER-defined settings. It also indicates a maximum battery charging current of 140A (utility charging + solar charging).
- Connect the battery cables to the inverter's battery terminals, ensuring correct polarity (positive to positive, negative to negative).
- Ziehen Sie alle Verbindungen fest an.
5.4. Anschluss der PV-Anlage
- Connect the solar panel array to the PV input terminals, observing correct polarity.
- Stellen Sie sicher, dass die Leerlaufspannung der PV-Anlagetage and power are within the inverter's specifications.
5.5. Wechselstrom-Eingangs-/Ausgangsanschluss
- Connect the AC utility grid or generator to the AC input terminals.
- Schließen Sie Ihre Wechselstromverbraucher an die Wechselstromausgangsklemmen an.
- Ensure all AC connections are properly grounded.
6. Bedienungsanleitung
6.1. Ein-/Ausschalten
- So schalten Sie das Gerät ein: Ensure all connections are secure. First, connect the battery, then the PV array, and finally the AC input. Press the On/Off switch.
- So schalten Sie das Gerät aus: Disconnect the AC input, then the PV array, and finally the battery. Press the On/Off switch.
6.2. LCD-Display und Bedienelemente
The LCD screen displays real-time system data. Use the touch buttons to navigate menus and adjust settings.
6.3. Setting Charging and Output Modes
Der Wechselrichter bietet flexible Lade- und Ausgangsmodi, um verschiedenen Energiemanagementanforderungen gerecht zu werden.

Image: An illustration detailing the three charging modes (1. Only Solar, 2. Only Utility, 3. Solar+Utility) and three output modes (1. Utility First, 2. Solar First (default), 3. SBU priority). Steps to set programs are also provided: 1. Long press and hold ENTER button for 3s, 2. Press UP and DOWN to select setting programs, 3. Press ENTER to confirm or ESC to exit.
6.3.1. Lademodi
- Nur Solar: Lädt Batterien ausschließlich über Solarpaneele.
- Nur Netzanschluss: Charges batteries exclusively from the AC utility grid or generator.
- Netz- und Solarhybrid: Prioritizes solar charging, supplementing with AC utility/generator if solar power is insufficient.
6.3.2. Load Output Modes
- Priorität der Versorgungsunternehmen: Loads are primarily powered by the AC utility grid. Inverter switches to battery/solar if utility fails.
- Priorität für Solarenergie: Loads are primarily powered by solar and battery. Inverter switches to utility if solar/battery power is insufficient.
- SBU-Priorität (Solar-Batterie-Utility): Loads are primarily powered by solar, then battery, and finally by utility as a last resort.
7. Wartung
Regelmäßige Wartung gewährleistet optimale Leistung und Langlebigkeit Ihres Wechselrichters.
- Reinigung: Periodically clean the inverter's exterior with a dry cloth. Do not use liquid cleaners.
- Belüftung: Ensure cooling fan vents are clear of dust and obstructions. The triple cooling fan design helps dissipate heat efficiently.
- Verbindungen: Überprüfen Sie jährlich alle elektrischen Verbindungen auf festen Sitz und Anzeichen von Korrosion.
- Umfeld: Maintain a clean, dry, and well-ventilated environment around the inverter. The dust-proof design helps prevent dust ingress.
8. Fehlerbehebung
If you encounter issues, refer to the following common problems and solutions. For persistent issues, contact customer support.
| Problem | Mögliche Ursache | Lösung |
|---|---|---|
| Wechselrichter schaltet sich nicht ein | Keine Batterieverbindung; Niedriger Batteriestandtage; On/Off switch off | Check battery connections; Charge battery; Turn on switch |
| Kein AC-Ausgang | Überlastung; Kurzschluss; Wechselrichterfehler | Reduce load; Check for short circuits; Restart inverter |
| PV-Ladefunktion funktioniert nicht | PV-Anlage getrennt; Unzureichendes Sonnenlicht; PV-Volumentage zu niedrig/hoch | Check PV connections; Ensure adequate sunlight; Verify PV array specifications |
| Überlastwarnung | Connected loads exceed inverter capacity | Disconnect some loads; Ensure total load is within 4000W |
| Warnung vor hohen Temperaturen | Poor ventilation; Ambient temperature too high | Clear vents; Improve airflow; Relocate inverter if necessary |
9. Spezifikationen
Technical specifications for the PowMr 4000W Hybrid Solar Inverter:
| Parameter | Wert |
|---|---|
| Modellnummer | POW-LVM4K-24V-FBA2 |
| Nennleistung | 4000 W |
| Eingangslautstärketage (Gleichstrom) | 24 V Gleichstrom |
| Ausgangsvolumentage (Wechselstrom) | 110/120 V Wechselstrom |
| Ausgangswellenform | Rein Sinus |
| max. PV Leerlauf Voltage | 350 V Gleichstrom |
| PV-Array MPPT Voltage Reichweite | 55-350 V DC |
| Max. PV-Eingangsleistung | 5600 W |
| Nennspannung am Netzeingangtage | 110/120 V Wechselstrom |
| Max. Hybrid Charging Current (AC+PV) | 140 A |
| Kommunikation | RS485, RS232 |
| Anzeigetyp | LCD |
| Abmessungen (L x B x H) | 15.7 Zoll L x 9.8 Zoll B x 3.5 Zoll H |
| Gewicht | 18.7 lbs (approximate, derived from image) |
10. Garantie und Support
10.1. Garantieinformationen
The PowMr 4000W Hybrid Solar Inverter comes with an 18 Monate Garantie from the date of purchase. This warranty covers defects in materials and workmanship under normal use. It does not cover damage caused by improper installation, misuse, accidents, unauthorized modifications, or natural disasters.
10.2. Kundendienst
For technical assistance, warranty claims, or any questions regarding your PowMr inverter, please contact PowMr customer support through the retailer's platform or the official PowMr website. Please have your model number (POW-LVM4K-24V-FBA2) and purchase date available when contacting support.