
1. Einleitung
The Valeton GP-180 is a versatile digital multi-effects processor designed for guitarists. It offers advanced modeling capabilities and flexible software, making it suitable for various musical applications, whether as a standalone unit or integrated into an existing pedalboard. This manual provides essential information for setting up, operating, and maintaining your GP-180, ensuring you can fully utilize its potential as a reliable core for your signal chain.
2. Produktüberschreitungview
The Valeton GP-180 features a robust design with intuitive controls, including footswitches, rotary knobs, and a clear display for easy navigation and parameter adjustment. The rear panel provides comprehensive connectivity options for various setups.
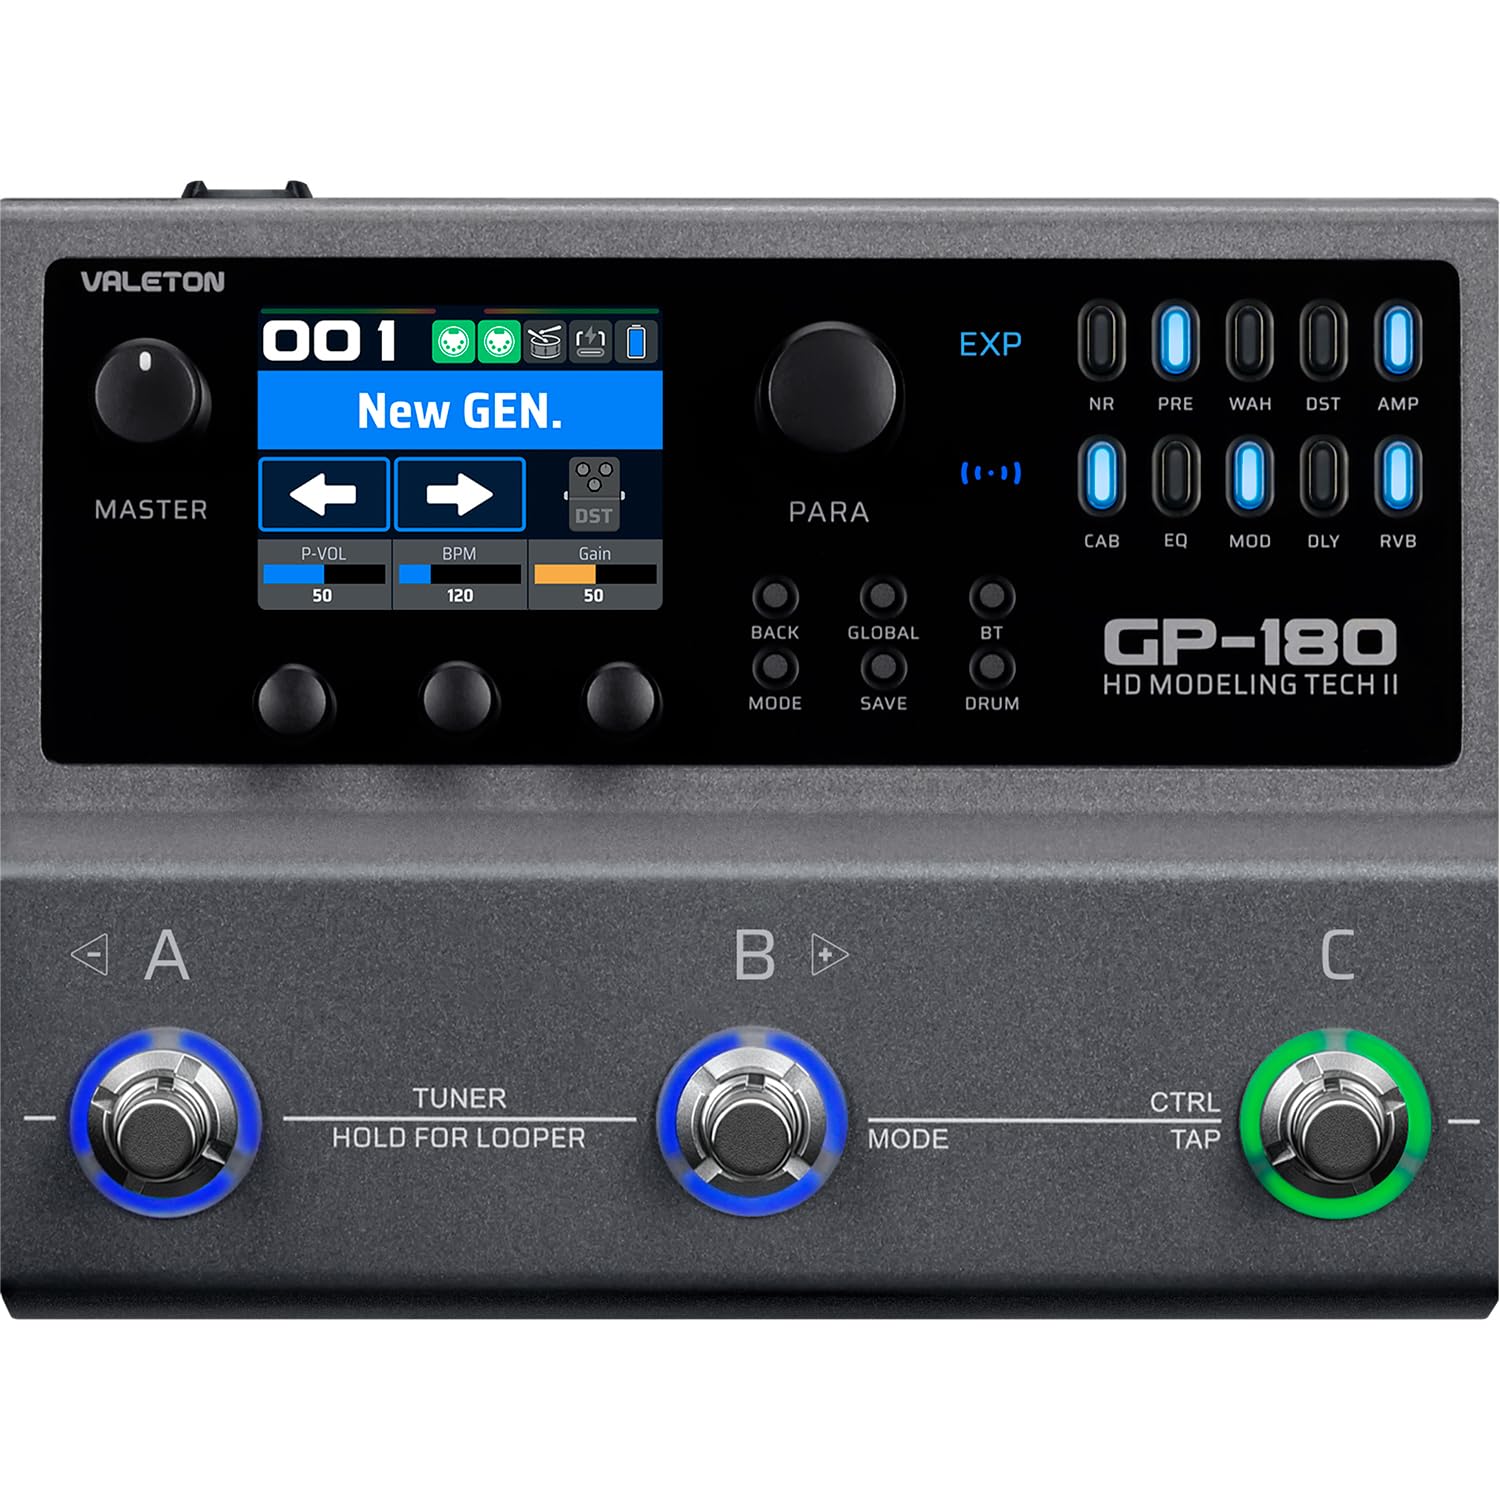
Abbildung 2.1: Oben view of the Valeton GP-180, highlighting the main interface with its display, rotary knobs, and three footswitches for control.

Figure 2.2: Rear panel connectivity of the GP-180, detailing the various input, output, and control ports.

Figure 2.3: The GP-180 integrated into a home studio environment, connected to headphones and a guitar.

Figure 2.4: Close-up of a user interacting with the GP-180's control knobs.

Figure 2.5: A user operating the footswitches of the GP-180 during performance.
3. Einrichtung
3.1 Stromanschluss
Connect the included 9V DC power adapter to the POWER input on the rear panel. Ensure the adapter provides at least 1500mA of current. Use only the specified power supply to prevent damage.
3.2 Instrumenten- und Audioanschlüsse
- Gitarreneingang: Schließen Sie Ihre Gitarre an die 'IN'-Buchse auf der Rückseite an.
- Audioausgang: Connect the 'OUT' jacks (L/R Balanced) to your ampVerstärker, Audio-Interface oder Mischpult.
- Kopfhörer: For silent practice, connect headphones to the 'PHONES' jack.
- Mikrofon: Connect a microphone to the 'MIC' input for vocal processing or recording.
- External Expression Pedal/Footswitch: Use the 'EXP/FS' jacks to connect an external expression pedal or footswitch for additional control.
3.3 USB-Anschluss
Connect the GP-180 to your computer using a USB cable via the 'PD USB' port. This allows for firmware updates, software editing, and direct audio recording.
4. Bedienungsanleitung
4.1 Grundlegende Navigation
The GP-180 features a central display and several rotary knobs for navigating menus and adjusting parameters. The three footswitches (A, B, C) allow for preset changes, effect toggling, and other performance-oriented functions.
4.2 Fußschalterfunktionen
- Fußschalter A, B, C: These can be assigned to switch presets, toggle individual effects, or control other parameters depending on the selected mode.
- HOLD FOR LOOPER (Footswitch B): Press and hold footswitch B to activate the looper function. A short press typically engages the tuner.
- CTRL/TAP (Footswitch C): This footswitch can be used for tap tempo or as an assignable control switch.
4.3 Steuertasten
- MODUS: Switches between different operational modes (e.g., Patch Mode, Stompbox Mode).
- SPEICHERN: Saves your current settings as a preset.
- GLOBAL: Accesses global settings for the unit.
- BT (Bluetooth): Activates Bluetooth for audio streaming or app control.
- TROMMEL: Engages the built-in drum machine for practice.
4.4 Effektmodule
The GP-180 includes a wide array of effect modules, indicated by LEDs on the right side of the display. These include:
- NR: Rauschunterdrückung
- VOR: Voramp
- WAH: Wah-Pedal
- Sommerzeit: Verzerrung
- AMP: Amplifier Modeling
- FAHRERHAUS: Schranksimulation
- EQ: Equalizer
- MOD: Modulationseffekte
- DLY: Delay-Effekte
- RGB: Reverb-Effekte
Use the corresponding buttons and rotary knobs to activate and adjust these effects within your signal chain.
5. Wartung
5.1 Reinigung
To clean the unit, use a soft, dry cloth. Do not use abrasive cleaners, waxes, or solvents. Avoid spraying liquid directly onto the unit.
5.2 Speicherung
When not in use for extended periods, store the GP-180 in a dry, cool place away from direct sunlight and extreme temperatures. Disconnect the power adapter.
5.3 Softwareaktualisierungen
Überprüfen Sie regelmäßig die offizielle Valeton-Website. website for firmware updates. Keeping your GP-180's software up-to-date ensures optimal performance and access to new features.
6. Fehlerbehebung
- Kein Strom: Ensure the power adapter is correctly connected and provides the specified 9V DC, 1500mA. Check the power outlet.
- Kein Ton: Vergewissern Sie sich, dass alle Audiokabel fest angeschlossen sind. Überprüfen Sie die Lautstärkepegel am GP-180, Ihrem Instrument und Ihrem amplifier/mixer. Ensure the correct input/output settings are selected on the unit.
- Verzerrter Klang: Check input gain levels to avoid clipping. Ensure all cables are in good condition.
- Probleme mit der USB-Verbindung: Try a different USB port or cable. Ensure the necessary drivers (if any) are installed on your computer. Restart both the GP-180 and your computer.
- Unerwartetes Verhalten: Perform a factory reset (refer to the full manual for instructions on how to do this, as it may vary). If issues persist, contact Valeton support.
7. Spezifikationen
| Besonderheit | Spezifikation |
|---|---|
| Marke | VALETON |
| Modellnummer | GP180 |
| Produktgewicht | 843 Gramm |
| Bandtage | 9 Volt |
| Aktuell | 1500 mA |
| Hardware-Schnittstelle | USB, Bluetooth |
| Technische Daten | 18.1 x 13.9 x 5.2 cm |
| Ursprungsland | China |
| UPC | 888506830174 |
| ASIN | B0GV23QTY7 |
8. Garantie und Support
8.1 Garantieinformationen
The Valeton GP-180 comes with a 1-year manufacturer's warranty. Please retain your proof of purchase for warranty claims. The warranty covers defects in materials and workmanship under normal use.
8.2 Kundendienst
For technical assistance, troubleshooting beyond this manual, or warranty inquiries, please contact Valeton customer support through their official website or your local distributor. Provide your product model and serial number when contacting support.


