
1. Wichtige Sicherheitshinweise
Please read this entire manual carefully before operating the VEVOR Belt Grinder Sander. Failure to follow these instructions may result in serious injury or property damage. Keep this manual for future reference.
- Tragen Sie persönliche Schutzausrüstung (PSA): Tragen Sie beim Bedienen der Schleifmaschine stets eine Schutzbrille oder ein Gesichtsschild, einen Gehörschutz und geeignete Handschuhe.
- Sicherheit am Arbeitsplatz: Ensure your work area is clean, well-lit, and free from obstructions. Keep children and bystanders away from the operating machine.
- Elektrische Sicherheit: Connect the grinder to a properly grounded outlet. Do not operate in wet conditions. Inspect the power cord for damage before each use.
- Werkstück sichern: Always secure the workpiece firmly to prevent kickback or loss of control.
- Überforderung vermeiden: Achten Sie jederzeit auf sicheren Stand und Gleichgewicht.
- Bei Nichtgebrauch den Stecker ziehen: Disconnect the power supply before changing accessories, performing maintenance, or when the machine is unattended.

Image: VEVOR Belt Grinder Sander with included accessories and user manual.
2. Produktüberschreitungview
The VEVOR Belt Grinder Sander JLD10-8 is a versatile tool designed for metalworking, knife making, and woodworking tasks. It features a powerful motor and variable speed control for precise grinding and polishing.
Hauptmerkmale:
- Powerful 550W Brushless Motor: Delivers strong output with a belt line speed of up to 21 m/s for efficient material removal.
- Variable Speed Control (VFD): Stepless speed adjustment from 200-5000 RPM for high-speed grinding or low-speed precision polishing.
- Two Grinding Modes: Supports circular and flat grinding for enhanced flexibility.
- Bidirektionale Drehung: Forward and reverse rotation control for greater grinding flexibility and material positioning.
- Versatile Sanding Belts: Includes three 30 x 1 inch sanding belts (100/180/240 grit) for various stages of grinding and polishing.

Image: The belt grinder sander in operation, demonstrating fast grinding and smooth control with sparks from metalworking.
Enthaltene Komponenten:
- 1 x Belt Grinder Sander Unit
- 1 x Circular Grinding Wheel + Support Rod
- 1 x Controller (VFD)
- 1 x Flat Grinding Wheel and Bracket Assembly
- 1 x Guard Cover
- 1 x M6-Innensechskantschlüssel
- 1 x User Manual (PDF) (Download PDF)
- 2 x Workbenches (Large & Small)
- 3 x Sanding Belts (100/180/240 Grit)
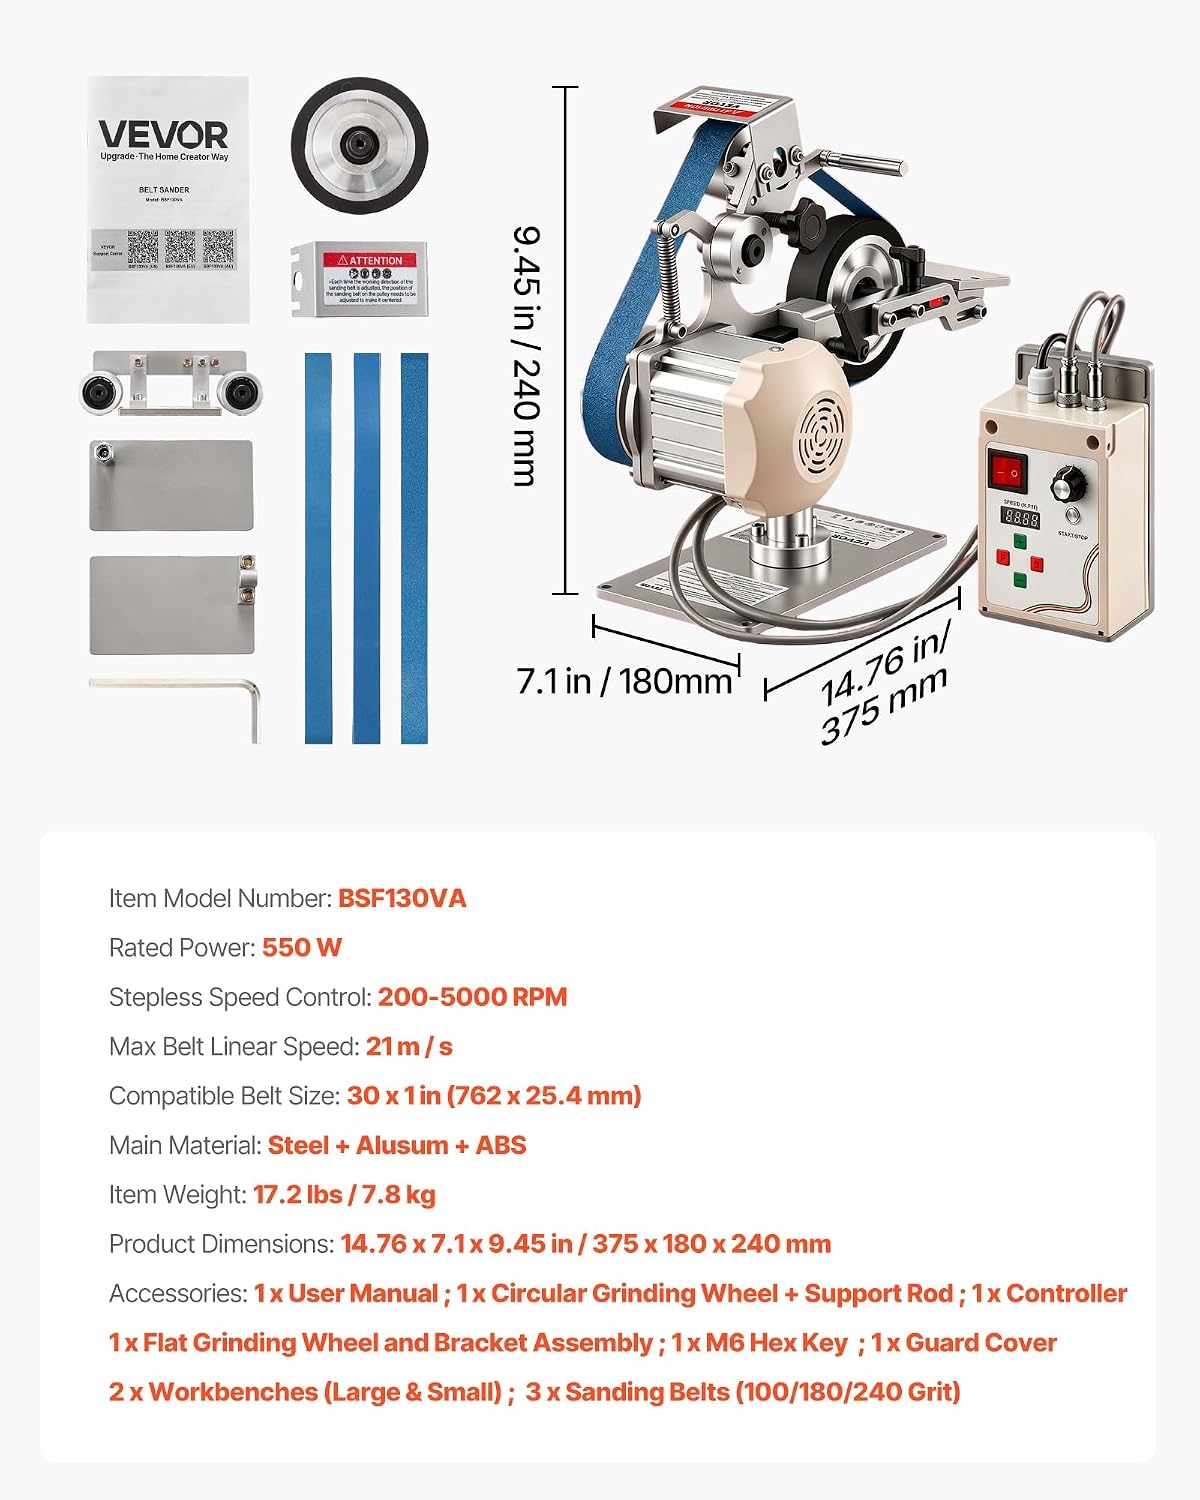
Image: Diagram illustrating the product dimensions and a visual list of included components.
3. Einrichtung
Follow these steps to set up your VEVOR Belt Grinder Sander for operation.
3.1 Auspacken und Prüfen
- Entnehmen Sie vorsichtig alle Komponenten aus der Verpackung.
- Inspect all parts for any signs of damage during shipping. Contact customer support if any damage is found.
- Prüfen Sie, ob alle in Abschnitt 2 aufgeführten Komponenten vorhanden sind.
3.2 Montage
- Place the heavy-duty steel base on a stable and level workbench.
- Attach the main grinder unit to the base, ensuring it is securely fastened.
- Connect the controller unit to the main grinder unit using the provided cables. Ensure connections are firm.
- Install the desired workbench (large or small) onto the grinder. The workbenches are removable for different grinding needs.
- Attach the guard cover for safety.

Bild: Detailliert view of the grinder's design features, including the robust base, removable workbench, and adjustment points.
3.3 Installing a Sanding Belt
- Stellen Sie sicher, dass die Mühle vom Stromnetz getrennt ist.
- Loosen the belt tensioning mechanism (refer to the diagram in the user manual for exact location).
- Slide the desired 30 x 1 inch sanding belt over the drive wheel and idler wheels.
- Den Riemenspannmechanismus so weit anziehen, bis der Riemen straff, aber nicht übermäßig gedehnt ist.
- Adjust the belt tracking knob to center the belt on the wheels. This may require minor adjustments during initial operation.
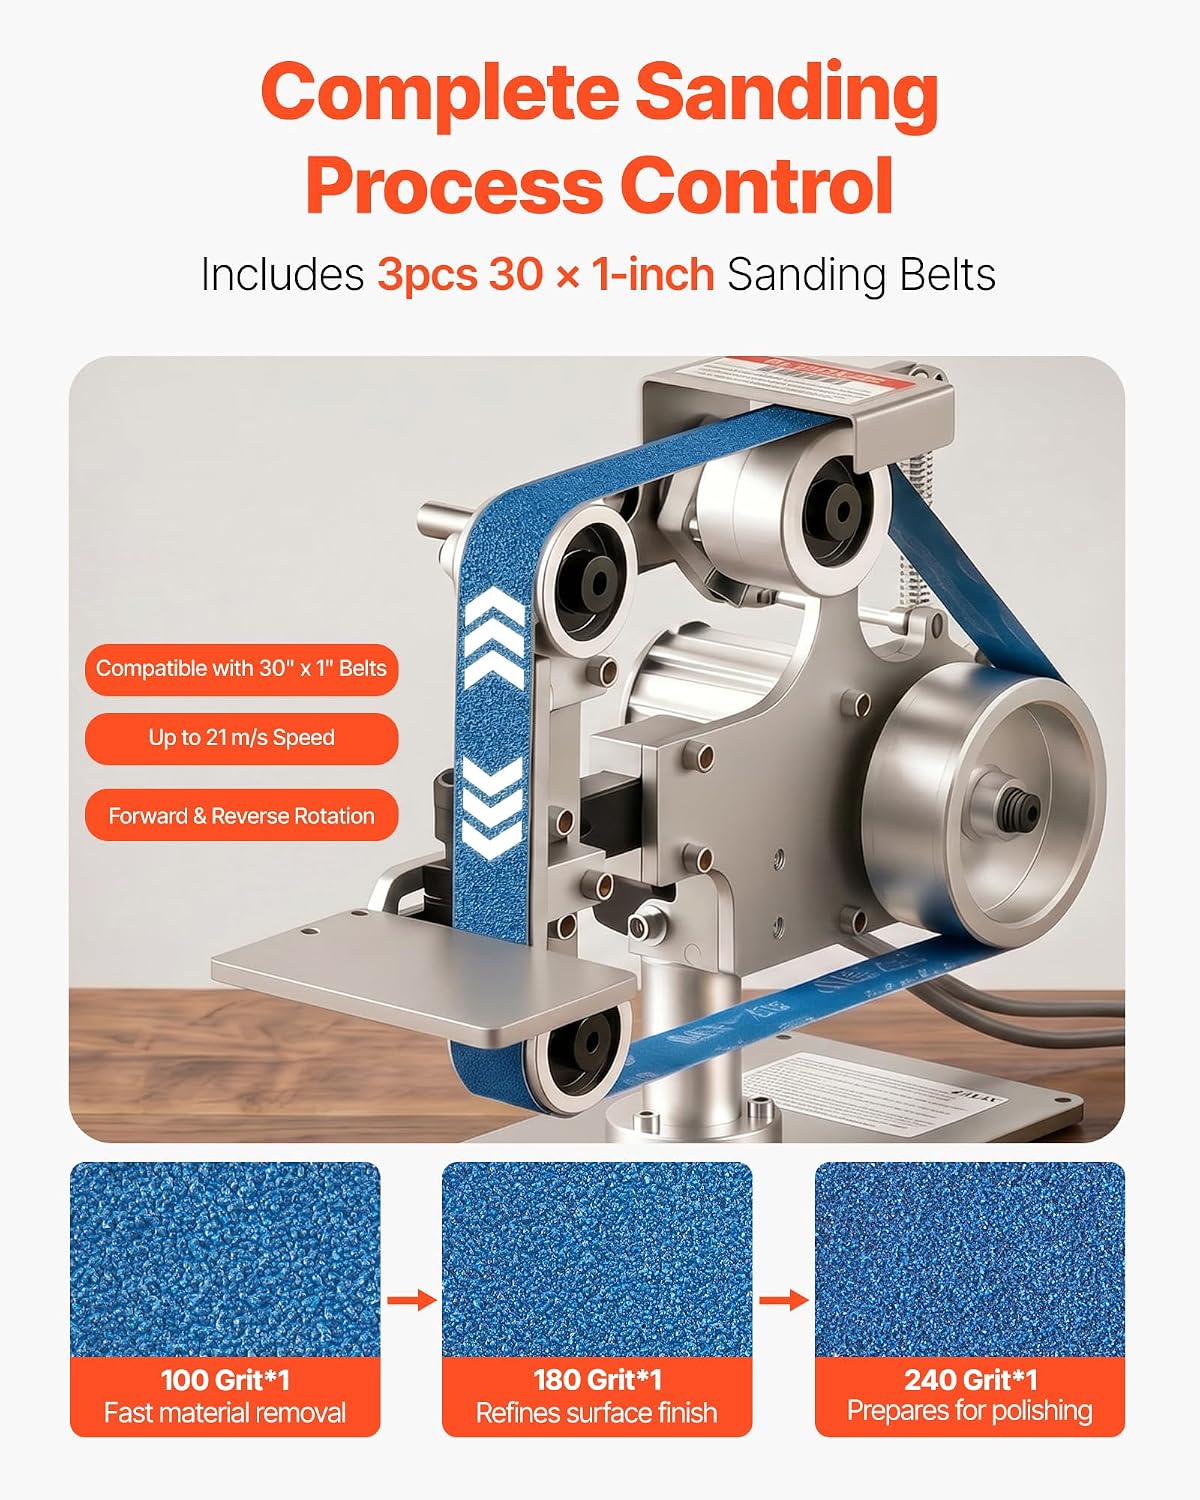
Image: The belt grinder with an installed belt, alongside examples of the 100, 180, and 240 grit sanding belts.
4. Bedienungsanleitung
Familiarize yourself with the controls before beginning any grinding or sanding tasks.
4.1 Bedienfeld vorbeiview

Image: The control panel, highlighting the power switch, speed knob, start/stop button, and RPM display.
- Stromschalter: Schaltet die Hauptstromversorgung des Geräts ein und aus.
- Geschwindigkeitsregler: Adjusts the rotational speed of the belt from 200 to 5000 RPM. Turn clockwise for higher speed, counter-clockwise for lower speed.
- Start/Stopp-Taste: Initiates or halts the belt movement.
- Drehzahlanzeige: Shows the current rotational speed.
- Vorwärts-/Rückwärtssteuerung: Press and hold the 'S' button on the controller to switch between forward and reverse rotation.
4.2 Grundlegende Bedienung
- Ensure the power switch is in the 'OFF' position before plugging the unit into a grounded 110V power outlet.
- Turn the power switch to 'ON'. The RPM display will illuminate.
- Adjust the speed knob to your desired RPM. Start with a lower speed for initial adjustments or fine work, and increase for faster material removal.
- Press the 'Start/Stop' button to begin belt movement. Observe the belt tracking and adjust with the belt tracking knob if necessary to keep the belt centered.
- Carefully bring your workpiece into contact with the moving belt. Apply even, controlled pressure.
- To stop operation, press the 'Start/Stop' button, then turn the power switch to 'OFF'. Unplug the unit when finished.
4.3 Grinding Modes and Applications
The grinder supports various configurations for different tasks:
- Kreisschleifen: Use the circular grinding wheel for shaping and contouring.
- Planschleifen: Utilize the flat grinding platen for achieving flat surfaces and precise angles.
- Vertical and Horizontal Use: The grinder can be adjusted to operate in both vertical and horizontal orientations to accommodate different workpiece sizes and grinding angles.

Bild: Examples of the grinder configured for circular, flat, and horizontal grinding tasks.
This machine is suitable for working with various materials including steel, aluminum, copper, hardwood, laminate wood, and softwood.
5. Wartung
Regular maintenance ensures the longevity and optimal performance of your belt grinder sander.
5.1 Reinigung
- Trennen Sie die Maschine immer vom Netz, bevor Sie sie reinigen.
- Use a brush or compressed air to remove dust and debris from the motor vents, belt area, and workbenches.
- Wipe down exterior surfaces with a clean, dry cloth. Do not use solvents that may damage plastic components.
5.2 Riemenwechsel
Replace sanding belts when they become worn or clogged. Refer to Section 3.3 for detailed belt installation instructions.
5.3 Allgemeine Inspektion
- Periodically check all fasteners and bolts for tightness. Tighten as needed.
- Inspect the power cord for cuts, fraying, or other damage. Replace immediately if damaged.
- Ensure all moving parts operate smoothly. Lubricate pivot points if necessary, using a light machine oil.
6. Fehlerbehebung
Dieser Abschnitt behandelt häufig auftretende Probleme. Bei Problemen, die hier nicht aufgeführt sind, wenden Sie sich bitte an den VEVOR-Kundendienst.
| Problem | Mögliche Ursache | Lösung |
|---|---|---|
| Die Mühle startet nicht. | Keine Stromversorgung Netzschalter ausschalten Fehlerhaftes Netzkabel | Überprüfen Sie die Steckdose und den Sicherungsautomaten. Stellen Sie sicher, dass der Netzschalter eingeschaltet ist. Überprüfen Sie das Netzkabel und ersetzen Sie es gegebenenfalls. |
| Belt slips or runs off track | Belt tension too loose Belt tracking not adjusted Abgenutzter Gürtel | Adjust belt tensioning mechanism Adjust belt tracking knob Replace with a new sanding belt |
| Übermäßige Vibrationen oder Lärm | Lose Komponenten Unbalanced workpiece Abgenutzte Lager | Alle Befestigungselemente prüfen und festziehen. Ensure workpiece is securely held Wenden Sie sich für den Service an den Kundendienst |
| Inkonsistente Geschwindigkeit | Controller-Problem Motorüberlastung | Achten Sie auf die richtige Lautstärketage liefern Den Druck auf das Werkstück verringern Kontaktieren Sie den Kundensupport |
7. Spezifikationen
Technical specifications for the VEVOR Belt Grinder Sander JLD10-8.
| Spezifikation | Wert |
|---|---|
| Modellnummer | JLD10-8 |
| Nennleistung | 550 Watt |
| Bandtage | 110 Volt |
| Amperage Kapazität | 5 A |
| Stufenlose Geschwindigkeitsregelung | 200-5000 U/min |
| Max Belt Linear Speed | 21 m/s |
| Compatible Belt Size | 30 x 1 mm (762 x 25.4 Zoll) |
| Hauptmaterial | Steel + Aluminum + ABS |
| Artikelgewicht | 17.2 Pfund / 7.8 kg |
| Produktabmessungen (L x B x H) | 14.76" x 7.1" x 9.45" (375 x 180 x 240 mm) |
8. Garantie und Support
Informationen zur Garantie, zur Produktregistrierung oder zum technischen Support finden Sie auf der offiziellen VEVOR-Website. website or contact VEVOR customer service directly. Details can typically be found in the included user manual PDF or on the manufacturer's product page.
VEVOR Offiziell WebWebsite: www.vevor.com