Nintendo 64 System Pikachu Version Blue/Yellow Instruction Manual
Model: Nintendo 64 System Pikachu Version
1. Einleitung
This manual provides essential information for the proper setup, operation, and maintenance of your Nintendo 64 System Pikachu Version Blue/Yellow console. Please read these instructions carefully before using your system to ensure optimal performance and longevity.
2. Packungsinhalt
Überprüfen Sie, ob Ihr Paket die folgenden Artikel enthält:
- Nintendo 64 System Pikachu Version Console (Blue/Yellow)
- Nintendo 64 Controller (matching color)
- AC Adapter (Power Supply)
- Stereo A/V Cable
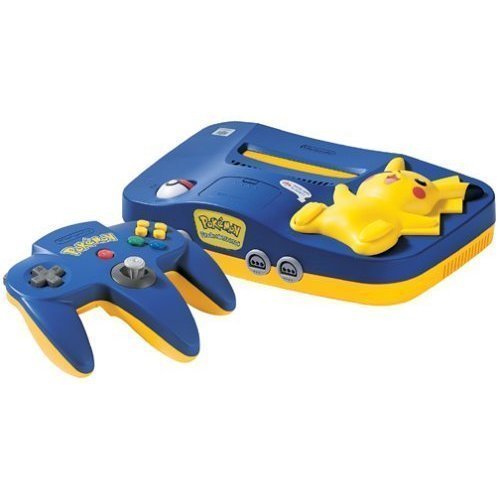
This image displays the Nintendo 64 System Pikachu Version in its distinctive blue and yellow casing. The console features a raised-relief Pikachu figure on top, with the Poké Ball power switch located on its foot. The console's unique design includes light-up cheeks for Pikachu when powered on.
3. Einrichtung
3.1 Anschluss an einen Fernseher
- Ensure your television is turned off.
- Connect the yellow plug of the Stereo A/V Cable to the video input (usually yellow) on your television.
- Connect the white plug to the left audio input (white) and the red plug to the right audio input (red) on your television.
- Connect the multi-out connector of the Stereo A/V Cable to the 'MULTI OUT' port on the back of the Nintendo 64 console.
3.2 Stromversorgung anschließen
- Insert the small end of the AC Adapter into the 'DC 12V' input on the back of the Nintendo 64 console.
- Plug the other end of the AC Adapter into a standard electrical outlet.
3.3 Inserting a Game Pak
- Stellen Sie sicher, dass die Konsole ausgeschaltet ist.
- Insert a Nintendo 64 Game Pak into the slot on top of the console, with the label facing forward. Press firmly until it clicks into place.
3.4 Controller anschließen
- Plug the controller cable into one of the controller ports on the front of the console. Up to four controllers can be connected.
4. Bedienungsanleitung
4.1 Ein-/Ausschalten
- To turn the system ON, rotate the Pokຐ Ball switch on Pikachu's foot to the 'ON' position. Pikachu's cheeks will light up.
- To turn the system AUS, rotate the Pokຐ Ball switch on Pikachu's foot to the 'OFF' position.
4.2 Resetting the Console
- To reset the console during gameplay, press Pikachu's foot (the Pokຐ Ball switch) firmly. This will restart the game.
4.3 Spiele spielen
- After powering on, select the correct video input channel on your television.
- The game will typically start automatically. Follow on-screen instructions for gameplay.
5. Wartung
5.1 Reinigung der Konsole
- Always power off and unplug the console before cleaning.
- Wipe the exterior of the console with a soft, dry cloth. For stubborn dirt, slightly dampDas Tuch mit Wasser befeuchten und anschließend sofort trocken wischen.
- Verwenden Sie keine Scheuermittel, Lösungsmittel oder chemische Sprays.
5.2 Cleaning Game Paks
- If a game pak is not functioning correctly, gently clean the gold connector pins on the bottom of the pak with a cotton swab lightly dampMit Isopropylalkohol abwischen. Vor dem Wiedereinsetzen vollständig trocknen lassen.
5.3 Speicherung
- Store the console and game paks in a cool, dry place away from direct sunlight, extreme temperatures, and excessive dust.
- Keep the console away from strong magnetic fields.
6. Fehlerbehebung
6.1 Kein Strom
- Ensure the AC Adapter is securely plugged into both the console and a working electrical outlet.
- Check if the Pokຐ Ball power switch is in the 'ON' position.
6.2 No Video or Audio
- Verify that the Stereo A/V Cable is correctly connected to both the console and the television.
- Ensure your television is set to the correct video input channel (e.g., AV1, Video 1).
- Check that the game pak is fully inserted into the console.
6.3 Game Not Loading or Freezing
- Remove the game pak and reinsert it firmly.
- Clean the game pak's connector pins as described in the Maintenance section.
- Press Pikachu's foot to reset the console.
7. Spezifikationen
| ASIN | B00005249D |
| Veröffentlichungsdatum | 29. September 1996 |
| Technische Daten | 12 x 9 x 6 Zoll |
| Artikelgewicht | 4 Pfund |
| Hersteller | Nintendo of America |
8. Garantie und Support
For warranty information and technical support, please refer to the documentation included with your purchase or visit the official Nintendo support webBewahren Sie Ihren Kaufbeleg für eventuelle Garantieansprüche auf.