1. Einleitung
The Brother LS2125 is a versatile sewing machine designed for various sewing projects, from basic mending to creating garments and quilts. It features 25 built-in stitch functions, including straight, zigzag, decorative, heirloom, and quilt stitches. This machine is equipped with an automatic 4-step buttonholer and a free arm for sewing cuffs and sleeves, making it suitable for both beginners and experienced sewers.
2. Produktüberschreitungview
The Brother LS2125 sewing machine offers a range of features to assist with your sewing tasks. Key components include the stitch selector, tension dial, and a convenient work light.
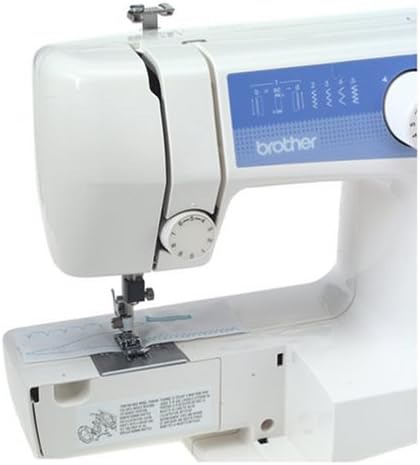
Abbildung 2.1: Front view of the Brother LS2125 sewing machine, showing the stitch selection dial and tension control.
Included with your sewing machine is a set of essential accessories to get you started and maintain your machine.
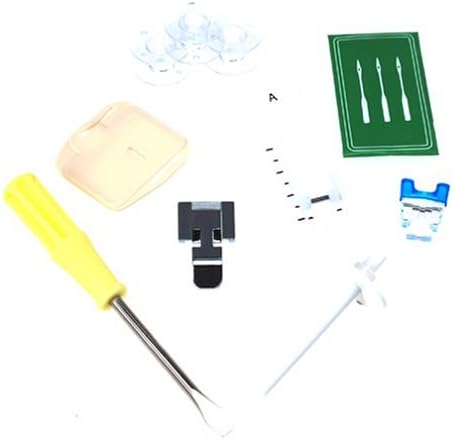
Abbildung 2.2: Included accessories such as bobbins, needles, screwdriver, and various presser feet.
Hauptmerkmale:
- 25 Built-in Stitch Functions: Includes straight, zig-zag, satin, elastic, and blind hem stitches.
- Automatic 4-Step Buttonholer: Simplifies the process of creating buttonholes.
- Auto-Set Stitch Length and Width: For simplified operation.
- Easy Threading and Quick-Set Bobbin Winding: Designed for user convenience.
- Snap-on Presser Feet: Allows for quick and easy changing of feet.
- Free Arm Capability: Converts from flat surface to free arm for sewing cuffs, sleeves, and pant legs.
- Integrierte Arbeitsleuchte: Beleuchtet den Nähbereich für bessere Sichtverhältnisse.
- Zubehöraufbewahrung: Built-in compartment for keeping tools and accessories organized.
3. Einrichtung
3.1 Auspacken und Aufstellen
- Nehmen Sie die Maschine vorsichtig aus der Verpackung.
- Stellen Sie die Maschine auf eine stabile, ebene Fläche.
- Ensure the power cord is accessible for connection to a suitable power outlet.
3.2 Stromanschluss
- Connect the power cord to the machine and then to a wall outlet.
- Turn on the power switch, usually located on the side or back of the machine. The work light should illuminate.
3.3 Aufwickeln der Spule
- Setzen Sie eine Garnrolle auf den Garnrollenstift.
- Follow the threading path for bobbin winding, typically indicated by diagrams on the machine.
- Setzen Sie eine leere Spule auf die Spulenwickelspindel.
- Push the spindle to the right to engage the bobbin winding mechanism.
- Gently press the foot controller or engage the start/stop button to wind the thread onto the bobbin.
- Once full, cut the thread and remove the bobbin.
3.4 Einfädeln des Obergewindes
- Heben Sie den Nähfußhebel an.
- Setzen Sie eine Garnrolle auf den Garnrollenstift.
- Follow the numbered threading guides on the machine, ensuring the thread passes through all tension discs and guides.
- Fädeln Sie die Nadel von vorne nach hinten ein.
3.5 Einsetzen der Spule
- Öffnen Sie die Spulenkapselabdeckung.
- Setzen Sie die aufgewickelte Spule in das Spulengehäuse ein und achten Sie darauf, dass sich der Faden in die richtige Richtung abwickelt (normalerweise gegen den Uhrzeigersinn).
- Pull the bobbin thread through the tension spring and guide.
- Schließen Sie die Spulenkapselabdeckung.
- Lower the needle to pick up the bobbin thread, then pull both threads under the presser foot and to the back.
4. Bedienungsanleitung
4.1 Auswahl eines Stichmusters
- Turn the pattern selection dial to choose one of the 25 available stitch patterns.
- The machine automatically sets the optimal stitch length and width for most patterns.
4.2 Einstellen der Fadenspannung
- The upper thread tension dial allows for fine-tuning the stitch balance.
- Adjust the dial as needed to achieve even stitches on both sides of the fabric. A balanced stitch shows threads meeting in the middle of the fabric layers.
4.3 Grundlegende Nähkenntnisse
- Legen Sie den Stoff unter den Nähfuß.
- Den Nähfußhebel absenken.
- Gently press the foot controller to begin sewing.
- To sew in reverse, press and hold the reverse lever/button.
4.4 Knopflöcher herstellen
- Befestigen Sie den Knopflochfuß.
- Select the 4-step buttonhole pattern on the dial.
- Follow the machine's markings for each of the four steps to create a perfectly sized buttonhole.
- Use the buttonhole adjusting screw for fine adjustments if necessary.
4.5 Verwendung des freien Arms
- To use the free arm, slide off the accessory storage compartment.
- This exposes the narrow free arm, ideal for sewing cylindrical items like cuffs, sleeves, and pant hems.
4.6 Wechseln der Nähfüße
- Ensure the needle is in the highest position and the power is off.
- Press the release button on the back of the presser foot holder to detach the current foot.
- Align the new snap-on presser foot with the holder and lower the presser foot lever until it snaps into place.
5. Wartung
5.1 Maschine reinigen
- Trennen Sie die Maschine immer vom Netz, bevor Sie sie reinigen.
- Verwenden Sie eine weiche Bürste, um Flusen und Staub aus dem Spulenbereich und vom Transporteur zu entfernen.
- Wischen Sie die Außenseite mit einem weichen, trockenen Tuch ab. Vermeiden Sie die Verwendung aggressiver Chemikalien.
5.2 Die Nadel wechseln
- Turn off the machine and raise the needle to its highest position.
- Lösen Sie die Nadel clamp Schraube und entfernen Sie die alte Nadel.
- Setzen Sie eine neue Nadel so ein, dass die flache Seite zur Rückseite der Maschine zeigt, und schieben Sie sie so weit wie möglich nach oben.
- Ziehen Sie die Nadel clamp fest verschrauben.
- Replace needles regularly (every 8-10 hours of sewing) or when they become dull or bent to prevent skipped stitches and fabric damage.
5.3 Zubehöraufbewahrung
- Utilize the extension table with its integrated accessory storage to keep your bobbins, needles, and presser feet organized and readily available.
6. Fehlerbehebung
This section addresses common issues you might encounter during operation. For more complex problems, refer to the full instruction manual or contact customer support.
| Problem | Mögliche Ursache | Lösung |
|---|---|---|
| Übersprungene Stiche | Incorrectly threaded needle, bent or dull needle, wrong needle type for fabric. | Re-thread the machine, replace the needle, ensure the correct needle is used. |
| Gewindebruch (oben) | Incorrect upper tension, improperly threaded, burr on needle plate, poor quality thread. | Adjust tension, re-thread, check for burrs, use good quality thread. |
| Thread Breakage (Bobbin) | Incorrectly wound bobbin, bobbin inserted incorrectly, lint in bobbin case. | Re-wind bobbin, re-insert bobbin correctly, clean bobbin case. |
| Ungleichmäßige Maschen / Schlaufenbildung | Incorrect thread tension (upper or bobbin), improper threading. | Adjust tension dials, re-thread both upper and bobbin threads. |
| Maschine startet nicht | Power cord not connected, power switch off, foot controller not connected. | Check power connections, ensure switch is on, verify foot controller connection. |
7. Spezifikationen
Below are the technical specifications for the Brother LS2125 sewing machine.

Abbildung 7.1: Dimensions of the Brother LS2125 sewing machine.
| Besonderheit | Detail |
|---|---|
| Modellnummer | LS2125 |
| Technische Daten | 17.5 x 14.2 x 7.5 Zoll (44.45 x 36.07 x 19.05 cm) |
| Artikelgewicht | 15.45 Pfund (7.01 kg) |
| Marke | Bruder |
| Farbe | Weiß |
| Material | Plastik |
| Stromquelle | Kabelgebundene Elektrik |
| UPC | 012502609773, 012502625360 |
| Hersteller | Brother International Corporation |
| Datum der ersten Verfügbarkeit | 2. Mai 2006 |
8. Garantie und Support
8.1 Eingeschränkte Garantie
The Brother LS2125 sewing machine is covered by a 25 Jahr eingeschränkte Garantie. This warranty typically covers manufacturing defects and specific components. Please refer to the warranty card included with your product for full terms and conditions, including coverage details and limitations.
8.2 Kundendienst
For technical assistance, troubleshooting beyond this manual, or warranty claims, please contact Brother customer support. You can typically find contact information on the official Brother webauf der Website oder in der mit Ihrem Gerät gelieferten Dokumentation.
- Online-Ressourcen: Besuchen Sie den offiziellen Brother-Support website for FAQs, digital manuals, and driver downloads.
- Telefonische Betreuung: Contact Brother customer service during business hours for direct assistance.
- Autorisierte Servicezentren: For repairs, locate an authorized Brother service center in your area.


