Einführung
The Yakima LoadWarrior Medium Sized Heavy Duty Steel Cargo Basket Roof Rack is designed to expand your vehicle's cargo capacity, providing a secure and durable solution for transporting gear. Built with weather-proof steel, this cargo basket offers quick installation and is compatible with most Yakima gear mounts, making it ideal for various outdoor activities and travel needs.
Produkteigenschaften
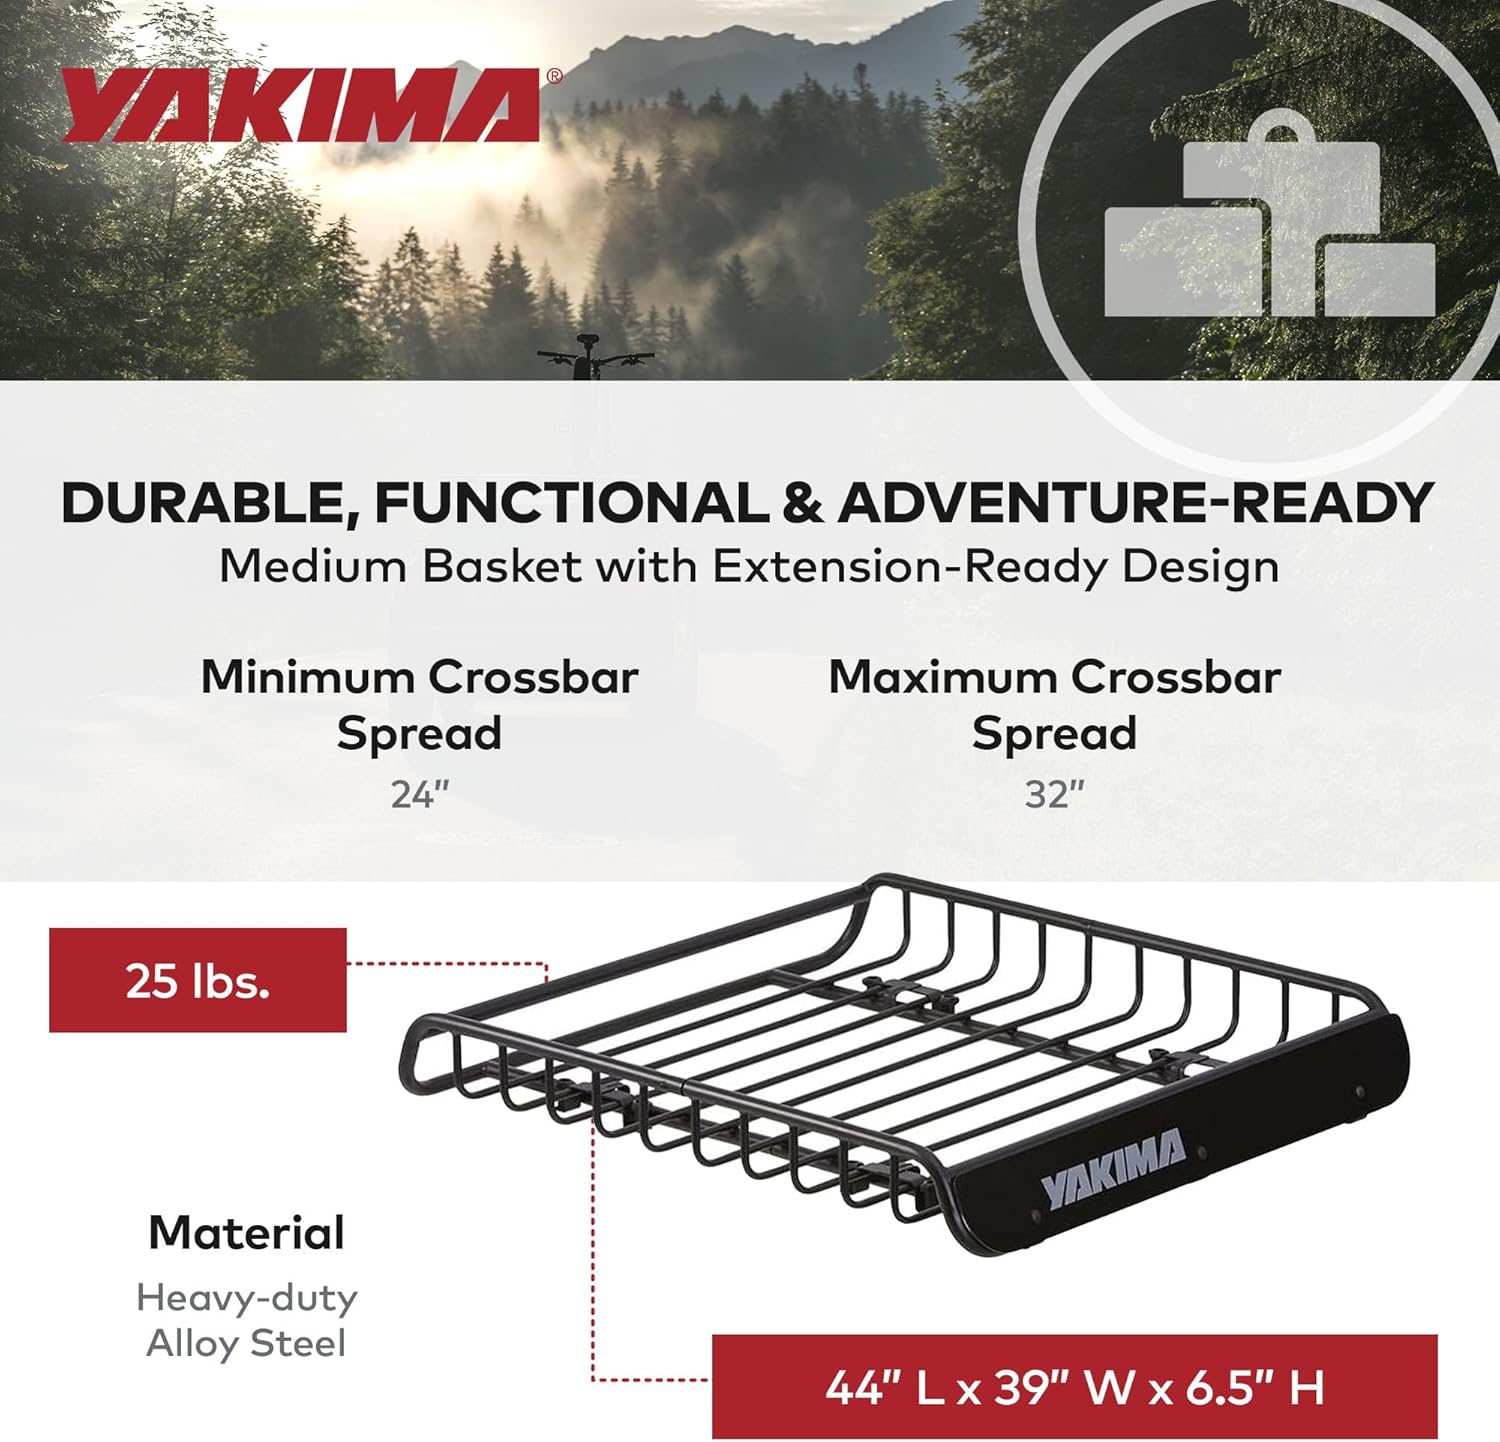
- Medium-Sized Cargo Basket: Designed for versatile use, accommodating a range of gear for various outdoor activities.
- Langlebige Konstruktion: Features weather-proof alloy steel construction for long-lasting performance and resilience against the elements.
- Custom Wind Fairing: Includes a custom wind fairing to reduce noise and improve aerodynamics during travel, ensuring a smoother ride.
- Universal Mounting Hardware: Compatible with Yakima StreamLine crossbars, as well as most factory or aerodynamic crossbars for broad vehicle compatibility.
- Einfache Installation: Designed for quick setup with minimal assembly required, allowing for efficient attachment and removal.
- Optional LoadWarrior Extension: An available extension (sold separately) can add 18 inches to the basket's length, increasing cargo capacity by 40 percent.
- SKS Locking Bracket: An SKS (Same Key System) locking bracket is sold separately for enhanced cargo security.


Lieferumfang
Your Yakima LoadWarrior cargo basket package typically includes the following components:
- LoadWarrior Cargo Basket (main sections)
- Universal Mounting Hardware (for crossbar attachment)
- Custom Wind Fairing
- Montageanleitung
Note: Optional accessories such as the LoadWarrior Extension and SKS Locking Bracket are sold separately and are not included in the standard package.
Setup und Installation
Follow these steps to properly set up and install your Yakima LoadWarrior cargo basket:
- Komponenten auspacken: Nehmen Sie alle Teile vorsichtig aus der Verpackung und überprüfen Sie, ob alle aufgeführten Komponenten vorhanden sind.
- Korbteile zusammenbauen: If your basket comes in multiple sections, connect them according to the included assembly instructions. Ensure all connections are secure.
- Montagezubehör anbringen: The universal mounting hardware is designed to fit Yakima StreamLine crossbars, as well as most factory or aerodynamic crossbars. Position the mounting clamps on your vehicle's crossbars, ensuring they are evenly spaced and aligned. The clamps are designed for tool-free installation, typically using hand-tightened knobs.
- Secure Basket to Hardware: Carefully lift the assembled cargo basket onto the mounted hardware. Align the basket with the clamps and secure it using the provided fasteners. Ensure all points are tightened firmly to prevent movement during transit.
- Install Wind Fairing: Attach the custom wind fairing to the front of the cargo basket. This component helps reduce wind noise and drag.
- Endkontrolle: Before driving, thoroughly check all mounting points and fasteners to ensure they are securely tightened. Gently push and pull on the basket in various directions to confirm it is stable and does not wobble.
For a visual guide on installation, please refer to the following video:
While for a different model, this video from Yakima provides insight into the mounting principles for cargo baskets on roof rack platforms:
Bedienungsanleitung
To ensure safe and effective use of your LoadWarrior cargo basket, follow these operating guidelines:
- Tragfähigkeit: The LoadWarrior has a maximum load capacity of 50 pounds (5E+1 Pounds). Do not exceed this weight limit to ensure safety and prevent damage to your vehicle or the cargo basket.
- Gewichtsverteilung: Distribute the weight of your cargo evenly across the basket. Place heavier items in the center and lower sections to maintain vehicle stability.
- Fracht sichern: Always use appropriate cargo nets, straps, or tie-downs (not included) to securely fasten all items within the basket. Ensure no items can shift, fall out, or obstruct your view während der Fahrt.
- Freigabe prüfen: Be aware of the increased height of your vehicle with the cargo basket and loaded items. Check for overhead clearances, especially in garages, carports, drive-thrus, and low-hanging structures.
- Hinweise zum Fahren: Adjust your driving habits when carrying a loaded cargo basket. Reduce speed, especially in windy conditions or on rough terrain, and allow for increased braking distance.
- Optional Extension: If using the optional LoadWarrior Extension, ensure it is securely installed according to its instructions. This extension increases cargo capacity by 40 percent.

Wartung
Regular maintenance will prolong the life and ensure the safe operation of your Yakima LoadWarrior cargo basket:
- Reinigung: Clean the cargo basket regularly with mild soap and water. Rinse thoroughly and dry to prevent water spots and maintain the finish. The weather-proof steel construction is designed to resist corrosion, but regular cleaning helps.
- Befestigungselemente prüfen: Periodically check all mounting hardware, bolts, and connections for tightness. Vibrations from driving can sometimes loosen fasteners. Re-tighten as necessary.
- Auf Schäden prüfen: Inspect the basket for any signs of damage, such as bends, cracks, or excessive wear. If any damage is found, discontinue use and contact Yakima support for assistance.
- Lagerung: If removing the basket for storage, clean it thoroughly and store it in a dry place away from direct sunlight and extreme temperatures.
Fehlerbehebung
Hier sind einige häufige Probleme und ihre Lösungen:
- Übermäßige Windgeräusche:
- Ensure the custom wind fairing is correctly installed and securely attached to the front of the basket.
- Check that cargo is not protruding excessively or creating additional drag. Adjust cargo placement if needed.
- Basket Feels Loose or Wobbly:
- Re-check and fully tighten all universal mounting hardware and fasteners connecting the basket to your vehicle's crossbars.
- Ensure the crossbars themselves are securely attached to your vehicle's roof.
- Difficulty Installing Mounting Hardware:
- Verify that your vehicle's crossbars are compatible with the universal mounting hardware.
- Refer to the detailed installation steps and video provided in the Setup and Installation section.
Technische Daten
| Marke | Yakima |
| Modellname | 8007070 |
| Material | Legierter Stahl |
| Artikelabmessungen (L x B x H) | 40 x 39 x 6.5 Zoll |
| Artikelgewicht | 25 Pfund |
| Tragfähigkeit | 50 Pfund |
| Montagetyp | Power Grip (Universal Fit) |
| Farbe | One Color (Black) |
Garantie und Support
The Yakima LoadWarrior Medium Cargo Basket is covered by a Eingeschränkte Garantie. For specific details regarding warranty coverage, terms, and conditions, please refer to the warranty documentation included with your product or visit the official Yakima webWebsite.
For technical support, troubleshooting assistance, or to inquire about replacement parts, please contact Yakima customer service through their official channels. Ensure you have your product model number (8007070) and proof of purchase available when contacting support.


