1. Einleitung
The Atlas Sound AA120 is a 120-watt, six-input mixer amplifier designed for commercial audio applications. It features five microphone/line inputs with phantom power, one stereo summing auxiliary input, and versatile output options including 8-ohm, 25V, 70V, and 100V speaker outputs. This manual provides detailed instructions for the proper installation, operation, and maintenance of your AA120 mixer ampschwerer.
2. Wichtige Sicherheitshinweise
- Anweisungen lesen: Lesen und verstehen Sie alle Sicherheits- und Bedienungsanweisungen, bevor Sie dieses Produkt verwenden.
- Anweisungen aufbewahren: Bewahren Sie diese Anleitung zum späteren Nachschlagen auf.
- Warnungen beachten: Beachten Sie alle Warnhinweise auf dem Produkt und in der Bedienungsanleitung.
- Folgen Sie den Anweisungen: Befolgen Sie alle Bedienungs- und Nutzungsanweisungen.
- Wasser und Feuchtigkeit: Verwenden Sie dieses Gerät nicht in der Nähe von Wasser.
- Reinigung: Nur mit trockenem Tuch reinigen.
- Belüftung: Do not block any ventilation openings. Install in accordance with the manufacturer's instructions. Ensure adequate airflow around the unit.
- Hitze: Installieren Sie das Gerät nicht in der Nähe von Wärmequellen wie Heizkörpern, Heizregistern, Öfen oder anderen Geräten (einschließlich ampKonverter (Lüfter), die Wärme erzeugen.
- Netzkabelschutz: Schützen Sie das Netzkabel vor Beschädigungen oder Beschädigungen durch Fußgänger, insbesondere an den Steckern, Steckdosen und an der Stelle, an der es aus dem Gerät austritt.
- Wartung: Überlassen Sie alle Wartungsarbeiten qualifiziertem Servicepersonal. Eine Wartung ist erforderlich, wenn das Gerät auf irgendeine Weise beschädigt wurde, z. B. wenn das Netzkabel oder der Stecker beschädigt sind, Flüssigkeit in das Gerät verschüttet wurde oder Gegenstände hineingefallen sind, das Gerät Regen oder Feuchtigkeit ausgesetzt war, nicht normal funktioniert oder fallengelassen wurde.
3. Rückwand überview
The rear panel of the Atlas Sound AA120 provides all necessary connections for power, inputs, and speaker outputs. Familiarize yourself with these connections before installation.
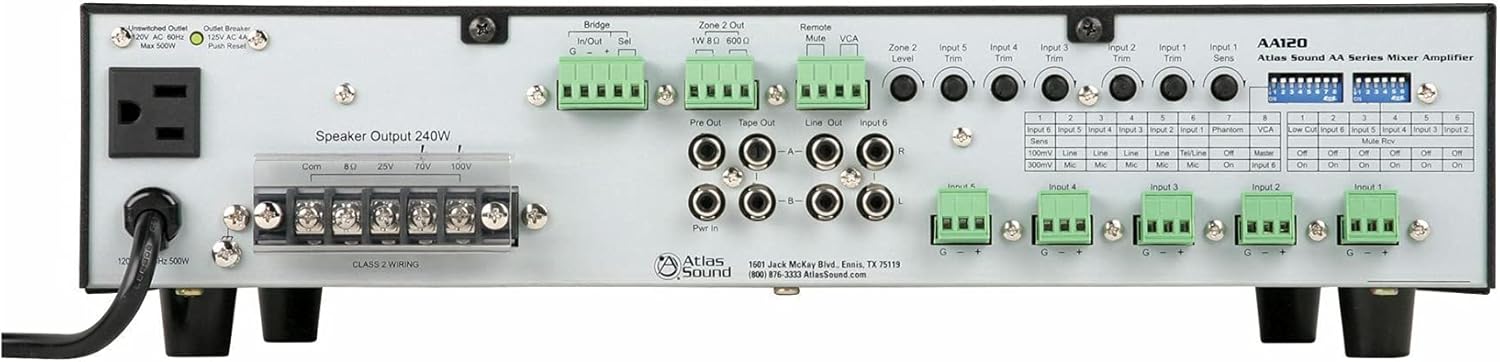
Figure 1: Rear Panel of the Atlas Sound AA120 Mixer Ampschwerer
Komponenten auf der Rückseite:
- Unswitched Outlet (120V AC 60Hz, Max 500W): A convenience outlet for powering external equipment.
- Outlet Breaker (125V AC 4A, Push Reset): A resettable circuit breaker for the unswitched outlet. Press to reset if tripped.
- Speaker Output 240W (Com, 8Ω, 25V, 70V, 100V): Terminal block for connecting speakers. Supports common, 8-ohm, 25-volt, 70-volt, and 100-volt speaker systems. Ensure Class 2 wiring is used.
- Bridge In/Out (G, -, +): Terminals for linking multiple amplifiers or integrating with external processing. 'Sel' switch selects bridging mode.
- Zone 2 Out (1W 8Ω, 600Ω): Output for a secondary audio zone, providing 1W at 8 ohms or a 600-ohm line level output.
- Remote Mute: Terminals for connecting an external remote mute switch.
- VCA (Bdtage Kontrolliert Amplifizierer): Terminals for external VCA control.
- Pre Out / Tape Out / Line Out / Input 6 (RCA): RCA jacks for pre-amplifier output, tape recording output, general line output, and stereo auxiliary input (Input 6).
- Pwr In (RCA): RCA jacks for power amplifier input, allowing external pre-amplifiers to drive the AA120's power section.
- Input Trim Controls (Input 1-5, Zone 2 Level): Rotary potentiometers for adjusting the input sensitivity of individual channels and the output level of Zone 2.
- Input 1-5 Terminal Blocks (G, -, +): Balanced input terminals for microphone or line-level sources.
- Dip-Schalter: A bank of switches for configuring various amplifier functions, including input sensitivity, phantom power, VCA assignment, low-cut filter, and mute reverse.
4. Einrichtung und Installation
4.1 Auspacken
Carefully remove the AA120 from its packaging. Inspect the unit for any signs of damage that may have occurred during transit. Retain the packaging for future transport or storage.
4.2 Platzierung
Platzieren Sie die amplifier in a location that allows for adequate ventilation. Avoid placing it near heat sources or in direct sunlight. Ensure the unit is on a stable, level surface. Do not obstruct the ventilation openings.
4.3 Stromanschluss
Schließen Sie das mitgelieferte Netzkabel an das Gerät an. amplifier's power inlet and then to a grounded 120V AC, 60Hz power outlet. The unswitched outlet on the rear panel can provide power to other equipment, up to a maximum of 500W. If this outlet's breaker trips, press the 'Push Reset' button to restore power.
4.4 Lautsprecheranschlüsse
The AA120 supports various speaker configurations. Connect your speakers to the 'Speaker Output 240W' terminal block. Ensure proper polarity and impedance matching.
- 8 Ohm: For direct connection to low-impedance speakers.
- 25V, 70V, 100V: Für konstante Voltage distributed speaker systems. Connect the common (Com) terminal to the negative speaker wire and the appropriate voltage terminal (25V, 70V, or 100V) to the positive speaker wire.
Notiz: Stellen Sie immer sicher, dass amplifier is powered off before making or changing speaker connections. Use Class 2 wiring for speaker connections.
4.5 Eingangsverbindungen
The AA120 offers six input channels:
- Inputs 1-5 (Balanced Terminal Blocks): These inputs accept either microphone or line-level signals. Connect balanced audio cables to the G (ground), - (negative), and + (positive) terminals.
- Input 6 (Stereo RCA): This input is designed for stereo line-level sources such as CD players or media players. The stereo signal is summed to mono internally.
4.6 Konfiguration der DIP-Schalter
The DIP switches on the rear panel allow for fine-tuning of input characteristics and other functions. Refer to the table below for their functions:
| Schalter Nr. | Funktion | AUS-Einstellung | ON-Einstellung |
|---|---|---|---|
| Input 6 Sens (1) | Input 6 Sensitivity | 100mV Line | 300mV Mic |
| Input 5 Sens (2) | Input 5 Sensitivity | Linie | Mikrofon |
| Input 4 Sens (3) | Input 4 Sensitivity | Linie | Mikrofon |
| Input 3 Sens (4) | Input 3 Sensitivity | Linie | Mikrofon |
| Input 2 Sens (5) | Input 2 Sensitivity | Linie | Mikrofon |
| Input 1 Sens (6) | Input 1 Sensitivity | Tel/Line | Mikrofon |
| Phantom (7) | Phantom Power | Aus | On |
| VCA (8) | VCA Control Assignment | Master | Eingabe 6 |
| Low Cut (1) | Low-Cut-Filter | Aus | On |
| Input 6 Mute Rev (2) | Input 6 Mute Reverse | Aus | On |
| Input 5 Mute Rev (3) | Input 5 Mute Reverse | Aus | On |
| Input 4 Mute Rev (4) | Input 4 Mute Reverse | Aus | On |
| Input 3 Mute Rev (5) | Input 3 Mute Reverse | Aus | On |
| Input 2 Mute Rev (6) | Input 2 Mute Reverse | Aus | On |
| Input 1 Mute Rev (7) | Input 1 Mute Reverse | Aus | On |
Wichtig: Schalten Sie immer das amplifier before changing DIP switch settings to prevent potential damage or unexpected behavior.
5. Bedienungsanleitung
5.1 Ein-/Ausschalten
Zum Einschalten des amplifier, ensure all connections are secure, then press the power switch located on the front panel (not visible in rear panel image, but standard). To power off, press the switch again.
5.2 Anpassen der Eingangspegel
Use the 'Input Trim' rotary controls on the rear panel for Inputs 1-5 to adjust the sensitivity of each input channel. This allows you to match the input level of your source device to the amplifier. For Input 6, adjust the source device's output level or use the VCA control if assigned.
5.3 Gesamtlautstärkeregler
The master volume control (typically on the front panel, not shown in rear image) adjusts the overall output level of the amplifier. Start with the master volume at a low setting and gradually increase it to the desired listening level.
5.4 Mute Functions
The AA120 supports remote or VOX (Voice Operated Switch) mute capabilities. The 'Remote Mute' terminals allow for an external switch to mute the audio. The 'Mute Rev' DIP switches (1-7) allow you to reverse the mute logic for individual inputs, useful for paging systems where other audio is muted when a microphone is active.
5.5 Zone 2 Operation
The 'Zone 2 Out' provides a separate audio output. The 'Zone 2 Level' control adjusts the output level for this zone. This can be used for a separate listening area or to feed another ampschwerer.
5.6 Low-Cut-Filter
The low-cut filter (6 dB per octave at 400 Hz) can be engaged via the DIP switch. This filter is particularly useful when using paging horns, as it helps to reduce low-frequency content that can cause distortion or reduce intelligibility in such speakers.
6. Wartung
6.1 Reinigung
Zum Reinigen des amplifier, disconnect it from the power source. Use a soft, dry cloth to wipe down the exterior. Do not use liquid cleaners or aerosol sprays, as they may damage the finish or internal components.
6.2 Belüftung
Periodically check that the ventilation openings are clear of dust and debris. Proper airflow is crucial for preventing overheating and ensuring the longevity of the ampschwerer.
7. Fehlerbehebung
If you encounter issues with your AA120, refer to the following common problems and solutions:
- Kein Strom:
- Stellen Sie sicher, dass das Netzkabel fest mit beiden Geräten verbunden ist. ampVerstärker und eine funktionierende Steckdose.
- Check the main circuit breaker for your building.
- If using the unswitched outlet, check its dedicated 'Outlet Breaker' and press 'Push Reset' if tripped.
- Kein Ton:
- Verify that speakers are correctly connected to the appropriate output terminals (Com, 8Ω, 25V, 70V, or 100V).
- Check all input connections and ensure source devices are playing audio.
- Ensure input trim controls and master volume are set to audible levels.
- Check DIP switch settings for mute functions; ensure no inputs are inadvertently muted.
- Verzerrter Klang:
- Reduce input trim levels if the input signal is too strong.
- Stellen Sie sicher, dass die Lautsprecherimpedanz mit der amplifier output (e.g., 8Ω speakers to 8Ω terminal).
- Check speaker wiring for shorts or loose connections.
If the problem persists after attempting these troubleshooting steps, contact Atlas Sound customer support for assistance.
8. Spezifikationen
| Besonderheit | Spezifikation |
|---|---|
| Leistungsabgabe | 120W at 8 ohms, 25V, or 70V |
| Speaker Output Capability | Up to 240W total (Com, 8Ω, 25V, 70V, 100V) |
| Kanäle | 1 |
| Eingänge | 5 Mic/Line inputs (with Phantom power), 1 Stereo Summing Aux input |
| Mute Capabilities | Remote or VOX mute |
| Low-Cut-Filter | 6 dB per octave at 400 Hz (selectable) |
| Bridge Circuit | In/Out with balanced link/internal relay |
| VCA Control | Assignable to Input 6 (BGM) or global mix bus |
| Pre Out/Power Amp In | For external processors |
| Technische Daten | 16.75"W x 4.25"H x 14.25"D (42.55 x 10.8 x 36.2 cm) |
| Artikelgewicht | 26.4 kg |
| Strombedarf | 120V AC, 60Hz |
9. Garantie und Support
9.1 Garantieinformationen
Atlas Sound products are manufactured to high standards and are backed by a limited warranty. For specific warranty terms and conditions, please refer to the warranty card included with your product or visit the official Atlas Sound webBewahren Sie Ihren Kaufbeleg für Garantieansprüche auf.
9.2 Kundendienst
For technical assistance, service, or replacement parts, please contact Atlas Sound customer support:
- Adresse: 1601 Jack McKay Blvd., Ennis, TX 75119, USA
- Telefon: (800) 876-3333
- WebWebsite: AtlasSound.com


