1. Einleitung
Thank you for choosing the Progress Lighting P8072-28 Recessed Trim. This incandescent open splay recessed trim features a white powdercoat finish and is designed for use with insulated ceilings. It has a 7-3/4 inch outside diameter and is intended for use with compatible Progress 6-inch recessed lighting housings (P87, P187, P83, P88, P82). Please read these instructions carefully before installation and use to ensure proper function and safety.

Abbildung 1.1: Vorderseite view of the P8072-28 Recessed Trim with an incandescent bulb installed.
2. Sicherheitshinweise
WARNUNG: Risk of electric shock. Disconnect power at the fuse box or circuit breaker before installation or servicing. All electrical connections must be in accordance with local codes, ordinances, or the National Electric Code (NEC). Consult a qualified electrician if you are unfamiliar with proper electrical wiring connections.
- Do not install this trim with non-compatible recessed housings. Compatibility is specified for Progress 6-inch recessed housings (P87, P187, P83, P88, P82).
- Refer to the housing's specifications for maximum wattage. This trim is rated for up to 250 watts at 120 volts.
- Stellen Sie sicher, dass alle Verbindungen sicher und ordnungsgemäß isoliert sind.
- Nehmen Sie keinerlei Änderungen am Produkt vor.
3. Komponentenliste
Vergewissern Sie sich vor Beginn der Installation, dass alle Komponenten vorhanden sind:
- P8072-28 Recessed Trim (1 unit)
- Product and Installation Sheet (this document)
Note: Recessed housing and incandescent bulb are sold separately.
4. Einrichtung und Installation
This trim is designed for easy installation into compatible 6-inch recessed housings. The trim mounts to the can with a 2-inch by 7-inch leaf spring mechanism, which pulls the trim tightly to the ceiling.
- Strom ausschalten: Before starting, ensure the power to the circuit is turned off at the circuit breaker or fuse box.
- Prepare Housing: Ensure the recessed housing (e.g., P87, P187) is properly installed in the ceiling according to its own instruction manual.
- Sockel anbringen: Die lamp socket from the recessed housing attaches directly to the trim. This eliminates the need for an adjustable socket mount within the housing. Secure the socket to the designated attachment point on the trim.
- Glühbirne einbauen: Screw the appropriate incandescent bulb (up to 250W) into the socket.
- Insert Trim: Carefully push the trim assembly, with the bulb and socket attached, into the recessed housing opening. The leaf springs on the trim will compress and then expand to firmly hold the trim against the ceiling. Apply firm, even pressure until the trim is flush with the ceiling surface.
- Strom wiederherstellen: Once the trim is securely in place, restore power at the circuit breaker or fuse box and test the light.

Abbildung 4.1: Draufsicht view of the P8072-28 Recessed Trim, illustrating the open splay design.
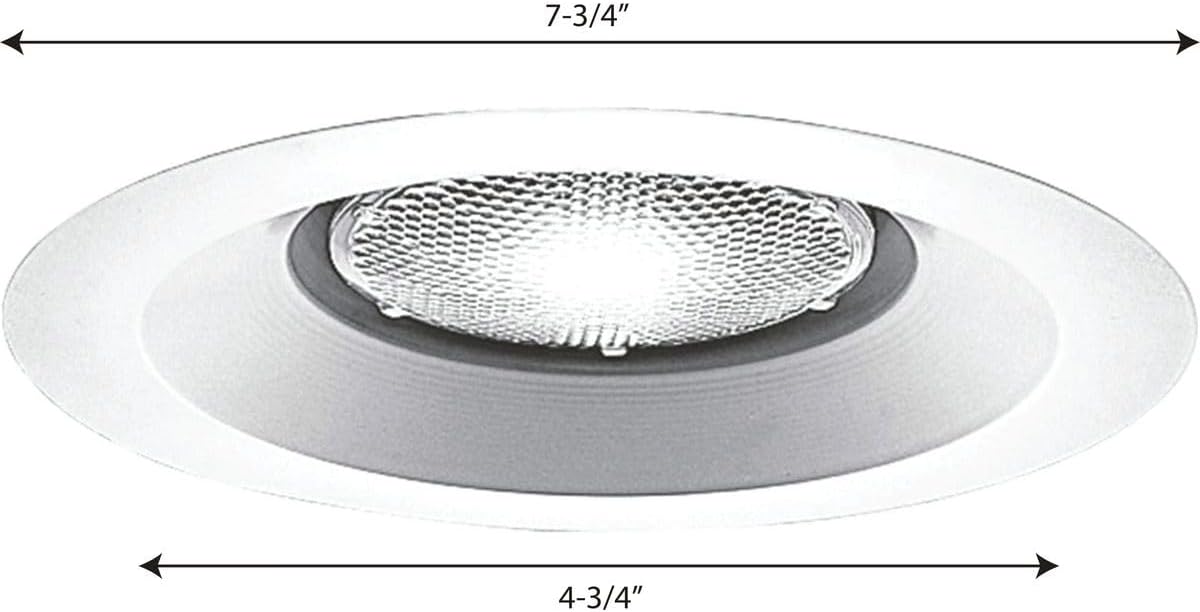
Figure 4.2: Dimensions of the P8072-28 Recessed Trim, showing a 7-3/4 inch outside diameter.
5. Bedienungsanleitung
The P8072-28 Recessed Trim operates in conjunction with your installed recessed housing and a compatible incandescent bulb. Operation is controlled via a standard wall switch connected to the lighting circuit.
- Stellen Sie sicher, dass das Wasser richtig isttage bulb (up to 250W) is installed.
- Benutzen Sie den Wandschalter, um die Leuchte ein- oder auszuschalten.
6. Wartung
The P8072-28 Recessed Trim requires minimal maintenance.
- Reinigung: To clean the trim, ensure power is off. Wipe with a soft, dry or slightly damp Tuch. Verwenden Sie keine Scheuermittel oder Lösungsmittel, da diese die Oberfläche beschädigen können.
- Lampenwechsel: Turn off power at the circuit breaker. Carefully pull the trim down from the ceiling to access the bulb. Unscrew the old bulb and screw in a new one of the correct type and wattage. Reinsert the trim firmly into the housing.
7. Fehlerbehebung
| Problem | Mögliche Ursache | Lösung |
|---|---|---|
| Licht geht nicht an. | Kein Strom am Gerät. Die Glühbirne ist locker oder durchgebrannt. Falsche Verkabelung. | Leistungsschalter/Sicherung prüfen. Glühlampe anziehen oder ersetzen. Lassen Sie die Verkabelung von einem qualifizierten Elektriker überprüfen. |
| Trim does not sit flush with ceiling. | Improper installation of leaf springs. Housing not properly installed. | Ensure leaf springs are fully engaged. Verify housing installation according to its manual. |
| Licht flackert. | Lose Glühbirne. Inkompatibler Dimmerschalter. Problem mit der Verkabelung. | Glühbirne festziehen. Ensure dimmer is compatible with incandescent lights. Wenden Sie sich an einen qualifizierten Elektriker. |
8. Spezifikationen
| Besonderheit | Detail |
|---|---|
| Modellnummer | P8072-28 |
| Marke | Fortschritt Beleuchtung |
| Typ | Recessed Trim (Open Splay) |
| Farbe | Weiß |
| Material | Aluminium |
| Außendurchmesser | 7-3/4 Zoll (19.69 cm) |
| Produktabmessungen (L x B x H) | 7.75" x 7.75" x 4.75" (19.69 cm x 19.69 cm x 12.07 cm) |
| Artikelgewicht | 5.9 Unzen (167 Gramm) |
| Bandtage | 120 Volt |
| Maximal Watttage | 250 Watt (Glühlampe) |
| Stromquelle | Kabelgebundene Elektrik |
| Verwendung im Innen- und Außenbereich | Innenbereich |
| Kompatible Gehäuse | Progress 6-inch recessed housings (P87, P187, P83, P88, P82) |
| UPC | 785247807222 |
9. Garantieinformationen
This Progress Lighting P8072-28 Recessed Trim comes with a 1 Jahr eingeschränkte Garantie from the date of purchase. This warranty covers defects in materials and workmanship under normal use. It does not cover damage resulting from improper installation, accident, misuse, abuse, or unauthorized modification. For warranty claims, please retain your proof of purchase and contact Progress Lighting customer support.
10. Unterstützung und Kontakt
For technical assistance, troubleshooting not covered in this manual, or warranty inquiries, please contact Progress Lighting customer support. Visit the official Progress Lighting webDie aktuellsten Kontaktinformationen finden Sie auf dieser Webseite.
Progress Lighting Official WebWebsite: Besuchen Sie den Progress Lighting Store auf Amazon.


