1. Einleitung
Thank you for choosing the Craftsman Digital 400A AC Clamp-On Ammeter, Model 82372. This instrument is designed for safe and accurate measurement of AC current without breaking the circuit, as well as AC/DC voltage, resistance, frequency, capacitance, continuity, diode, and temperature. Please read this manual thoroughly before use to ensure proper operation and to prevent potential hazards.
2. Sicherheitshinweise
WARNUNG: Um Stromschläge oder Verletzungen zu vermeiden, lesen und verstehen Sie alle Sicherheitshinweise, bevor Sie dieses Messgerät verwenden.
- Halten Sie sich stets an die örtlichen und nationalen Sicherheitsvorschriften.
- Verwenden Sie das Messgerät nicht, wenn es beschädigt erscheint oder die Messleitungen beschädigt sind.
- Nicht mehr als die angegebene Menge auftragen.tage) wie auf dem Messgerät markiert, zwischen den Klemmen oder zwischen einer beliebigen Klemme und der Erdung.
- Seien Sie vorsichtig beim Arbeiten mit VolumentagEs liegt über 30 V AC RMS, 42 V Spitze oder 60 V DC. Diese SpannungentagEs besteht die Gefahr eines Stromschlags.
- Halten Sie Ihre Finger während der Messungen hinter den Fingerschutzkappen an den Messleitungen.
- Betreiben Sie das Messgerät nicht in der Nähe von explosiven Gasen, Dämpfen oder Staub.
- Before measuring current, ensure the meter is set to the correct function and range.
- Vor Funktionsänderungen die Messleitungen vom Stromkreis trennen.
- Tauschen Sie die Batterie sofort aus, wenn die Anzeige für niedrigen Batteriestand erscheint.
- This meter is rated for Category III - 600V.
3. Produktüberschreitungview
The Craftsman Digital 400A AC Clamp-On Ammeter features a compact design for measurements in tight locations and an extra-large 4000 count LCD screen for clear readings.
3.1 Meter Components

Figure 1: Top Section of the Ammeter
This image displays the upper portion of the Craftsman Digital 400A AC Clamp-On Ammeter. Visible components include the clamp jaw for non-contact current measurement, the rotary function dial with settings for AC current (2A, 20A, 200A, 400A), resistance (Ω), DC voltage (VDC), AC voltage (VAC), and OFF. The yellow 'MAX' button and 'HOLD' button are also shown, along with the 'AUTO POWER OFF' indicator.
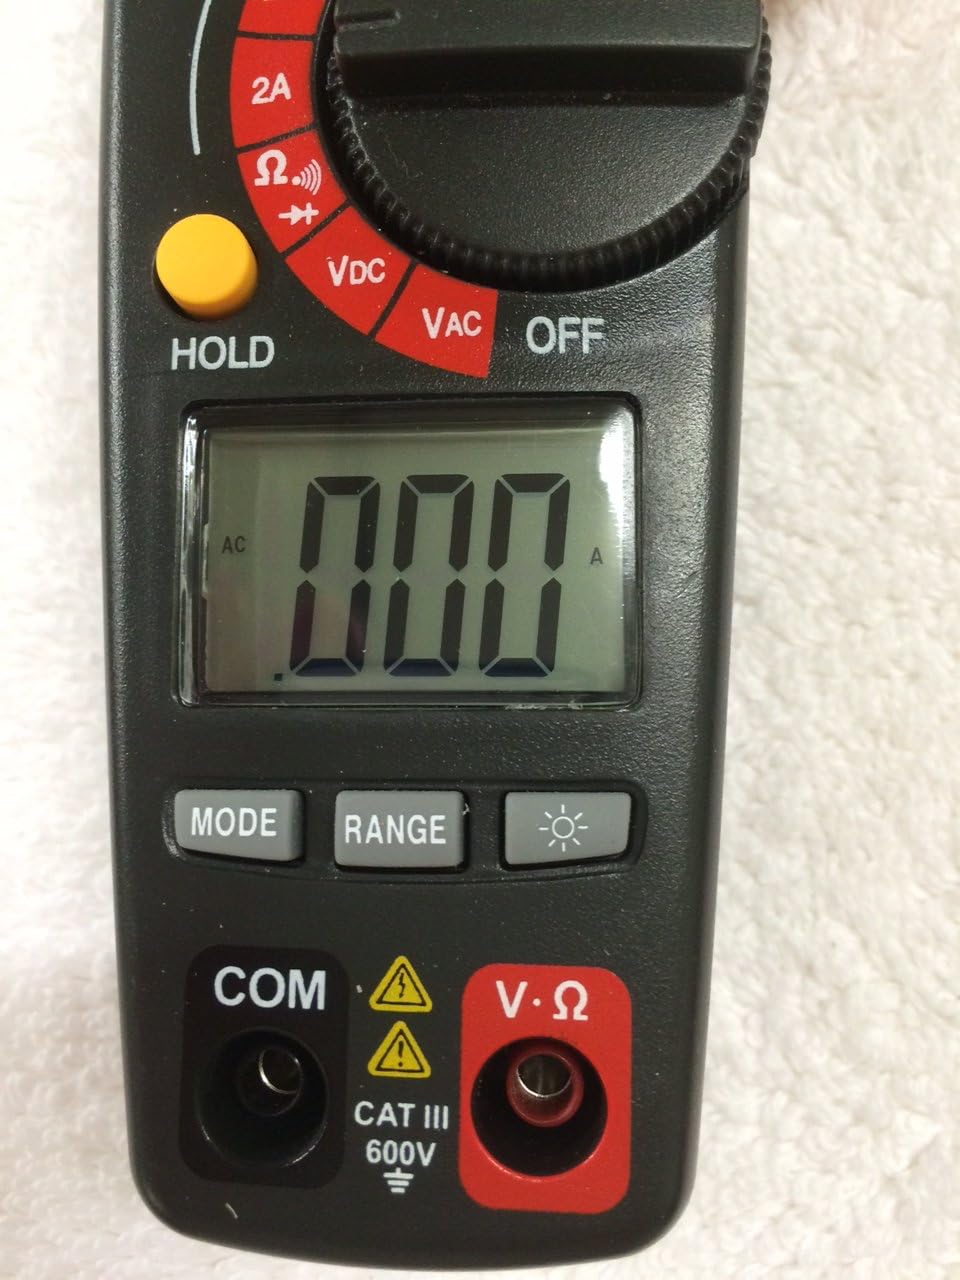
Figure 2: Bottom Section of the Ammeter
This image shows the lower part of the Craftsman Digital 400A AC Clamp-On Ammeter. Key features include the large LCD display, the 'MODE' button, 'RANGE' button, and the backlight button (indicated by a light bulb icon). Below the display are the input jacks: 'COM' (common) and 'V·Ω' (voltage/resistance) with a CAT III 600V safety rating warning.
- Clamp Kiefer: Used for non-contact AC current measurements.
- Funktionsrad: Selects the desired measurement function (AC Current, Voltage, Resistance, etc.) and turns the meter ON/OFF.
- LCD Anzeige: Zeigt Messwerte, Einheiten und Funktionsindikatoren an.
- MAX-Taste: Toggles between maximum value hold and normal operation.
- Halte den Knopf: Friert den aktuellen Messwert auf dem Display ein.
- MODE-Taste: Selects between different functions within a dial setting (e.g., AC/DC voltage, continuity/diode).
- BEREICH-Taste: Manually selects measurement range or returns to auto-ranging.
- Taste für Hintergrundbeleuchtung: Aktiviert die Display-Hintergrundbeleuchtung für bessere Sichtbarkeit bei schwachem Licht.
- Input Jacks (COM, V·Ω): Zum Anschließen von Messleitungen für Voltage, Widerstands-, Durchgangs-, Dioden-, Kapazitäts- und Frequenzmessungen.
4. Einrichtung
4.1 Einlegen der Batterie
Das Messgerät benötigt Batterien für den Betrieb. So legen Sie die Batterien ein oder tauschen sie aus:
- Ensure the meter is OFF and disconnect any test leads.
- Suchen Sie den Batteriefachdeckel auf der Rückseite des Messgeräts.
- Die Befestigungsschraube(n) lösen und die Abdeckung abnehmen.
- Neue Batterien unter Beachtung der richtigen Polarität (+ und -) einlegen.
- Bringen Sie die Abdeckung des Batteriefachs wieder an und befestigen Sie sie mit der/den Schraube(n).
Note: The meter features auto power off to conserve battery life.
5. Bedienungsanleitung
Before taking any measurements, ensure the meter is in good condition and the test leads are properly connected (if applicable).
5.1 Measuring AC Current (Clamp Funktion)
This function allows non-contact measurement of AC current up to 400A.
- Turn the function dial to the desired AC current range (2A, 20A, 200A, or 400A).
- Drücken Sie die Tasteamp Auslöser zum Öffnen des Schlossesamp Kiefer.
- Schließen Sie einen einzelnen Leiter (nicht ein Drahtbündel) in den Anschluss ein.amp Kiefer. Stellen Sie sicher, dass der Kiefer vollständig geschlossen ist.
- Lesen Sie den Wechselstromwert auf dem LCD-Display ab.
Note: For accurate readings, ensure only one conductor is inside the clamp Kiefer.
5.2 Messen von AC/DC-Voltage
The meter measures AC/DC voltage bis 600V.
- Insert the black test lead into the COM jack and the red test lead into the V·Ω jack.
- Turn the function dial to the VDC or VAC position.
- If measuring DC voltage, press the MODE button to select DC if necessary.
- Schließen Sie die Messspitzen an den zu messenden Stromkreis oder das zu messende Bauteil an.
- Lesen Sie den Bandtage-Wert auf dem LCD-Display.
5.3 Widerstandsmessung (Ω)
Measures resistance in Ohms (Ω).
- Insert the black test lead into the COM jack and the red test lead into the V·Ω jack.
- Drehen Sie den Funktionswähler auf die Position Ω.
- Vor der Widerstandsmessung muss sichergestellt werden, dass der Stromkreis oder das Bauteil spannungsfrei ist.
- Verbinden Sie die Testsonden mit dem Bauteil.
- Lesen Sie den Widerstandswert auf dem LCD-Display ab.
5.4 Durchgangs- und Diodenprüfung
These functions are typically accessed via the Ω setting using the MODE button.
- Insert the black test lead into the COM jack and the red test lead into the V·Ω jack.
- Drehen Sie den Funktionswähler auf die Position Ω.
- Press the MODE button repeatedly until the continuity symbol (a speaker icon) or diode symbol (a triangle with a line) appears on the display.
- For continuity: Connect probes across the circuit. A continuous beep indicates a complete circuit.
- For diode: Connect probes across the diode. A forward bias voltage drop will be displayed. Reverse bias should show OL (open loop).
5.5 Measuring Frequency and Capacitance
The meter supports frequency and capacitance measurements, typically accessed through the V·Ω input and MODE button.
- Insert the black test lead into the COM jack and the red test lead into the V·Ω jack.
- Turn the function dial to the appropriate setting (often shared with voltage or resistance, requiring MODE selection).
- Press the MODE button until the frequency (Hz) or capacitance (F) symbol appears.
- Connect the test probes to the circuit or component.
- Lesen Sie den Wert auf dem LCD-Display ab.
5.6 Temperature Measurement (Type K Thermometer)
The meter includes a Type K thermometer for surface or air temperature measurements.
- Ensure the meter is OFF and disconnect any test leads.
- Insert the Type K thermocouple probe into the designated input jacks (usually marked with 'TEMP' or shared with V·Ω, check meter markings).
- Turn the function dial to the temperature setting (often marked with °C or °F).
- Platzieren Sie die Spitze des Thermoelements auf oder in der Nähe des Objekts, dessen Temperatur gemessen werden soll.
- Lesen Sie die Temperatur auf dem LCD-Display ab.
5.7 Data Hold and Max Hold
- Halte den Knopf: Drücken Sie die HOLD-Taste, um den aktuellen Messwert auf dem Display einzufrieren. Drücken Sie sie erneut, um die Anzeige wieder freizugeben.
- MAX-Taste: Press the MAX button to capture and display the maximum measured value. Press again to exit MAX hold.
6. Wartung
6.1 Reinigung
Den Zähler mit Werbung abwischenamp cloth and mild detergent. Do not use abrasives or solvents. Keep the clamp Kiefer frei von Staub und Schmutz.
6.2 Batteriewechsel
Refer to Section 4.1 for battery installation/replacement instructions. Replace batteries when the low battery indicator appears on the display to ensure accurate readings.
6.3 Speicherung
If the meter is not used for an extended period, remove the batteries to prevent leakage. Store the meter in a cool, dry place away from direct sunlight.
7. Fehlerbehebung
| Problem | Mögliche Ursache | Lösung |
|---|---|---|
| Der Zähler schaltet sich nicht ein. | Defekte oder falsch eingesetzte Batterien. | Batteriepolarität prüfen; Batterien austauschen. |
| „OL“ (Überlastung) wird angezeigt. | Die Messung überschreitet den gewählten Messbereich oder die maximale Kapazität des Messgeräts. | Select a higher range or ensure measurement is within meter's specifications. |
| Ungenaue Messwerte. | Low battery, incorrect function/range, poor test lead connection, external interference. | Replace batteries, verify function/range, ensure secure connections, move away from strong magnetic fields. |
| No reading for AC current. | Mehrere Leiter in einemamp jaw, DC current being measured. | Ensure only one AC conductor is in the clamp. This meter measures AC current only. |
8. Spezifikationen
| Besonderheit | Spezifikation |
|---|---|
| Marke | Handwerker |
| Modell | 82372 |
| Messtyp | Ammeter (Clamp-An) |
| Wechselstrombereich | Bis zu 400A |
| AC/DC-Voltage Reichweite | Bis zu 600V |
| Widerstand | Ja |
| Frequenz | Ja |
| Kapazität | Ja |
| Durchgangsprüfung | Ja |
| Diodentest | Ja |
| Temperaturmessung | Typ-K-Thermometer |
| Anzeige | 4000 Count LCD |
| Accuracy (AC Current) | 3.0% (VAC) - Note: Product description states 3.0% (VAC) for AC/DC current, which is unusual. Assuming it refers to AC current accuracy. |
| Sicherheitsbewertung | Category III - 600V |
| Stromquelle | Batteriebetrieben |
| Besondere Merkmale | One-touch auto zero, belt holster, molded rubber holster, auto on/off, Data Hold, Max Hold. |
9. Garantie und Support
For warranty information and technical support, please refer to the official Craftsman webBesuchen Sie die Website oder kontaktieren Sie den Kundenservice. Bewahren Sie Ihren Kaufbeleg als Kaufnachweis für eventuelle Garantieansprüche auf.
Craftsman Customer Service: Besuchen Sie www.craftsman.com/support Für aktuelle Supportinformationen und Kontaktdaten.


