1. Einleitung
This manual provides comprehensive instructions for the installation, operation, and maintenance of your Jensen AWM965 AM/FM|CD|DVD|MP3/USB Wallmount Stereo. The AWM965 is a versatile 12-volt unit designed for wall mounting, featuring an AM/FM electronic tuner, CD and DVD player, and a front USB input for MP3, WMA, and JPEG file playback. It also includes three stereo high-level speaker output zones and a remote control for convenient operation.

Abbildung 1.1: Vorderseite view of the Jensen AWM965 Wallmount Stereo, showing the display, control knobs, and various buttons.
2. Sicherheitshinweise
Please read all safety instructions carefully before operating the unit. Failure to follow these instructions may result in injury or damage to the unit. Keep this manual for future reference.
- Stromversorgung: This unit operates on a 12V DC negative ground power supply. Ensure correct voltage und Polarität während der Installation.
- Installation: Professional installation is recommended. Ensure all wiring is secure and properly insulated to prevent short circuits.
- Feuchtigkeit: Um Brände oder Stromschläge zu vermeiden, setzen Sie das Gerät weder Regen noch Feuchtigkeit aus.
- Reinigung: Verwenden Sie zum Reinigen ein weiches, trockenes Tuch. Vermeiden Sie Scheuermittel oder Lösungsmittel.
- Wartung: Versuchen Sie nicht, dieses Gerät selbst zu reparieren. Überlassen Sie alle Wartungsarbeiten qualifiziertem Fachpersonal.
3. Packliste
Bitte prüfen Sie vor der Installation, ob alle Artikel im Paket enthalten sind.
- Jensen AWM965 Wallmount Stereo Unit
- Fernbedienung mit Batterie
- 20-Pin Power/A/B Speaker Mating Pigtail
- Aux Audio/Video Cable
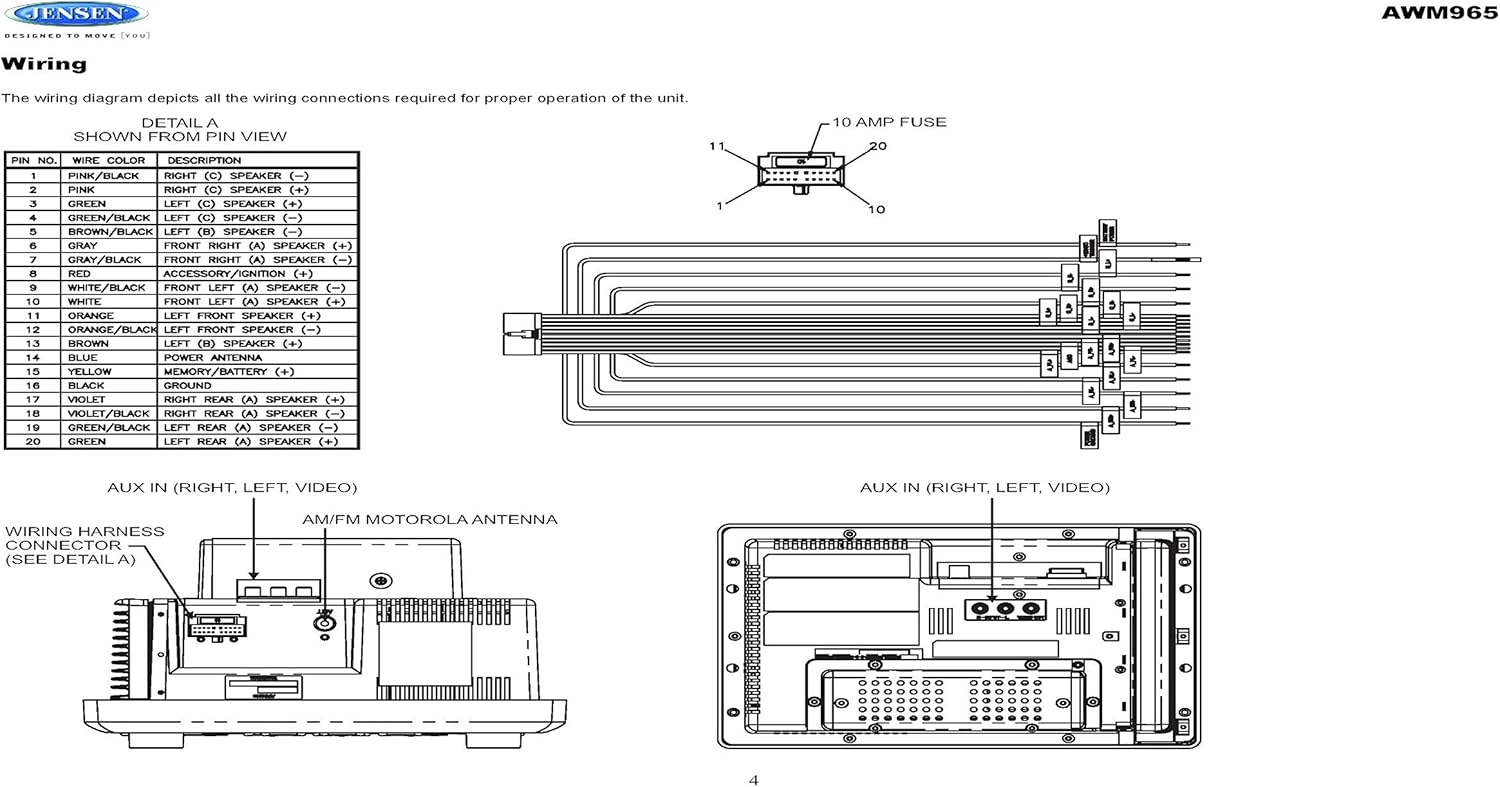
Figure 3.1: Diagram illustrating the components included in the Jensen AWM965 package, including the main unit, remote control, wiring harness, and auxiliary cables.

Figure 3.2: Image showing the included remote control, 20-pin wiring harness, and auxiliary audio/video cable.
4. Einrichtung
4.1 Auswahl des Montageortes
It is important to select an appropriate mounting location for the AWM965 to ensure optimal performance and longevity. Consider the following:
- Avoid places exposed to heat-radiating appliances such as electric heaters.
- Do not mount adjacent to other equipment that radiates significant heat.
- Ensure the location is well-ventilated and not dusty.
- Vermeiden Sie feuchte oder nasse Standorte.
4.2 Preparing the Opening
Use the provided mounting hole diagram to measure and cut an opening in the mounting surface. After cutting, mount the unit using four M3x20mm screws.
4.3 Montage des Radios
Route the power, speaker, and antenna cables through the hole. Connect them to the unit as outlined in the wiring diagram. After ensuring correct connections, perform a test operation.
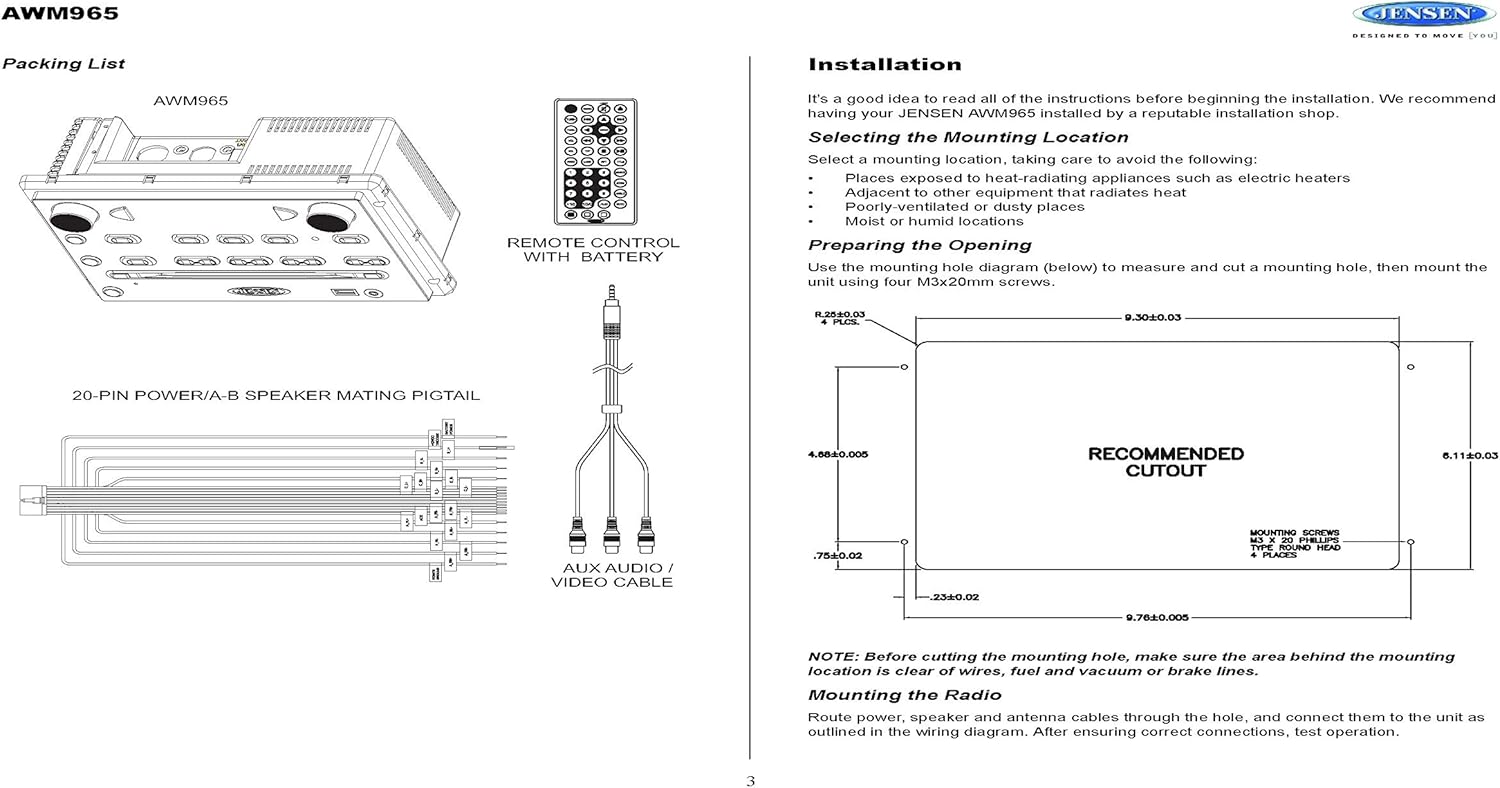
Figure 4.1: Detailed diagram showing the product dimensions (10.43"W x 7.01"H x 5"D) and the recommended cutout dimensions for installation (9.30"W x 6.11"H).
4.4 Verkabelung
The wiring diagram below depicts all the connections required for proper operation of the unit. Ensure all connections are secure and correctly matched to prevent damage.
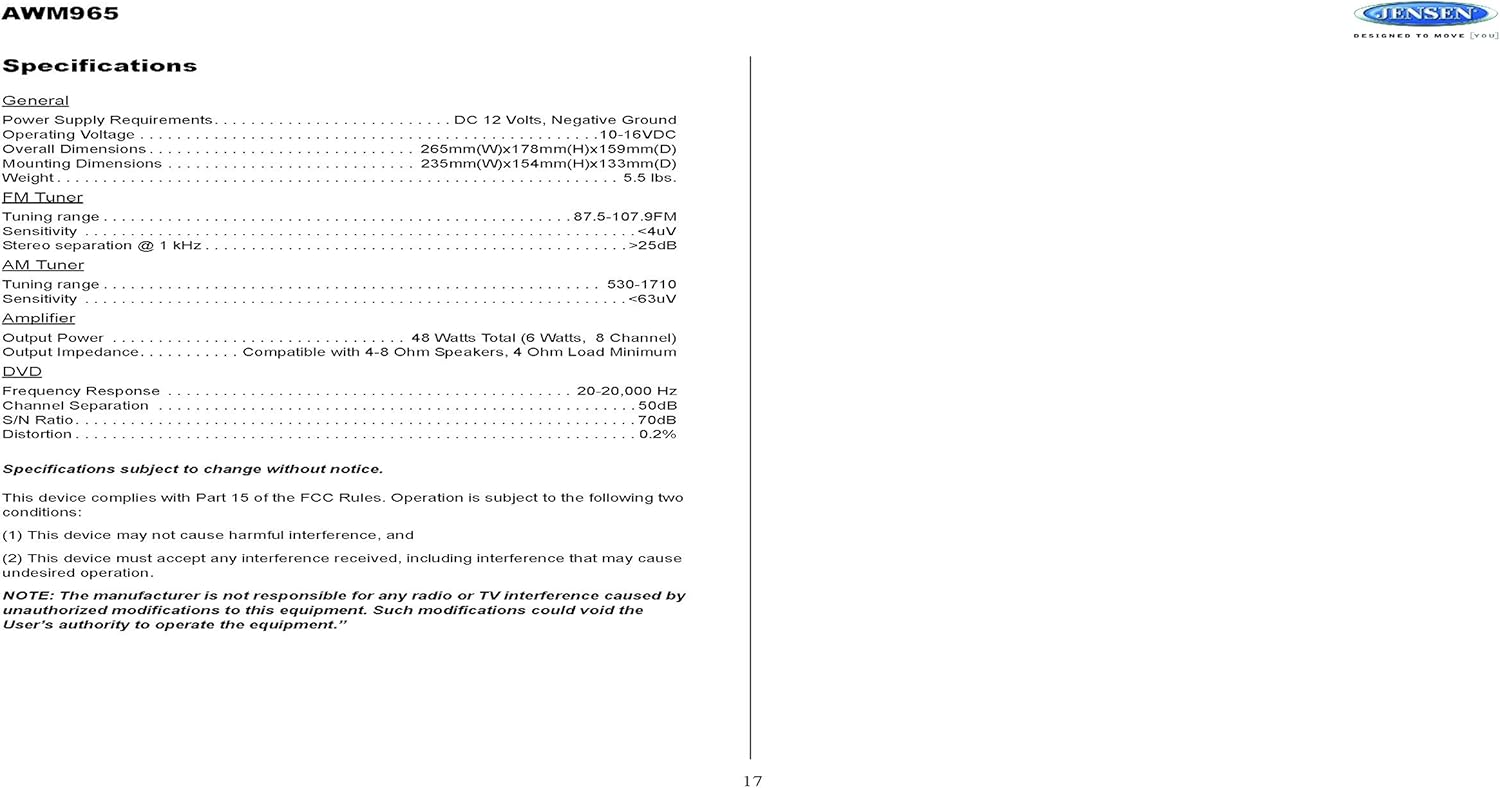
Figure 4.2: Detailed wiring diagram for the Jensen AWM965, showing the 20-pin connector pin assignments for power, ground, accessory, antenna, and speaker outputs (Right/Left, Front/Rear, A/B/C zones).
Wiring Harness Pin Details:
| Pin Nr. | Kabelfarbe | Beschreibung |
|---|---|---|
| 1 | ROSA / SCHWARZ | RECHTER (C) LAUTSPRECHER (-) |
| 2 | ROSA | RECHTER (C) LAUTSPRECHER (+) |
| 3 | GRÜN | LINKER (C) LAUTSPRECHER (+) |
| 4 | GRÜN SCHWARZ | LINKS (C) LAUTSPRECHER (-) |
| 5 | BRAUN SCHWARZ | LINKS (B) LAUTSPRECHER (-) |
| 6 | BRAUN | LINKER (B) LAUTSPRECHER (+) |
| 7 | GRAUSCHWARZ | VORNE RECHTS (A) LAUTSPRECHER (-) |
| 8 | ROT | ACCESSORY / IGNITION (+) |
| 9 | WEISS SCHWARZ | VORNE LINKS (A) LAUTSPRECHER (-) |
| 10 | WEISS | VORNE LINKS (A) LAUTSPRECHER (+) |
| 11 | ORANGE | LINKER FRONTLAUTSPRECHER (+) |
| 12 | ORANGE / SCHWARZ | LINKER FRONTLAUTSPRECHER (-) |
| 13 | BRAUN | RECHTER (B) LAUTSPRECHER (+) |
| 14 | BLAU | LEISTUNGSANTENNE |
| 15 | GELB | MEMORY / BATTERY (+) |
| 16 | SCHWARZ | BODEN |
| 17 | VIOLETT | RECHTER HINTEN (A) LAUTSPRECHER (+) |
| 18 | VIOLET / BLACK | RECHTER HINTERER (A) LAUTSPRECHER (-) |
| 19 | GRÜN SCHWARZ | LINKER HINTEN (A) LAUTSPRECHER (-) |
| 20 | GRÜN | LINKER HINTEN (A) LAUTSPRECHER (+) |
5. Bedienungsanleitung
5.1 Bedienelemente auf der Vorderseite
Familiarize yourself with the controls on the front panel for easy operation.

Abbildung 5.1: Nahaufnahme view of the Jensen AWM965 front panel, highlighting the display, volume knob, power button, tuning/track buttons, and various function buttons for AUX, AS/PS, speaker zones, and media playback.
- VOL (Lautstärke-)Regler: Rotate to adjust volume. Push to access audio menu.
- POWER-Taste: Drücken Sie, um das Gerät ein- oder auszuschalten.
- T/F CLOCK Button: Press to display or set the clock.
- TUN/TRK (Tune/Track) Buttons: Use for tuning radio stations or navigating tracks on media.
- AUX-Taste: Wählt die Hilfseingangsquelle aus.
- AS/PS (Auto Store/Preset Scan) Button: Automatically stores strong radio stations or scans through presets.
- A, B, C (Speaker Zone) Buttons: Activates or deactivates speaker output zones.
- ENTER-Taste: Bestätigt die Auswahl.
- LAUT-Taste: Aktiviert/deaktiviert die Lautheitskompensation.
- MUTE-Taste: Stummschalten/Stummschaltung aufheben der Audioausgabe.
- 1-6 Tasten: Radio station presets, track functions (RPT, RDM, G.LANG).
- ALARM SET / ON/OFF Buttons: Sets and activates/deactivates the alarm clock.
- DVD MENU Button: Öffnet das DVD-Menü.
- Disc Eject Button: Ejects a loaded disc.
- USB-Anschluss: Schließen Sie USB-Geräte zur Medienwiedergabe und zum Aufladen an.
5.2 Grundlegende Bedienung
- Ein-/Ausschalten: Drücken Sie die LEISTUNG Taste.
- Lautstärkeregelung: Drehen Sie den VOL Knopf.
- Quellenauswahl: Drücken Sie die MODUS button (if available, or cycle through sources using a dedicated button or menu).
5.3 Radiobetrieb (AM/FM)
- Stimmung: Drücken Sie die TUN/TRK buttons to manually tune or hold to seek.
- Voreingestellte Sender: Press and hold a numbered button (1-6) to store the current station. Press briefly to recall.
- Auto Store / Preset Scan: Verwenden Sie die AS/PS button for automatic station management.
5.4 CD/DVD/MP3/USB Playback
- Einlegen von Discs: Insert a disc into the slot with the label side up. The unit will automatically begin playback.
- USB-Wiedergabe: Insert a compatible USB flash drive into the front USB port. The unit supports MP3, WMA, and JPEG formats.
- Wiedergabesteuerung: Verwenden Sie die TUN/TRK buttons for track navigation (skip forward/backward). Use numbered buttons for repeat (RPT) or random (RDM) playback.
- DVD-Menü: Drücken Sie die DVD-MENÜ button to access the disc's menu.
- USB-Aufladung: The front USB port supports charging of iPod and other USB-based devices.
5.5 Clock and Alarm Features
- Einstellen der Uhr: Halten Sie die T/F CLOCK button to enter clock setting mode. Use the TUN/TRK buttons to adjust hours and minutes, and EINGEBEN zur Bestätigung.
- Wecker: Verwenden Sie die WECKER GESTELLT button to configure the alarm time and the EIN/AUS button to activate or deactivate it.
- Schlaf-Timer: Refer to the full manual for detailed instructions on setting the sleep timer.
5.6 Hilfseingang
Connect external audio/video devices to the front 3.5mm line-level input using the provided Aux Audio/Video Cable. Press the AUX Schaltfläche zum Auswählen dieser Quelle.
5.7-Fernbedienung
The included wireless remote control provides convenient access to most functions. Ensure the battery is correctly installed.
Figure 5.2: Image of the Jensen AWM965 remote control, showing buttons for power, menu, tune, volume, enter, source, program, language, repeat, title, zoom, angle, and numeric keypad.
6. Wartung
6.1 Reinigung des Geräts
Wipe the front panel and cabinet with a soft, dry cloth. For stubborn stains, dampen the cloth lightly with water. Never use harsh chemicals, abrasive cleaners, or solvents as they may damage the finish.
6.2 Disc-Pflege
Fassen Sie die Discs an den Kanten an, um Fingerabdrücke zu vermeiden. Halten Sie die Discs sauber und kratzfrei. Bewahren Sie die Discs in ihren Hüllen auf, wenn Sie sie nicht verwenden.
7. Fehlerbehebung
If you experience problems with your AWM965, consult the following common issues and solutions before contacting support.
- Kein Strom: Check the 12V DC power connection and ensure the unit's fuse (10 AMP) is not blown. Verify proper grounding.
- Kein Ton: Check speaker connections and ensure speaker zones (A, B, C) are activated. Verify volume level and mute status.
- Disc Error: Ensure the disc is clean, free of scratches, and inserted correctly. Try a different disc.
- Schlechter Radioempfang: Check the antenna connection. Ensure the antenna is fully extended and positioned for best reception.
- USB-Gerät nicht erkannt: Ensure the USB device is formatted correctly and contains compatible files (MP3, WMA, JPEG). Try a different USB device.
8. Spezifikationen
Detailed technical specifications for the Jensen AWM965 unit.
| Kategorie | Spezifikation |
|---|---|
| Stromversorgung | 12 V DC, negative Masse |
| Betriebslautstärketage | 10-16 V DC |
| Gesamtabmessungen | 265mm(W) x 178mm(H) x 159mm(D) / 10.4"W x 7"H x 5"D |
| Montageabmessungen | 235mm(W) x 154mm(H) x 133mm(D) / 9.25"W x 6.06"H x 5.25"D |
| Gewicht | 0.9 Pfund (ca.) |
| FM-Abstimmbereich | 87.5 bis 107.9 MHz |
| FM-Empfindlichkeit | <4 uV |
| FM Stereo Separation @ 1 kHz | >25 dB |
| AM-Abstimmbereich | 530-1710 kHz |
| AM-Empfindlichkeit | <63 uV |
| Amplifier Ausgangsleistung | 48 Watts Total (8 Channel) |
| Ausgangsimpedanz | Compatible with 4-8 Ohm Speakers |
| DVD Frequency Response | 20-20,000 Hz |
| DVD Channel Separation | 50 dB |
| DVD S/N Ratio | 70 dB |
| DVD Distortion | 0.2 % |
| Kompatible Disc-Formate | CD, CD-R, CD-RW, MP3, DVD, DVD+/-RW |
| Besondere Merkmale | Adjustable LCD Dimmer, Front USB (MP3/WMA/JPEG, Charging), Front 3.5mm Line-Level Video/Audio Input, 1 Composite Video Out, 1 Stereo Audio Input |
Die Spezifikationen können ohne Vorankündigung geändert werden.
8.1 FCC-Konformität
Dieses Gerät entspricht Teil 15 der FCC-Bestimmungen. Der Betrieb unterliegt den folgenden zwei Bedingungen:
- Dieses Gerät darf keine schädlichen Störungen verursachen.
- Dieses Gerät muss alle empfangenen Störungen tolerieren, einschließlich Störungen, die einen unerwünschten Betrieb verursachen können.
NOTE: The manufacturer is not responsible for any radio or TV interference caused by unauthorized modifications to this equipment. Such modifications could void the user's authority to operate the equipment.
9. Garantieinformationen
Jensen products are designed and manufactured to the highest quality standards. This product is covered by a limited warranty against defects in materials and workmanship. The specific terms and duration of the warranty are typically provided with the product packaging or can be found on the manufacturer's official webBitte bewahren Sie Ihren Kaufbeleg für Garantieansprüche auf.
10. Unterstützung
If you require further assistance or encounter issues not covered in this manual, please contact Jensen customer support. You can typically find contact information (phone number, email, or support portal) on the official Jensen webWebsite oder in der Produktverpackung.
When contacting support, please have your product model number (AWM965) and a detailed description of the issue ready.


