1. Einleitung
This manual provides essential information for the proper installation, operation, and maintenance of your Behringer Truth B1031A Active 2-Way Reference Studio Monitor. Please read this manual thoroughly to ensure optimal performance and longevity of your device. The B1031A is designed for professional audio applications, offering ultra-linear frequency response and precise sound reproduction.
2. Wichtige Sicherheitshinweise
- Energiequelle: Connect the unit only to a power supply of the voltage specified in the manual or on the unit.
- Erdung: Stellen Sie sicher, dass das Gerät ordnungsgemäß geerdet ist, um einen Stromschlag zu verhindern.
- Belüftung: Lüftungsöffnungen nicht blockieren. Installieren Sie gemäß den Anweisungen des Herstellers.
- Wasser und Feuchtigkeit: Do not use this apparatus near water or expose it to rain or moisture.
- Hitze: Installieren Sie das Gerät nicht in der Nähe von Wärmequellen wie Heizkörpern, Heizregistern, Öfen oder anderen Geräten (einschließlich ampKonverter (Lüfter), die Wärme erzeugen.
- Reinigung: Nur mit trockenem Tuch reinigen.
- Wartung: Überlassen Sie alle Wartungsarbeiten qualifiziertem Servicepersonal. Eine Wartung ist erforderlich, wenn das Gerät auf irgendeine Weise beschädigt wurde, z. B. wenn das Netzkabel oder der Stecker beschädigt sind, Flüssigkeit in das Gerät verschüttet wurde oder Gegenstände hineingefallen sind, das Gerät Regen oder Feuchtigkeit ausgesetzt war, nicht normal funktioniert oder fallengelassen wurde.
3. Packungsinhalt
Upon unpacking your Behringer Truth B1031A, please verify that all components are present and in good condition:
- Behringer Truth B1031A Active Studio Monitor (1 unit)
- Stromkabel
- Benutzerhandbuch (dieses Dokument)
Sollten Teile fehlen oder beschädigt sein, wenden Sie sich bitte umgehend an Ihren Händler.
4. Produktüberschreitungview
The Behringer Truth B1031A is an active 2-way reference studio monitor featuring an 8-inch Kevlar woofer and a 1-inch silk dome tweeter. It incorporates precision Class A/B amplifiers with active protection circuits, delivering 100 W for low frequencies and 50 W for high frequencies. Its design aims for ultra-linear frequency response and wide dispersion characteristics.
4.1. Vorderseite

The front panel features the primary acoustic components: the 8-inch Kevlar woofer for low-frequency reproduction and the 1-inch silk dome tweeter for high frequencies. Indicator LEDs provide visual feedback on the monitor's power status and signal clipping.
4.2. Rückseite
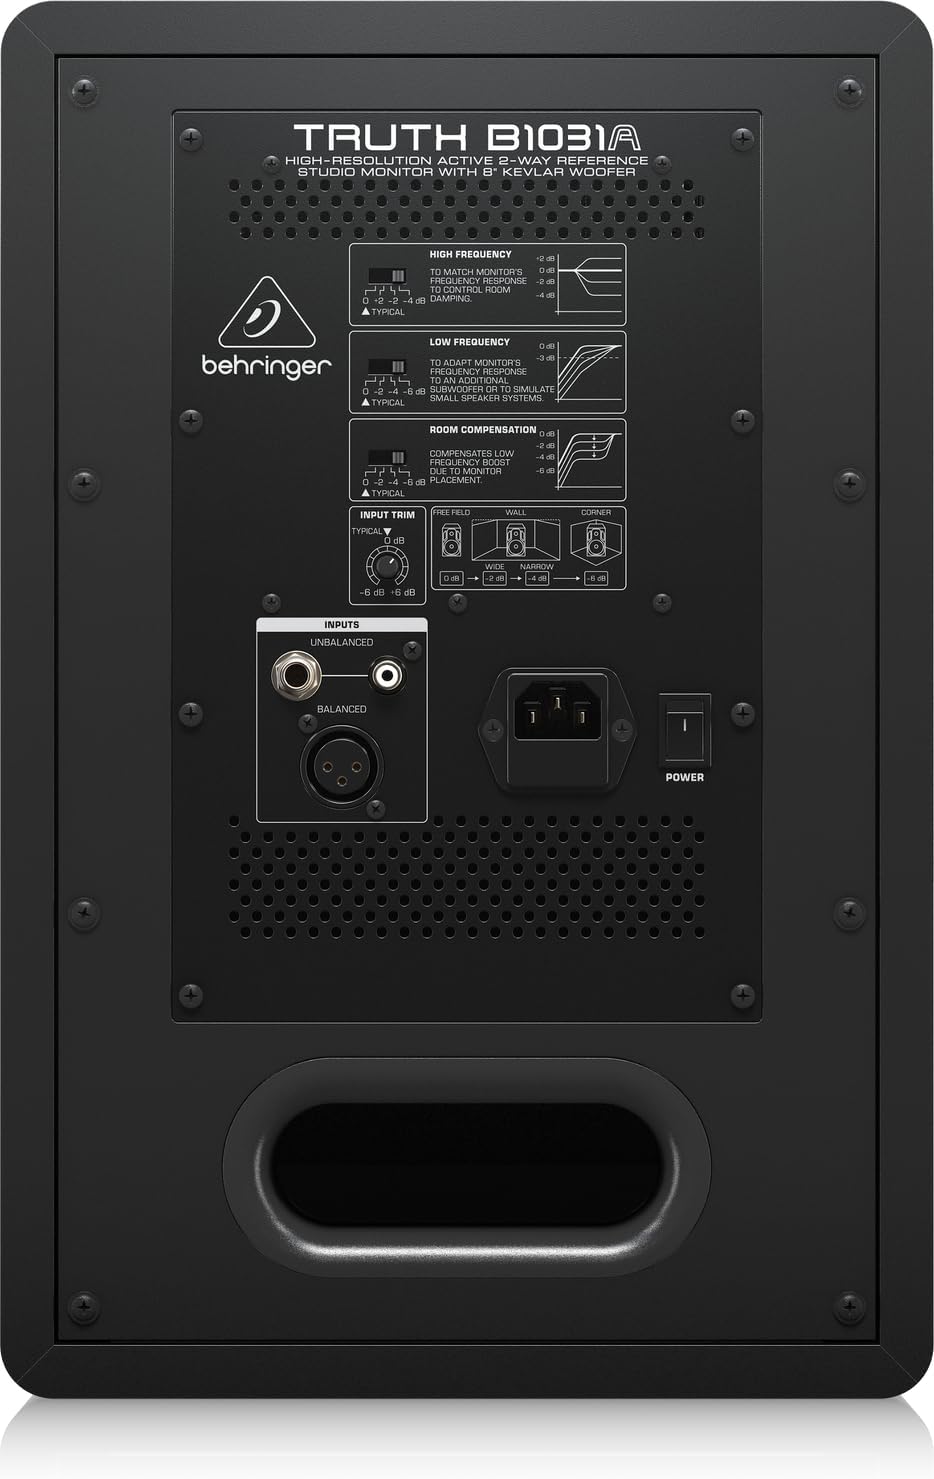
The rear panel houses all input connections and acoustic adjustment controls. These include:
- Symmetrischer XLR-Eingang: Für professionelle Audioanschlüsse.
- Balanced 1/4" TRS Input: Für professionelle Audioanschlüsse.
- Unbalanced RCA Input: For consumer audio devices.
- Eingangstrimmung: Passt die Eingangsempfindlichkeit an.
- High Frequency Adjustment: Allows tailoring of the high-frequency response.
- Low Frequency Adjustment: Allows tailoring of the low-frequency response.
- Room Compensation Switches: Adjusts the monitor's response to compensate for room acoustics (e.g., placement near walls or corners).
- Power Switch and IEC Power Inlet: Zum Anschließen des Netzkabels und zum Ein-/Ausschalten des Geräts.
5. Einrichtung
5.1. Platzierung
Proper placement of your studio monitors is crucial for accurate sound reproduction. Consider the following guidelines:
- Stereodreieck: Position the monitors and your listening position to form an equilateral triangle. The distance between the two monitors should be equal to the distance from each monitor to your head.
- Ear Level: Die Hochtöner sollten idealerweise auf Ohrhöhe sein, wenn Sie sich an Ihrer primären Hörposition befinden.
- Abstand von Wänden: Avoid placing monitors directly against walls or in corners, as this can exaggerate bass frequencies. If unavoidable, use the Zimmerentschädigung switches on the rear panel to adjust.
- Symmetrie: Ensure the left and right monitors are placed symmetrically within the room to maintain a balanced stereo image.
5.2. Verbindungen
Before making any connections, ensure the monitor is powered off and unplugged from the mains.
- Audioeingang: Connect your audio source (e.g., audio interface, mixer) to the B1031A using either an XLR, 1/4" TRS, or RCA cable. For optimal signal integrity, balanced XLR or TRS connections are recommended.
- Stromanschluss: Insert the supplied power cable into the IEC power inlet on the rear panel of the monitor, then plug the other end into a suitable AC power outlet.
6. Betrieb
6.1. Ein-/Ausschalten
- Ensure all audio connections are secure and the input trim is set to a low level.
- Flip the power switch on the rear panel to the 'ON' position. The power indicator LED on the front panel will illuminate.
- To power off, flip the power switch to the 'OFF' position. It is recommended to power off your audio source first, then the monitors.
6.2. Anpassen der Bedienelemente
- Eingangstrimmung: Use this knob to match the output level of your audio source. Start with a low setting and gradually increase until you achieve a comfortable listening level without distortion.
- High Frequency Adjustment: This switch allows you to boost or cut high frequencies to suit your listening environment or preference.
- Low Frequency Adjustment: This switch allows you to boost or cut low frequencies. This is particularly useful for compensating for room acoustics or if you are using a separate subwoofer.
- Zimmerentschädigung: These switches are designed to optimize the monitor's performance based on its placement in your room. Refer to the diagram on the rear panel for recommended settings when placing the monitor near walls or in corners.
7. Wartung
To ensure the longevity and optimal performance of your Behringer Truth B1031A monitor, follow these maintenance guidelines:
- Reinigung: Reinigen Sie die Außenseite des Monitors mit einem weichen, trockenen Tuch. Vermeiden Sie die Verwendung von Scheuermitteln, Lösungsmitteln oder Wachsen, da diese die Oberfläche beschädigen können.
- Staub: Regularly dust the speaker cones and vents to prevent accumulation, which can affect sound quality and cooling.
- Umfeld: Operate the monitor in a stable environment, away from extreme temperatures, humidity, and direct sunlight.
- Transport: When moving the monitor, ensure it is powered off and disconnected. Use appropriate packaging to protect it from physical damage.
8. Fehlerbehebung
If you encounter issues with your B1031A monitor, consult the following table for common problems and solutions:
| Problem | Mögliche Ursache | Lösung |
|---|---|---|
| Kein Ton | No power; incorrect input connection; input trim too low; audio source issue. | Check power cable and switch; verify audio cable connections; increase input trim; check audio source output. |
| Verzerrter Ton | Input signal too high; damaged cable; faulty audio source. | Reduce input trim or output level from source; try a different audio cable; test with another audio source. |
| Summendes oder brummendes Geräusch | Ground loop; interference from other electronics; unbalanced cable used for long runs. | Ensure proper grounding; move monitor away from other electronic devices; use balanced cables (XLR/TRS). |
| Uneven stereo image | Improper monitor placement; differing acoustic settings between monitors. | Adjust monitor placement for symmetry; ensure High/Low Frequency and Room Compensation settings are identical on both monitors. |
If the problem persists after attempting these solutions, please contact Behringer customer support or a qualified service technician.
9. Spezifikationen
Technical specifications for the Behringer Truth B1031A Active Studio Monitor:
| Besonderheit | Spezifikation |
|---|---|
| Modellname | WAHRHEIT B1031A |
| Lautsprechertyp | Aktiver 2-Wege-Referenz-Studiomonitor |
| Woofer-Durchmesser | 8 Zoll (Kevlar-Kegel) |
| Hochtönertyp | 1 Inch Silk Dome |
| Amplifier-Typ | Klasse A/B |
| LF Amplifier-Ausgang | 100 Watt |
| HF Amplifier-Ausgang | 50 Watt |
| Gesamtleistung Watttage | 150 Watt |
| Konnektivitätstechnologie | XLR, 1/4" TRS, RCA |
| Stromquelle | Kabelgebundener Strom (110 Volt) |
| Produktabmessungen (T x B x H) | 13.3" x 10.28" x 15.47" |
| Artikelgewicht | 24.91 Pfund |
| Farbe | Schwarz |
| Material | Metall |
10. Garantie und Support
Behringer products are designed and manufactured to high-quality standards. For detailed warranty information, including terms and conditions, please refer to the warranty card included with your product or visit the official Behringer website. For technical support, service, or spare parts, please contact your local Behringer dealer or authorized service center. You can also find support resources and contact information on the Behringer Store.


