Tekmar 150 One Stage Setpoint Control
Bedienungsanleitung
1. Einleitung
This manual provides comprehensive instructions for the installation, operation, and maintenance of the Tekmar 150 One Stage Setpoint Control. This device is designed to manage heating or cooling systems based on a single setpoint, ensuring efficient and reliable performance.
Please read this manual thoroughly before installation and use to ensure proper function, safety, and to prevent damage to the unit or associated equipment. Keep this manual for future reference.
2. Sicherheitshinweise
Adherence to the following safety guidelines is crucial for preventing personal injury and damage to the equipment:
- Stromversorgung trennen: Always disconnect the main power supply before installing, servicing, or removing the control unit. Failure to do so may result in electrical shock or equipment damage.
- Qualifiziertes Personal: Installation and wiring must be performed by qualified, licensed personnel in accordance with all local and national electrical codes.
- Bestimmungsgemäße Verwendung: Use this product only for its intended purpose as described in this manual. Any other use may void the warranty and create a hazard.
- Umgebungsbedingungen: Do not expose the control to water, excessive humidity, or extreme temperatures outside its specified operating range.
- Inspektion: Regularly inspect the unit for any signs of damage. Do not operate the control if it appears damaged.
3. Packungsinhalt
Überprüfen Sie, ob alle Artikel im Paket vorhanden sind:
- Tekmar 150 One Stage Setpoint Control Unit
- Montagezubehör (Schrauben, Dübel)
- Bedienungsanleitung (dieses Dokument)
4. Einrichtung und Installation
4.1 Montageort
Select a suitable indoor location for mounting the Tekmar 150 control. The location should be:
- Easily accessible for operation and maintenance.
- Free from direct sunlight, drafts, or heat sources that could affect its temperature sensing.
- Away from areas with high vibration or electromagnetic interference.
4.2 Montage der Einheit
- Mark the desired mounting points on the wall using the control unit as a template.
- Bohren Sie gegebenenfalls Vorbohrungen und setzen Sie die Dübel ein.
- Secure the control unit to the wall using the provided mounting hardware. Ensure it is level and firmly attached.
4.3 Kabelverbindungen
WARNING: Ensure power is disconnected before proceeding with wiring.
Refer to the wiring diagram provided on the back of the control unit or in the separate wiring schematic (if applicable). Connect the power supply, sensor inputs, and controlled equipment outputs to the appropriate terminals. Ensure all connections are secure and comply with local electrical codes.
Use appropriate gauge wiring for all connections. Incorrect wiring can damage the unit or connected equipment.
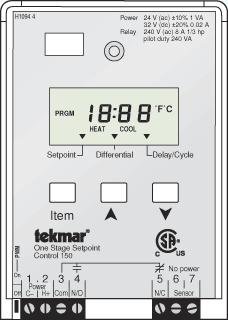
Abbildung der Vorderseite view of the Tekmar 150 One Stage Setpoint Control unit, typically used for managing heating or cooling systems based on a single setpoint. The display and control buttons are visible.
5. Bedienung
5.1 Erstes Einschalten
After all wiring is complete and verified, restore power to the control unit. The unit will perform a brief self-test, and the display (if present) will illuminate. The default setpoint or current operating status will be shown.
5.2 Setting the Setpoint
The Tekmar 150 allows for easy adjustment of the desired setpoint. Use the designated adjustment dial or buttons (refer to the unit's front panel) to increase or decrease the setpoint value. The display will show the current setpoint as you adjust it.
- Auf/Ab-Tasten: Press the 'Up' or 'Down' buttons to change the setpoint.
- Wählen: Rotate the dial clockwise to increase the setpoint, counter-clockwise to decrease.
The control will automatically adjust its output to maintain the system at the setpoint.
5.3 Kontrollleuchten
The control unit may feature indicator lights to show its operational status:
- Strom (Grün): Zeigt an, dass das Gerät mit Strom versorgt wird.
- Output Active (Amber/Red): Indicates that the control is actively calling for heating or cooling.
- Error (Red/Flashing): Indicates a fault condition. Refer to the troubleshooting section.
6. Wartung
The Tekmar 150 One Stage Setpoint Control is designed for reliable, long-term operation with minimal maintenance. However, periodic checks can help ensure optimal performance:
- Reinigung: Periodically wipe the exterior of the unit with a soft, dry cloth to remove dust and debris. Do not use abrasive cleaners or solvents.
- Verbindungen: Annually, inspect all wiring connections to ensure they are secure and free from corrosion.
- Keine vom Benutzer zu wartenden Teile: There are no user-serviceable parts inside the control unit. Do not attempt to open or repair the unit yourself. Refer all servicing to qualified personnel.
7. Fehlerbehebung
If you experience issues with your Tekmar 150 control, consult the following table before contacting technical support:
| Problem | Mögliche Ursache | Lösung |
|---|---|---|
| Gerät lässt sich nicht einschalten | Keine Stromversorgung; lose Kabelverbindung | Check circuit breaker; Verify power connections (ensure power is off before checking wiring). |
| System not responding to setpoint changes | Incorrect wiring; Sensor fault; System lockout | Verify wiring against diagram; Check sensor connections; Consult system manual for lockout procedures. |
| Display zeigt Fehlercode | Interner Fehler; Sensorproblem | Note the error code and contact technical support. Try cycling power to reset. |
| Ungenaue Temperaturwerte | Sensor placement; Damaged sensor; Loose sensor connection | Relocate sensor away from drafts/heat sources; Inspect sensor and wiring; Re-secure connections. |
If the problem persists after attempting these solutions, contact Tekmar technical support.
8. Spezifikationen
| Besonderheit | Spezifikation |
|---|---|
| Marke | tekmar |
| Modell | 150 |
| Kontrollmethode | Fernbedienung |
| Artikelgewicht | 4 Pfund |
| UPC | 642415186605 |
| ASIN | B0057GRJO2 |
| Verwendung im Innen- und Außenbereich | Innenbereich |
9. Garantie und Support
Tekmar products are manufactured to high standards and are backed by a limited warranty. For specific warranty terms and conditions, please refer to the warranty card included with your product or visit the official Tekmar webWebsite.
For technical assistance, troubleshooting beyond this manual, or to inquire about replacement parts, please contact Tekmar customer service. Have your product model number and purchase date available when contacting support.
Tekmar Customer Support:
- Contact information not provided in product data. Please refer to Tekmar's official website or product packaging for current support details.


