Einführung
The Chief TS325TU Medium THINSTALL Dual Swing Arm Wall Display Mount is designed to provide a secure and versatile mounting solution for flat panel displays ranging from 30 to 52 inches. This mount offers an ultra-low profile when collapsed and extends up to 25 inches, allowing for optimal viewing angles with its Centris low-profile tilt and Centerless lateral shift capabilities. It features integrated cable management for a clean installation.
Sicherheitshinweise
WARNUNG: Failure to read, understand, and follow all instructions can result in serious personal injury, property damage, or voiding of product warranty. If you have any questions, contact Chief customer service or a qualified installer.
- Die maximale Tragfähigkeit darf nicht überschritten werden. 75.00 kg.
- Stellen Sie sicher, dass die Montagefläche das Gesamtgewicht der Halterung und des Displays sicher tragen kann.
- Always mount to structural studs or appropriate wall anchors. Note that this mount is designed for studs approximately 16 inches apart.
- Verwenden Sie geeignete Werkzeuge und beachten Sie alle örtlichen Bauvorschriften.
- Halten Sie Kinder und Haustiere während der Installation fern.
Packungsinhalt
Vergewissern Sie sich vor Beginn der Installation, dass alle Komponenten vorhanden sind:
- 1 x Hauptbaugruppe
- 1 x Wall Rail
- 1 x Right Upright
- 1 x Left Upright
- 1 x Top Interface Support
- 1 x Bottom Interface Support
- 2 x Wall Rail Cover
- 1 x Lag Screw Cover
- 1 x Bumper
- 1 x Latch Spacer
- 2 x Long Adhesive
- 4 x Short Adhesive
- Montagezubehör (verschiedene Schrauben, Unterlegscheiben, Abstandshalter)
Setup und Installation
Proper installation is critical for the safety and performance of your display mount. It is recommended to have at least two people for installation due to the weight and size of the mount.
Erforderliche Werkzeuge (nicht im Lieferumfang enthalten):
- Bolzenfinder
- Bohren Sie mit geeigneten Bohrern
- Ebene
- Bandmaß
- Socket Wrench / Ratchet
- Kreuzschlitzschraubendreher
- Bleistift
Schritt-für-Schritt-Installation:
- Bereiten Sie die Wand vor:
Locate and mark the center of two adjacent wall studs. This mount is designed for standard 16-inch stud spacing. Ensure there are no electrical wires or plumbing in the drilling path. It is highly recommended to plan your entire layout, including TV, speakers, and wiring, before drilling.
- Attach Wall Rail:
Position the Wall Rail on the marked studs, ensuring it is level. Mark the pilot hole locations. Drill pilot holes into the studs. Secure the Wall Rail to the wall using the provided lag screws. Ensure the screws are tightened securely but do not overtighten to avoid stripping.
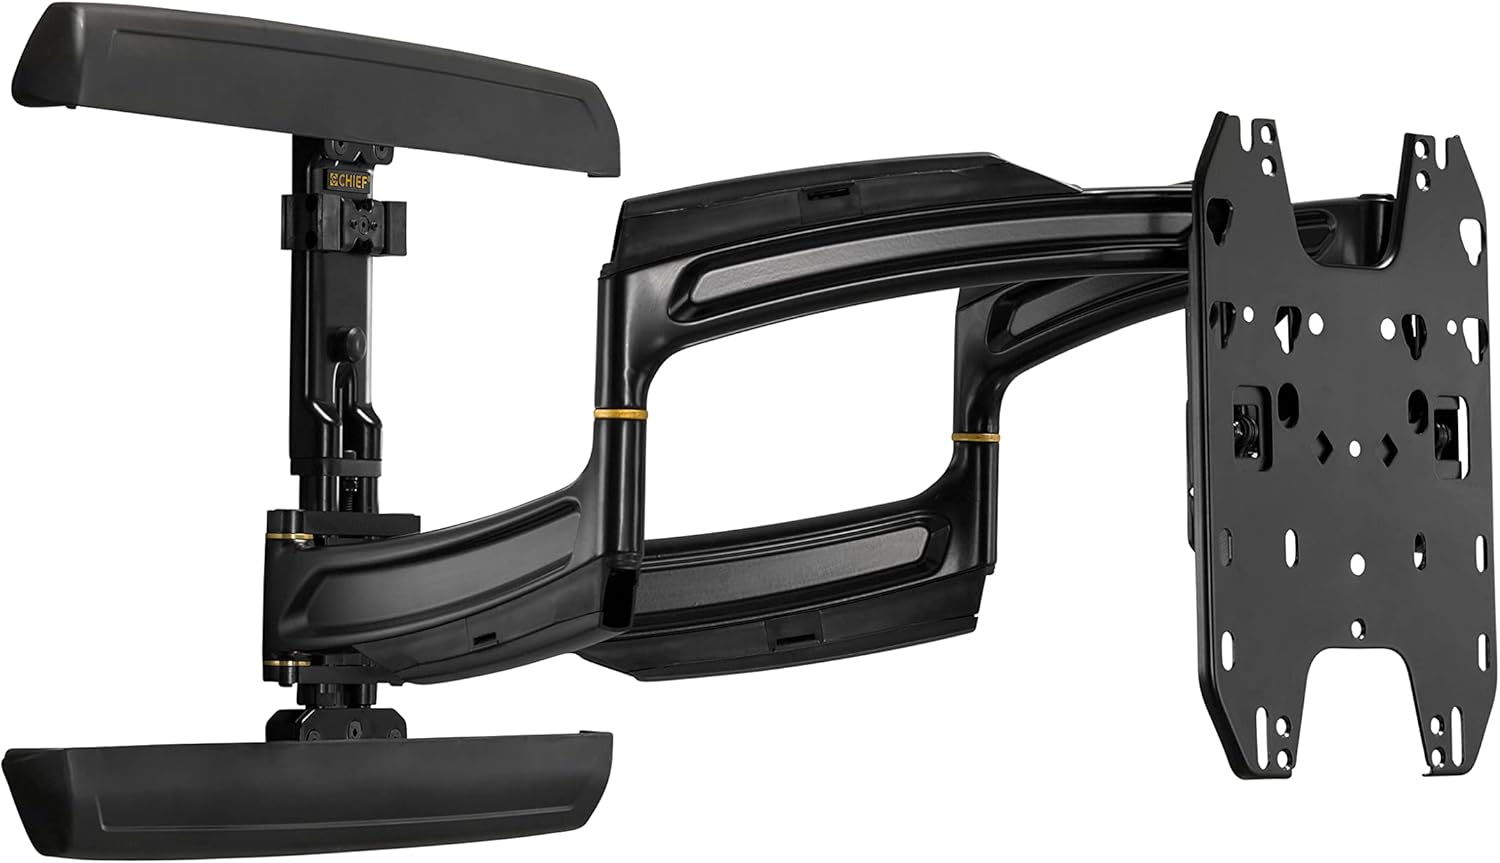
Image: Main assembly of the Chief TS325TU mount, showing the wall plate, articulating arms, and display interface.
- Assemble Display Interface:
Attach the Right and Left Uprights to the back of your display using the appropriate screws, washers, and spacers from the mounting hardware kit. Ensure the uprights are centered and level on the display. Then, attach the Top and Bottom Interface Supports to the uprights.
- Mount Display to Wall Rail:
Carefully lift the display with the attached interface and hook it onto the Wall Rail. The design allows for post-installation lateral shift of up to 16 inches (406 mm) for limitless centering capability. Secure the display to the mount according to the specific instructions in the detailed manual (refer to manufacturer's full manual for precise steps).
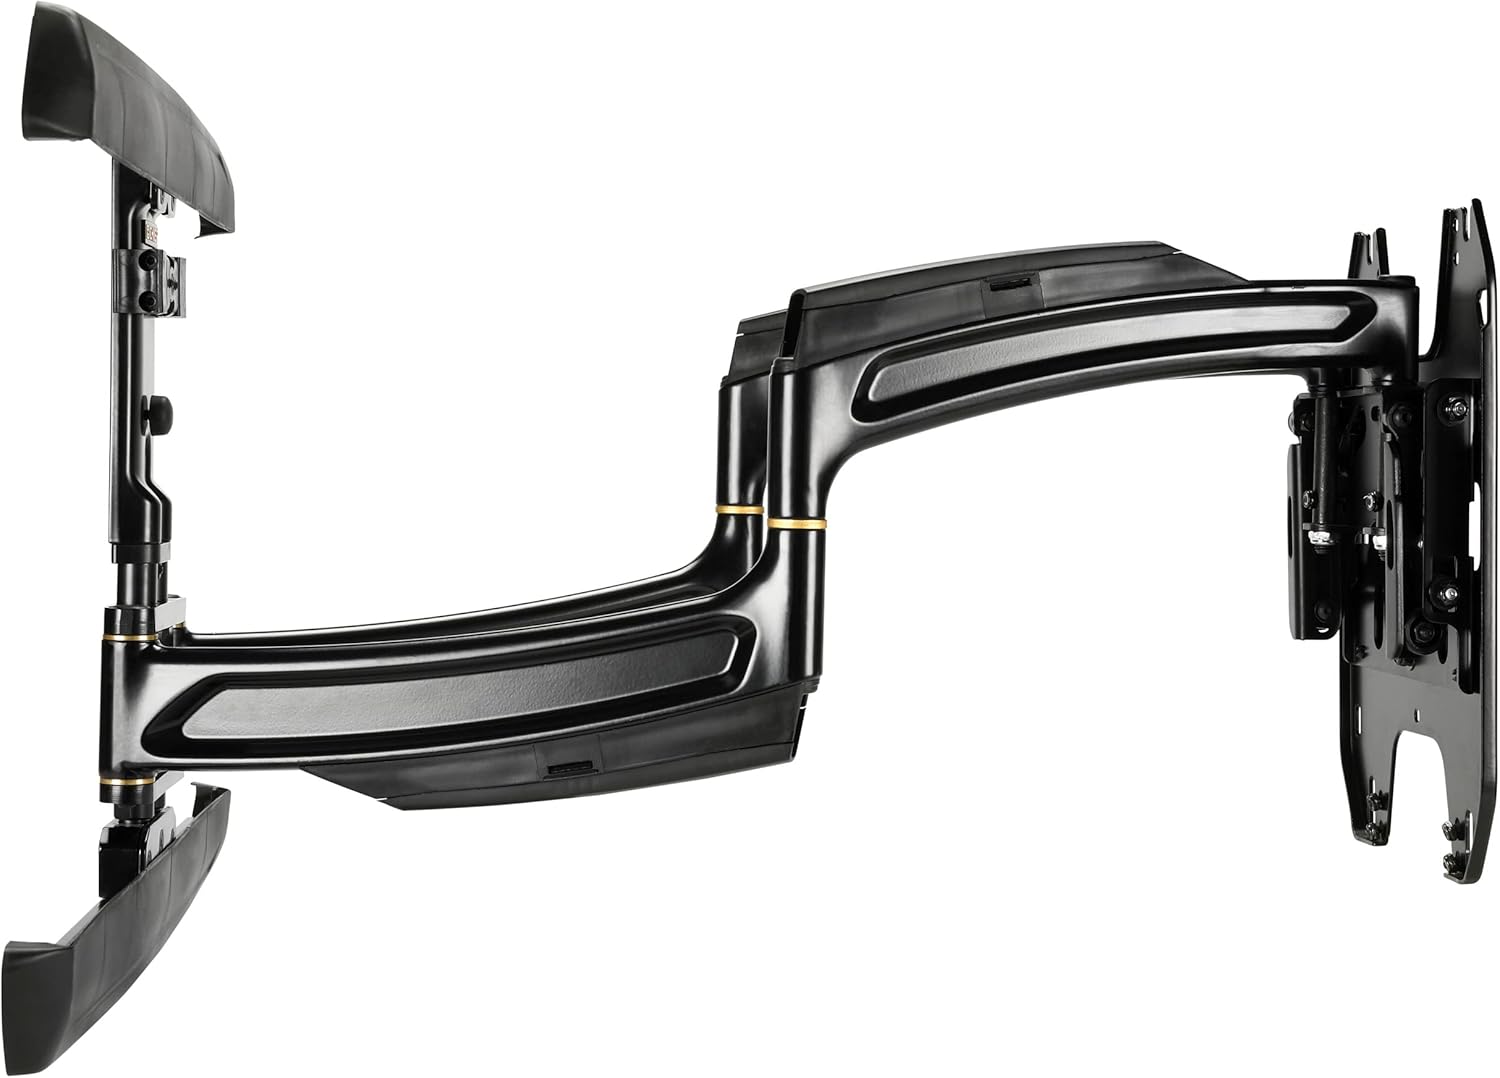
Abbildung: Seite view of the Chief TS325TU mount, illustrating its compact profile when retracted and the extension capability.
- Kabelmanagement:
Utilize the enclosed, tool-free cable covers and the wide open wall plate to route power and signal cables. This helps maintain a clean and organized appearance.
Bedienung der Montierung
The Chief TS325TU mount offers flexible positioning for your display:
- Verlängerung: The mount extends up to 25 inches (635 mm) from the wall, maximizing viewing potential from various positions in the room.
- Neigung: The Centris low-profile tilt mechanism allows for up to 15 degrees of effortless fingertip tilt. This enables you to achieve optimal viewWinkel anpassen und Blendung reduzieren.
- Swivel/Pan: The dual swing arms allow for significant swivel capabilities, enabling you to turn the display left or right to suit your viewing-Bedürfnisse.
- Lateral Shift: After installation, the display can be shifted laterally along the wall plate by up to 16 inches (406 mm) to fine-tune its horizontal position without re-drilling.

Bild: Abgewinkelt view of the Chief TS325TU mount, highlighting its robust construction and articulating design.
Wartung
Regular maintenance ensures the longevity and safe operation of your mount:
- Reinigung: Reinigen Sie die Halterung regelmäßig mit einem weichen, trockenen Tuch. Bei hartnäckigen Flecken verwenden Sie ein leicht dämpfendes Tuch.amp Mit einem milden Seifentuch abwischen und anschließend trockenreiben. Scheuermittel und Lösungsmittel vermeiden.
- Verbindungen prüfen: Überprüfen Sie regelmäßig alle Schrauben und Bolzen, um sicherzustellen, dass sie fest sitzen. Ziehen Sie sie nicht zu fest an.
- Bewegungsprüfung: Occasionally extend, retract, tilt, and swivel the mount to ensure smooth operation. If movement becomes stiff, consult the troubleshooting section or contact support.
Fehlerbehebung
| Problem | Mögliche Ursache | Lösung |
|---|---|---|
| Die Halterung wirkt instabil oder wackelig. | Loose wall mounting bolts or display attachment screws. | Carefully re-tighten all wall and display attachment screws. Do not overtighten. If the issue persists, consult a professional installer. |
| Difficulty extending or retracting the arm. | Friction in the arm joints. | Ensure the mount is not overloaded. Check for any obstructions. The mount is designed for smooth movement; excessive force should not be required. |
| Display does not tilt smoothly. | Tilt mechanism tension. | The Centris tilt mechanism is designed for fingertip adjustment. Refer to the full manufacturer's manual for specific tilt tension adjustment procedures if needed. |
| Die Kabel sind nicht ordentlich verlegt. | Improper routing through cable covers. | Re-route cables through the integrated cable covers on the arms and wall plate for a cleaner look. |
For complex issues or if you are unsure about any step, please contact Chief customer support or a certified installer.
Technische Daten
| Besonderheit | Detail |
|---|---|
| Produktmodell | TS325TU |
| Marke | Chef |
| Montagetyp | Wandhalterung |
| Bewegungstyp | Tilt, Articulating |
| Maximale Tragfähigkeit | 75.00 kg |
| Minimum Compatible Display Size | 30 Zoll |
| Maximum Compatible Display Size | 52 Zoll |
| Maximale Ausdehnung | 25 Zoll (635 mm) |
| Maximaler Neigungswinkel | 15 Grad |
| Lateral Shift Adjustment | Up to 16 Inches (406 mm) |
| Produktabmessungen (zusammengeklappt) | 1.3 x 29.5 x 17.2 Zoll (33 x 749 x 437 mm) |
| Artikelgewicht | 1 Pfund (0.45 kg) Note: This weight seems unusually low for a mount of this type and capacity. Please refer to official manufacturer documentation for precise weight. |
| Material | Metall |
| Farbe | Schwarz |
Garantie und Support
For detailed warranty information, please refer to the official Chief Manufacturing website or the documentation included with your product. Chief provides support for their products to ensure customer satisfaction.
If you require technical assistance, have questions about installation, or need to report a missing part, please visit the official Chief Manufacturing support page or contact their customer service directly. Contact information can typically be found on their webWebsite:


