1. Einleitung
Vielen Dank für Ihren Einkauf.asing the Hello Kitty KT2064 AM/FM Projection Alarm Clock Radio. This device combines a digital alarm clock with an AM/FM radio and a unique projection feature, allowing you to display the time on your ceiling or wall. Please read this manual carefully to ensure proper operation and to fully utilize all features of your new alarm clock radio.

Bild 1.1: Vorderseite view of the Hello Kitty KT2064 Projection Alarm Clock Radio, showing the digital display and the Hello Kitty design.
2. Funktionen
- Projektionsfunktion: Projects the time onto your ceiling or wall with adjustable focus and up to 120-degree pivot angle.
- Dual Alarm Options: Wake up to either a buzzer alarm or your favorite radio station.
- AM/FM-Radio: Integrated radio tuner for listening to broadcast stations.
- Schlummerfunktion: Allows for an additional 9 minutes of sleep before the alarm sounds again.
- Sleep to Radio: Set a timer (up to 2 hours) for the radio to play before automatically turning off.
- Batterie-Backup: Behält Zeit- und Alarmeinstellungen bei Stromausfall beitages (requires 3 CR2025 button cell batteries, not included).
- LED-Zeitanzeige: Clear red LED display for current time.
3. Packungsinhalt
Bitte prüfen Sie das Paket auf folgende Artikel:
- Hello Kitty KT2064 Projection Alarm Clock Radio Unit
- Netzteil
- Benutzerhandbuch (dieses Dokument)
Note: 3 CR2025 button cell batteries for backup are not included and must be purchased separately.
4. Einrichtung
4.1 Stromanschluss
- Unpack the alarm clock radio and its accessories.
- Connect the AC power adapter to the DC input jack located on the back of the unit.
- Plug the other end of the AC power adapter into a standard wall outlet. The unit will power on, and the LED display will light up.
4.2 Installing Backup Batteries
Installing backup batteries ensures that your time and alarm settings are retained during a power outage.
- Suchen Sie das Batteriefach an der Unterseite oder Rückseite des Geräts.
- Öffnen Sie die Abdeckung des Batteriefachs.
- Insert 3 CR2025 button cell batteries, observing the correct polarity (+ and - markings).
- Schließen Sie den Batteriefachdeckel fest.

Bild 4.2: Hinten view of the alarm clock radio, showing control buttons and potential location for battery compartment.
5. Bedienungsanleitung
5.1 Uhrzeit einstellen
- Halten Sie die ZEITEINSTELLUNG button (or similar button, refer to unit markings) for approximately 3 seconds until the hour digits begin to flash.
- Verwenden Sie die STUNDE or + / - Tasten zum Einstellen der Stunde. Beachten Sie die AM/PM-Anzeige.
- Drücken Sie die ZEITEINSTELLUNG Drücken Sie die Taste erneut. Die Minutenanzeige blinkt.
- Verwenden Sie die MINUTE or + / - Tasten zum Einstellen der Minuten.
- Drücken Sie die ZEITEINSTELLUNG Drücken Sie die Taste ein weiteres Mal, um die Zeiteinstellung zu bestätigen und den Modus zu verlassen.
5.2 Einstellen des Alarms (Alarm 1 und Alarm 2)
This unit supports two independent alarms.
- Halten Sie die AL1-SATZ Taste (für Alarm 1) oder AL2-SATZ button (for Alarm 2) for approximately 3 seconds until the hour digits of the alarm time begin to flash.
- Verwenden Sie die STUNDE or + / - Tasten, um die Weckstunde einzustellen.
- Drücken Sie die jeweilige Taste AL-SATZ Drücken Sie die Taste erneut. Die Minutenanzeige blinkt.
- Verwenden Sie die MINUTE or + / - Tasten zum Einstellen der Alarmminuten.
- Drücken Sie die AL-SATZ Drücken Sie erneut die Taste, um die Alarmquelle auszuwählen: SUMMER or RADIOVerwenden Sie die + / - buttons to toggle.
- Drücken Sie die AL-SATZ Drücken Sie die Taste ein weiteres Mal, um die Alarmeinstellungen zu bestätigen und den Alarmmodus zu verlassen.
- Zum Aktivieren/Deaktivieren eines Alarms drücken Sie die Taste AL1 EIN/AUS or AL2 EIN/AUS button (or similar) repeatedly until the alarm indicator appears/disappears on the display.
5.3 Using the Radio
- Drücken Sie die RADIO EIN/AUS Taste, um das Radio einzuschalten.
- Drücken Sie die AM/FM Taste zum Umschalten zwischen AM- und FM-Bändern.
- Verwenden Sie die TUNE+ Und MELODIE- Tasten zum manuellen Einstellen des gewünschten Senders.
- For automatic scanning, press and hold TUNE+ or MELODIE- for a few seconds until the radio finds the next clear station.
- Stellen Sie die Lautstärke mit den LAUTSTÄRKE + Und VOLUME - Schaltflächen.
- Um das Radio auszuschalten, drücken Sie die RADIO EIN/AUS erneut die Taste.
5.4 Projektionsfunktion
- Locate the projector lens on top of the unit.
- Drücken Sie die PROJEKTOR EIN/AUS button to activate the time projection.
- Adjust the angle of the projector head (up to 120 degrees) to direct the time display onto your ceiling or wall.
- Drehen Sie den FOKUS ring around the projector lens to achieve a clear image.
- To turn off the projection, press the PROJEKTOR EIN/AUS erneut die Taste.

Image 5.4: The alarm clock radio actively projecting the time and Hello Kitty logo onto a surface.
5.5 Schlummerfunktion
Wenn der Alarm ertönt, drücken Sie die große Taste. SCHLAFEN button (usually located on top of the unit). The alarm will pause for approximately 9 minutes and then sound again.
5.6 Sleep to Radio Function
This feature allows you to fall asleep to the radio, which will automatically turn off after a set period.
- Turn on the radio and tune to your desired station.
- Drücken Sie die SCHLAFEN button repeatedly to cycle through the available sleep timer durations (e.g., 120, 90, 60, 30, 15 minutes, or OFF). The selected duration will appear on the display.
- The radio will play for the chosen duration and then automatically turn off.
6. Wartung
- Reinigung: Wischen Sie das Gerät mit einem weichen, trockenen Tuch ab. Verwenden Sie keine Scheuer- oder Lösungsmittel.
- Wassereinwirkung: Das Gerät sollte nicht mit Wasser oder übermäßiger Feuchtigkeit in Berührung kommen.
- Temperatur: Setzen Sie das Gerät keinen extremen Temperaturen oder direkter Sonneneinstrahlung aus.
- Batteriewechsel: Replace backup batteries annually or when the low battery indicator appears to ensure continuous functionality during power outages.
7. Fehlerbehebung
| Problem | Mögliche Ursache | Lösung |
|---|---|---|
| Gerät lässt sich nicht einschalten. | Netzteil nicht angeschlossen oder Steckdose defekt. | Vergewissern Sie sich, dass das Netzteil fest mit dem Gerät und einer funktionierenden Steckdose verbunden ist. Testen Sie die Steckdose mit einem anderen Gerät. |
| Zeit-/Weckereinstellungen gehen nach Stromausfall verloren.tage. | Die Notstrombatterien sind defekt oder nicht installiert. | Install new CR2025 button cell batteries or replace existing ones. |
| Die Projektion ist unscharf. | Der Fokus ist nicht richtig eingestellt. | Drehen Sie den FOKUS ring around the projector lens until the image is clear. |
| Der Radioempfang ist schlecht. | Antenne nicht ausgefahren oder Störungen. | Extend the FM wire antenna fully. For AM, try repositioning the unit. Avoid placing near electronic devices that may cause interference. |
| Der Alarm ertönt nicht. | Der Alarm ist nicht aktiviert oder falsch eingestellt. | Ensure the alarm is set and activated (alarm indicator visible). Check alarm volume if set to radio. |
8. Spezifikationen
| Marke | Hallo Kitty |
| Modellnummer | KT2064P |
| Anzeigetyp | Digitale LED |
| Stromquelle | Netzteil |
| Pufferbatterie | 3 x CR2025 Knopfzelle (nicht im Lieferumfang enthalten) |
| Radiofrequenz | AM/FM (FM up to 108 MHz) |
| Produktabmessungen (L x B x H) | 14.5 x 11.9 x 17.3 cm (ungefähr 5.7 x 4.7 x 6.8 Zoll) |
| Produktgewicht | 885 g (ca. 1.95 Pfund) |
| Projektionswinkel | Bis zu 120 Grad |
| Schlummerdauer | 9 Мinuten |
| Einschlaftimer | Bis zu 2 Stunden |
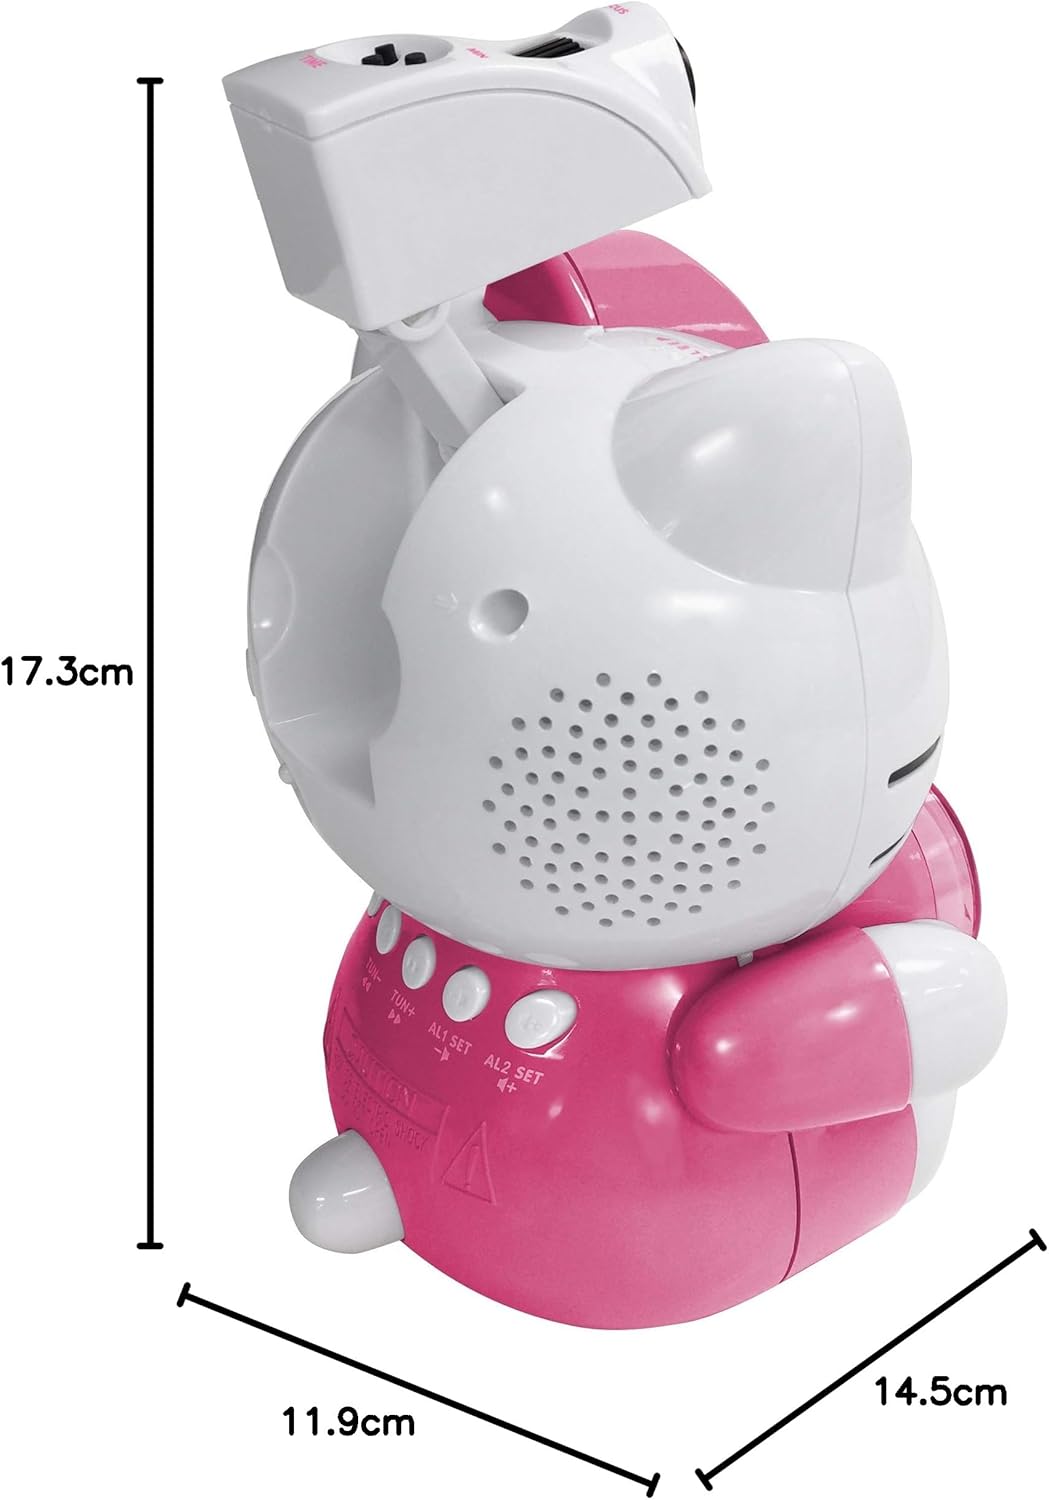
Image 8.1: Dimensions of the Hello Kitty KT2064 Projection Alarm Clock Radio.
9. Garantie und Support
This product comes with a standard manufacturer's warranty. For specific warranty details, please refer to the documentation provided at the time of purchase or contact your retailer. If you encounter any issues not covered in the troubleshooting section, please contact customer support for assistance.
For support inquiries, please visit the official Hello Kitty product support webBesuchen Sie unsere Website oder wenden Sie sich an Ihren lokalen Händler.


