1. Produktüberschreitungview
The AcuRite 10-inch LED digital clock is designed for clear time display in various environments such as homes, offices, or classrooms. It features large, easy-to-read numbers and multiple lighting options, including an auto-dim mode for comfortable viewing at night. The clock is powered by an included 9-foot power adapter and offers integrated cord storage for a tidy setup. It can be wall-mounted using built-in keyholes or placed on a tabletop with its fold-out stand.

Abbildung 1: Vorderseite view of the AcuRite 75114M LED Digital Clock.
2. Enthaltene Komponenten
- AcuRite 75114M 10-inch LED Digital Clock
- Bedienungsanleitung
- Power Adapter (9-foot cord)
Note: 2 AA batteries are required for battery backup functionality and are not included.
3. Einrichtung
3.1 Stromversorgung der Uhr
The clock operates using the included 9-foot power adapter. Plug the adapter into a standard electrical outlet. The clock requires continuous power to function. For convenience, the clock features integrated cord storage to manage excess cable.

Figure 2: Integrated cord storage on the back of the clock.
3.2 Installation der Notstromversorgung
Für die Notstromversorgung bei Stromausfalltages, install 2 AA batteries (not included) into the battery compartment located on the back of the clock. The display will not be active during battery backup mode, but the clock will maintain accurate timekeeping.

Figure 3: Back of the clock with battery compartment and controls.
3.3 Platzierungsoptionen
- Wandmontage: Use the integrated keyholes on the back of the clock to securely mount it to a wall. Ensure appropriate wall anchors and screws are used for stability.
- Verwendung auf dem Tisch: Utilize the fold-out stand on the back of the clock for stable placement on a desk, shelf, or table.
4. Bedienungsanleitung
4.1 Einstellen von Uhrzeit und Datum
The clock features control buttons on the back for setting the time and date. Refer to Figure 3 for button locations.
- Halten Sie die SATZ Taste, um in den Zeiteinstellungsmodus zu wechseln.
- Verwenden Sie die UP Und RUNTER Tasten zum Einstellen der Stunde, dann drücken SATZ Zur Bestätigung und zum Minutenprotokoll wechseln.
- Repeat the process for minutes, then for the year, month, and day.
- The clock supports a 12-hour format (AM/PM indicator will be displayed).
4.2 Einstellen der Displayhelligkeit
The clock offers six different lighting settings, including an auto-dim mode. Use the dedicated brightness control button (often labeled with a sun icon or similar, refer to Figure 3) to cycle through the available brightness levels. The auto-dim mode automatically adjusts the display brightness based on ambient light conditions.
4.3 Informationen anzeigen
The clock displays the current time in large digits. Additionally, it shows the temperature, day of the week, and the current date.
5. Wartung
5.1 Reinigung
Um die Uhr zu reinigen, wischen Sie das Display und die Uhr vorsichtig ab.asing mit einem weichen, damp cloth. Avoid using abrasive cleaners or solvents, as these may damage the surface.
5.2 Batteriewechsel
Wenn die Uhr häufig Stromausfälle erleidettages and the time is not maintained, the AA backup batteries may need to be replaced. Open the battery compartment on the back of the clock, remove the old batteries, and insert new ones, ensuring correct polarity.
6. Fehlerbehebung
| Problem | Mögliche Ursache | Lösung |
|---|---|---|
| Die Uhranzeige ist leer. | No power from adapter. | Stellen Sie sicher, dass der Netzadapter sowohl an die Uhr als auch an eine funktionierende Steckdose fest angeschlossen ist. |
| Time is incorrect after a power interruption. | Die Notstrombatterien sind defekt oder nicht installiert. | Install or replace 2 AA batteries in the battery compartment. Reset the time manually if necessary. |
| Die Uhr geht falsch oder ist ungenau. | Internal clock drift or power fluctuations. | Manually reset the time. If inaccuracy persists, contact AcuRite customer support. |
| Das Display ist entweder zu hell oder zu dunkel. | Die Helligkeitseinstellung muss angepasst werden. | Use the brightness control button on the back of the clock to cycle through the six lighting settings, including auto-dim mode. |
7. Spezifikationen
| Besonderheit | Detail |
|---|---|
| Marke | AcuRite |
| Modellnummer | 75114 Mio. |
| Farbe | Weiß |
| Anzeigetyp | Digitale LED |
| Besonderheit | Light Up, Auto-Dimming |
| Technische Daten | 10 Zoll B x 5.5 Zoll H |
| Stromquelle | Corded Electric (9-foot adapter), Battery Powered (backup) |
| Batterien erforderlich | No (for main operation), Yes (2 AA for backup, not included) |
| Montagetyp | Wandmontage, Tischplatte |
| Material | Plastik |
| Artikelgewicht | 1.3 Pfund |
| Konnektivitätstechnologie | Power (AC adapter) |
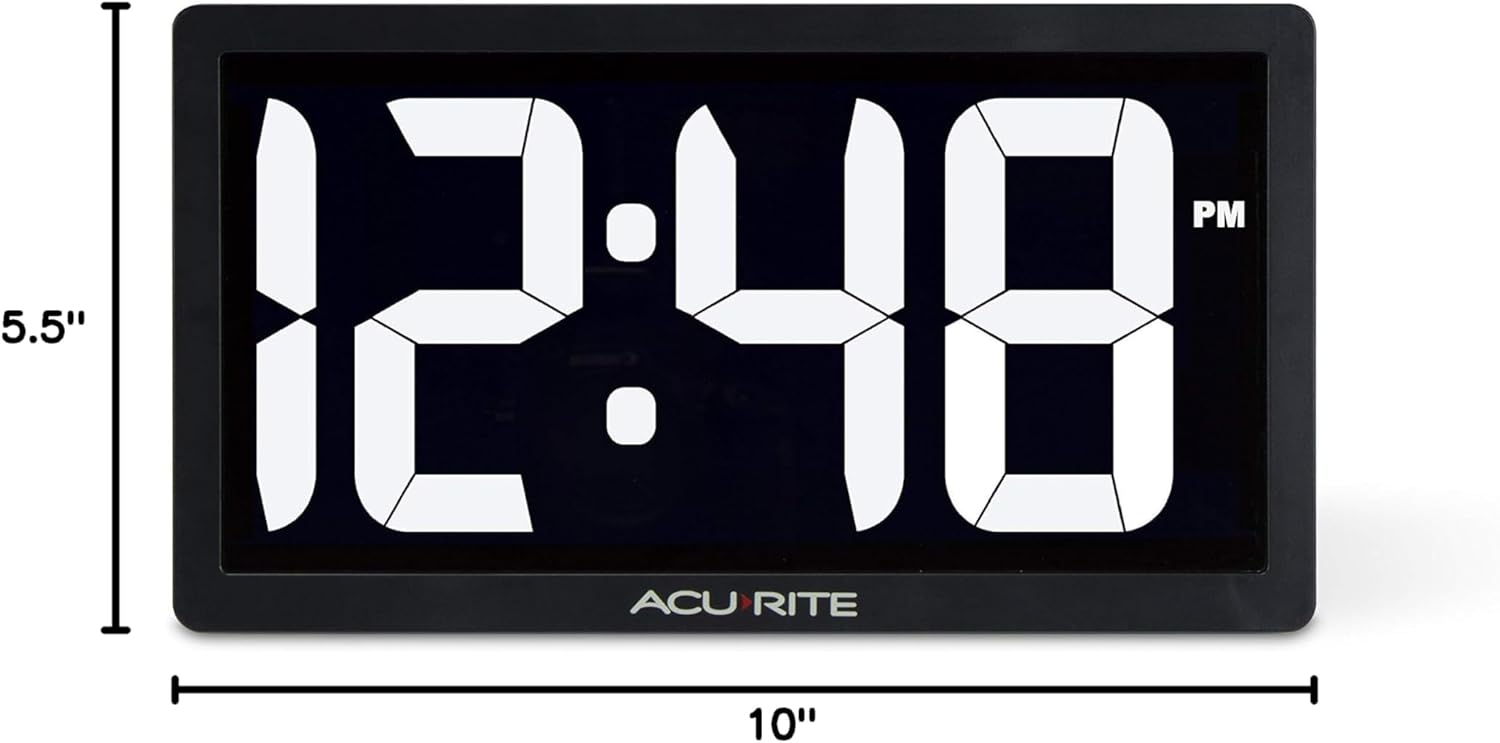
Figure 4: Product dimensions of the AcuRite 75114M clock.
8. Garantie und Support
8.1 Garantieinformationen
This AcuRite 75114M LED Digital Clock comes with a one-year limited warranty. Please retain your proof of purchase for warranty claims.
8.2 Kundendienst
For technical assistance, troubleshooting not covered in this manual, or warranty inquiries, please contact AcuRite customer support. Refer to the official AcuRite webWebsite für aktuelle Kontaktinformationen.


