1. Einleitung
This manual provides detailed instructions for the installation, operation, and maintenance of your Gewiss GW10701 Programmable Thermostat. This device is designed to control heating and air conditioning systems, allowing you to manage room temperature efficiently and comfortably. Please read this manual thoroughly before installation and use to ensure proper functionality and safety.
2. Sicherheitshinweise
Beachten Sie stets die folgenden Sicherheitsvorkehrungen, um Verletzungen oder Schäden am Gerät zu vermeiden:
- Die Installation darf nur von qualifiziertem Fachpersonal gemäß den örtlichen Elektrovorschriften und -bestimmungen durchgeführt werden.
- Disconnect power to the heating/cooling system at the main circuit breaker before installing or servicing the thermostat.
- Das Thermostat darf weder Wasser noch übermäßiger Feuchtigkeit ausgesetzt werden.
- Verwenden Sie ausschließlich den angegebenen Batterietyp und achten Sie bei der Installation auf die richtige Polarität.
- Batterien für Kinder unzugänglich aufbewahren. Batterien nicht ins Feuer werfen.
- Do not attempt to open or repair the thermostat yourself. Contact qualified service personnel.
3. Produktüberschreitungview
The Gewiss GW10701 is a wall-mounted programmable thermostat featuring an LCD display and intuitive controls for temperature management.
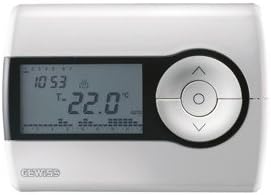
Abbildung 1: Front view of the Gewiss GW10701 Thermostat. It features a clear LCD screen displaying time and temperature, alongside a circular control panel with directional buttons and a central confirmation button for easy navigation and setting adjustments.
3.1. Komponenten
- LCD Anzeige: Shows current time, temperature, operating mode, and programming settings.
- Bedientasten: Typically include UP/DOWN arrows for temperature adjustment, MODE button for selecting operating modes (e.g., Heat, Cool, Auto, Off), and a SET/PROG button for accessing programming menus. (Note: Specific button functions may vary slightly; refer to on-screen prompts.)
- Batteriefach: Located on the rear or side, houses the power supply batteries.
- Montageplatte: Für eine sichere Wandmontage.
4. Installation
4.1. Wahl eines Standorts
Select a central location on an interior wall, approximately 1.5 meters (5 feet) above the floor. Avoid locations near heat sources (lamps, direct sunlight, fireplaces), drafts (windows, doors), or areas with poor air circulation.
4.2. Montage des Thermostats
- Stromversorgung trennen: Turn off the power to your heating/cooling system at the main circuit breaker.
- Separate Base Plate: Carefully detach the front cover of the thermostat from its base plate.
- Markieren und Bohren: Hold the base plate against the wall at your chosen location. Mark the drilling points. Drill holes and insert wall anchors if necessary.
- Sichere Bodenplatte: Fasten the base plate to the wall using the provided screws.
- Verkabelung (falls zutreffend): Connect the system wires to the appropriate terminals on the base plate. Refer to the wiring diagram provided with your heating/cooling system or consult a qualified electrician. Note: While the thermostat is battery-powered, it controls a 230V system. Ensure correct wiring.
- Batterien installieren: Insert the required batteries into the battery compartment, observing correct polarity (+/-).
- Thermostat anschließen: Carefully reattach the thermostat front cover to the base plate, ensuring it clicks securely into place.
- Strom wiederherstellen: Turn on the power to your heating/cooling system at the main circuit breaker.
5. Bedienung
5.1. Ersteinrichtung
Upon first power-up or after battery replacement, you may need to set the current time and date. Follow the on-screen prompts or refer to the programming section.
5.2. Temperatur einstellen
Verwenden Sie die UP Und RUNTER arrow buttons to adjust the desired temperature. The display will show the set temperature temporarily, then revert to the current room temperature.
5.3. Betriebsarten
Drücken Sie die MODUS button (or similar) to cycle through available operating modes:
- HITZE: Der Thermostat aktiviert die Heizungsanlage, wenn die Raumtemperatur unter den eingestellten Wert sinkt.
- KÜHL: The thermostat will activate the air conditioning system when the room temperature rises above the set temperature.
- WAGEN: Der Thermostat schaltet automatisch zwischen Heizen und Kühlen um, um den eingestellten Temperaturbereich aufrechtzuerhalten.
- AUS: Die Heizungs- und Kühlsysteme sind ausgeschaltet.
6. Programmierung
The Gewiss GW10701 allows you to create custom heating/cooling schedules for different times of the day and days of the week. This feature helps optimize energy consumption and comfort.
6.1. Uhrzeit und Datum einstellen
- Drücken Sie die SATZ or PROG Taste, um das Einstellungsmenü aufzurufen.
- Navigate using the arrow buttons to find "Time" or "Date" settings.
- Use the arrow buttons to adjust the values (hour, minute, day, month, year).
- Bestätigen Sie jede Einstellung mit dem SATZ or central button.
6.2. Creating a Program Schedule
The thermostat typically offers daily or weekly programming options. You can set different temperatures for various periods (e.g., Wake, Day, Evening, Sleep).
- Drücken Sie die PROG Taste, um in den Programmiermodus zu wechseln.
- Wählen Sie den Tag oder die Gruppe von Tagen aus, die Sie programmieren möchten (z. B. Mo-Fr, Sa-So oder einzelne Tage).
- For each period (e.g., "Wake"), set the desired start time and temperature using the arrow buttons.
- Advance to the next period and repeat the process.
- Save your program and exit programming mode.
Consult the on-screen menu and specific button labels on your device for precise programming steps, as interfaces can vary.
7. Wartung
7.1. Batteriewechsel
The thermostat is powered by batteries. When the battery indicator appears on the display, replace the batteries promptly to ensure continuous operation. Typically, 2x AA or AAA alkaline batteries are required.
- Die vordere Abdeckung des Thermostats vorsichtig abnehmen.
- Entfernen Sie die alten Batterien und entsorgen Sie diese ordnungsgemäß.
- Legen Sie neue Batterien ein und achten Sie dabei auf die richtige Polarität.
- Bringen Sie die vordere Abdeckung wieder an.
7.2. Reinigung
Clean the thermostat's exterior with a soft, dry cloth. Do not use abrasive cleaners, solvents, or spray cleaners directly onto the device, as this can damage the display or internal components.
8. Fehlerbehebung
| Problem | Mögliche Ursache | Lösung |
|---|---|---|
| Das Display ist leer oder dunkel. | Schwache oder leere Batterien. | Ersetzen Sie die Batterien durch neue. |
| Heizungs-/Kühlsystem reagiert nicht. |
|
|
| Die Temperaturanzeigen scheinen ungenau zu sein. | Der Standort des Thermostats kann durch Zugluft oder Wärmequellen beeinflusst werden. | Ensure thermostat is not exposed to direct sunlight, drafts, or heat-emitting appliances. |
9. Spezifikationen
- Hersteller: Gewiss
- Modellnummer: GW10701 (Chorus)
- Abmessungen (L x B x H): 13 x 2.3 x 9.2 cm
- Gewicht: 9.07 g
- Farbe: Weiß
- Material: Plastik
- Stromversorgung: Batteriebetrieben
- Schaltlautstärketage: 230 Volt (for controlled system)
- Anzeigetyp: LCD oder LED
- Montageart: Wandmontage
- Steuerungsfunktionen: Programmable, Button control
- Verwendung: Heating systems, Air conditioning systems
10. Garantie und Support
For warranty information, technical support, or service inquiries regarding your Gewiss GW10701 Thermostat, please refer to the warranty card included with your product or visit the official Gewiss website. You may also contact your local Gewiss distributor or retailer for assistance.
Gewiss Official WebWebsite: www.gewiss.com


