1. Einleitung
This manual provides essential information for the safe and efficient installation, operation, and maintenance of your Vortice Record Extractor Fan M10/4T 100mm with Timer. This unit is designed for intermittent or continuous ventilation in small to medium domestic or commercial premises, such as bathrooms, utility rooms, or kitchens. Please read these instructions thoroughly before installation and use, and retain them for future reference.

Abbildung 1: Front view of the Vortice Record Extractor Fan M10/4T 100mm with Timer. This image displays the fan's white casing and central circular grille.
2. Sicherheitshinweise
WARNUNG: Um das Risiko von Bränden, Stromschlägen oder Verletzungen zu verringern, beachten Sie Folgendes:
- Die Installation muss von einem qualifizierten Elektriker gemäß allen lokalen und nationalen Verdrahtungsvorschriften durchgeführt werden.
- Vor Installations-, Wartungs- oder Reinigungsarbeiten muss stets die Stromversorgung getrennt werden.
- Dieses Gerät ist nicht für den Gebrauch durch Personen (einschließlich Kinder) mit eingeschränkten physischen, sensorischen oder geistigen Fähigkeiten oder Mangel an Erfahrung und Wissen bestimmt, es sei denn, sie werden von einer für ihre Sicherheit verantwortlichen Person beaufsichtigt oder erhalten Anweisungen zur Verwendung des Geräts.
- Kinder sollten beaufsichtigt werden, um sicherzustellen, dass sie nicht mit dem Gerät spielen.
- Verwenden Sie diesen Lüfter nicht mit einem Halbleiter-Geschwindigkeitsregler.
- Ensure that the air discharge is not obstructed.
- The fan must not be installed in areas where the ambient temperature exceeds 40°C (104°F).
3. Packungsinhalt
Carefully unpack the product and check for any damage. If any components are missing or damaged, contact your retailer immediately.
- Vortice Record Extractor Fan M10/4T unit
- Bedienungsanleitung
- Montagezubehör (Schrauben, Dübel)
- Power cord (may not be included depending on regional regulations or specific model variant)
4. Spezifikationen
The following table outlines the key technical specifications for the Vortice Record Extractor Fan M10/4T 100mm with Timer.
| Besonderheit | Spezifikation |
|---|---|
| Marke | Wirbel |
| Modellname | M10/4T (11630) |
| Elektrisches Ventilatordesign | Abluftventilator |
| Stromquelle | Elektrische Kabel |
| Bandtage | 240 Volt |
| Wastage | 16 Watt |
| Luftstromkapazität | 85 Kubikmeter pro Stunde (ca. 50 CFM) |
| Geräuschpegel | 39 Dezibel |
| Klingenlänge | 100 Millimeter |
| Artikelgewicht | 0.43 Kilogramm (ca. 15.1 Unzen) |
| Verpackungsabmessungen | 18.4 L x 7.6 H x 13.0 W (centimeters) / 7.6 x 5.39 x 3.23 (inches) |
| Installationstyp | Wandhalterung |
| Zimmertyp | Badezimmer |
| Besonderheit | Timerfunktion |
| Kontrollmethode | Touch (likely referring to external switch) |
| Ausführung | Metallisch |
| Zertifizierung | CE-geprüft |

Abbildung 2: Technical data and energy label for the Vortice Record Extractor Fan. Key data points include a maximum flow rate of 82 m³/h, total electrical power consumption of 14.3 W at maximum flow, and a sound power level (LWA) of 51 dB(A).
5. Installation
Installation should only be performed by a qualified professional to ensure compliance with electrical safety standards and optimal performance.
5.1. Wahl eines Standorts
Select a suitable wall-mount location, typically in a bathroom or utility area, ensuring adequate space for the fan and ducting. Avoid locations directly above heat sources or where the fan might be exposed to direct water spray.

Abbildung 3: Example of a Vortice extractor fan installed on a wall in a room, demonstrating typical placement for ventilation.
5.2. Montage und Verkabelung
- Bereiten Sie die Eröffnung vor: Create an appropriate opening in the wall for the fan's ducting, typically 100mm in diameter. Refer to the dimensional drawing for precise measurements.
- Sichern Sie den Lüfter: Mount the fan unit securely to the wall using the provided mounting hardware. Ensure it is level and stable.
- Elektrischer Anschluss: Connect the fan to the main electrical supply. The M10/4T model includes a timer function, which requires specific wiring to a switched live and permanent live supply. Consult the wiring diagram provided with the product packaging or a qualified electrician for correct connection.
- Kanalisierung: Connect appropriate ducting to the fan's outlet to direct extracted air outdoors. Ensure all connections are sealed to prevent air leakage.
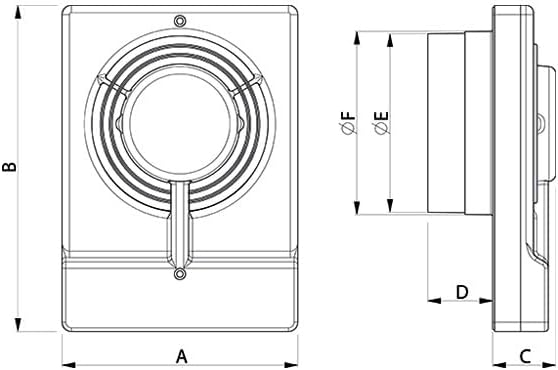
Abbildung 4: Technical drawing illustrating the dimensions of the Vortice Extractor Fan, including overall width (A), height (B), depth (C), and duct diameter (E, F).
6. Bedienung
The Vortice Record Extractor Fan M10/4T is designed for simple operation, typically controlled via an external light switch or a dedicated fan switch.
6.1. Basic On/Off
When connected to a light switch, the fan will activate when the light is turned on. When connected to a dedicated fan switch, simply toggle the switch to turn the fan on or off.
6.2. Timer-Funktion
The M10/4T model features an adjustable timer. After the fan is switched off (e.g., by turning off the light), the fan will continue to operate for a preset duration before automatically shutting down. This duration can typically be adjusted using a small potentiometer located within the fan unit (access usually requires removing the front cover and disconnecting power). Experiment with the timer setting to achieve the desired run-on time for effective ventilation.
7. Wartung
Regular maintenance ensures optimal performance and longevity of your extractor fan. Always disconnect the power supply before any maintenance.
7.1. Reinigung der Außenseite
Wischen Sie die Außenseite des Ventilators mit einem weichen, fusselfreien Tuch ab.amp Mit einem Tuch abwischen. Verwenden Sie keine Scheuermittel, Lösungsmittel oder aggressive Chemikalien, da diese die Oberfläche beschädigen können.
7.2. Cleaning the Fan Blades
Periodically, dust and debris may accumulate on the fan blades, reducing efficiency. To clean:
- Stromversorgung trennen: Ensure the fan's power supply is completely disconnected at the circuit breaker.
- Abdeckung entfernen: Carefully remove the front grille or cover of the fan.
- Saubere Klingen: Gently clean the fan blades and surrounding areas with a soft brush or a vacuum cleaner with a brush attachment. Avoid bending the blades.
- Zusammenbauen: Once clean, reattach the cover securely.

Abbildung 5: Intern view of the Vortice Extractor Fan, showing the fan blades and motor housing, which may require periodic cleaning.
8. Fehlerbehebung
If you encounter issues with your Vortice Extractor Fan, refer to the following common problems and solutions:
| Problem | Mögliche Ursache | Lösung |
|---|---|---|
| Lüfter schaltet nicht ein | Keine Stromversorgung Fehlerhafte Verkabelung Interner Fehler | Check circuit breaker and wall switch. Ensure correct wiring (consult electrician). If problem persists, contact support. |
| Der Ventilator ist übermäßig laut. | Lose Montage Verstopfung der Lüfterblätter Motorproblem | Ensure fan is securely mounted. Disconnect power and check for obstructions. If noise persists, contact support. |
| Unzureichende Luftabsaugung | Verstopfte Lüftungskanäle Verschmutzte Lüfterblätter Incorrect fan size for room | Check ducting for blockages. Clean fan blades as per maintenance section. Ensure fan is appropriately sized for the room volume. |
| Der Timer funktioniert nicht richtig. | Falsche Timer-Einstellung Verdrahtungsproblem | Adjust the timer potentiometer. Verify timer wiring with an electrician. |
For issues not listed here or if solutions do not resolve the problem, please contact qualified technical support.
9. Garantie und Support
9.1. Garantieinformationen
Please refer to the warranty card or documentation included with your purchase for specific warranty terms and conditions. Keep your proof of purchase for any warranty claims.
9.2. Kundendienst
For technical assistance, spare parts, or service, please contact your retailer or visit the official Vortice webWebsite für Support-Kontaktinformationen.


