1. Einleitung
Thank you for choosing the Hama 95236 8-inch LCD Digital Photo Frame. This manual provides important information regarding the safe operation, setup, and maintenance of your device. Please read it thoroughly before using the product and keep it for future reference.
2. Sicherheitshinweise
- Do not open the device. Incorrect assembly or repair can lead to electric shock.
- Betreiben Sie das Produkt nicht, wenn es sichtbar beschädigt ist.
- Protect the product from dirt, moisture, and overheating. Use it only in dry environments.
- Lassen Sie das Produkt nicht fallen und setzen Sie es keinen starken Vibrationen aus.
- Verwenden Sie das Produkt nur bestimmungsgemäß.
- Bewahren Sie dieses Produkt wie alle elektrischen Produkte außerhalb der Reichweite von Kindern auf.
- Entsorgen Sie Verpackungsmaterial umgehend entsprechend den örtlich geltenden Vorschriften.
3. Packungsinhalt
Bitte prüfen Sie, ob das Paket folgende Artikel enthält:
- Hama 95236 8-inch LCD Digital Photo Frame
- Netzteil
- Benutzerhandbuch (dieses Dokument)
4. Produktüberschreitungview
Machen Sie sich mit den Komponenten und Bedienelementen Ihres digitalen Bilderrahmens vertraut.
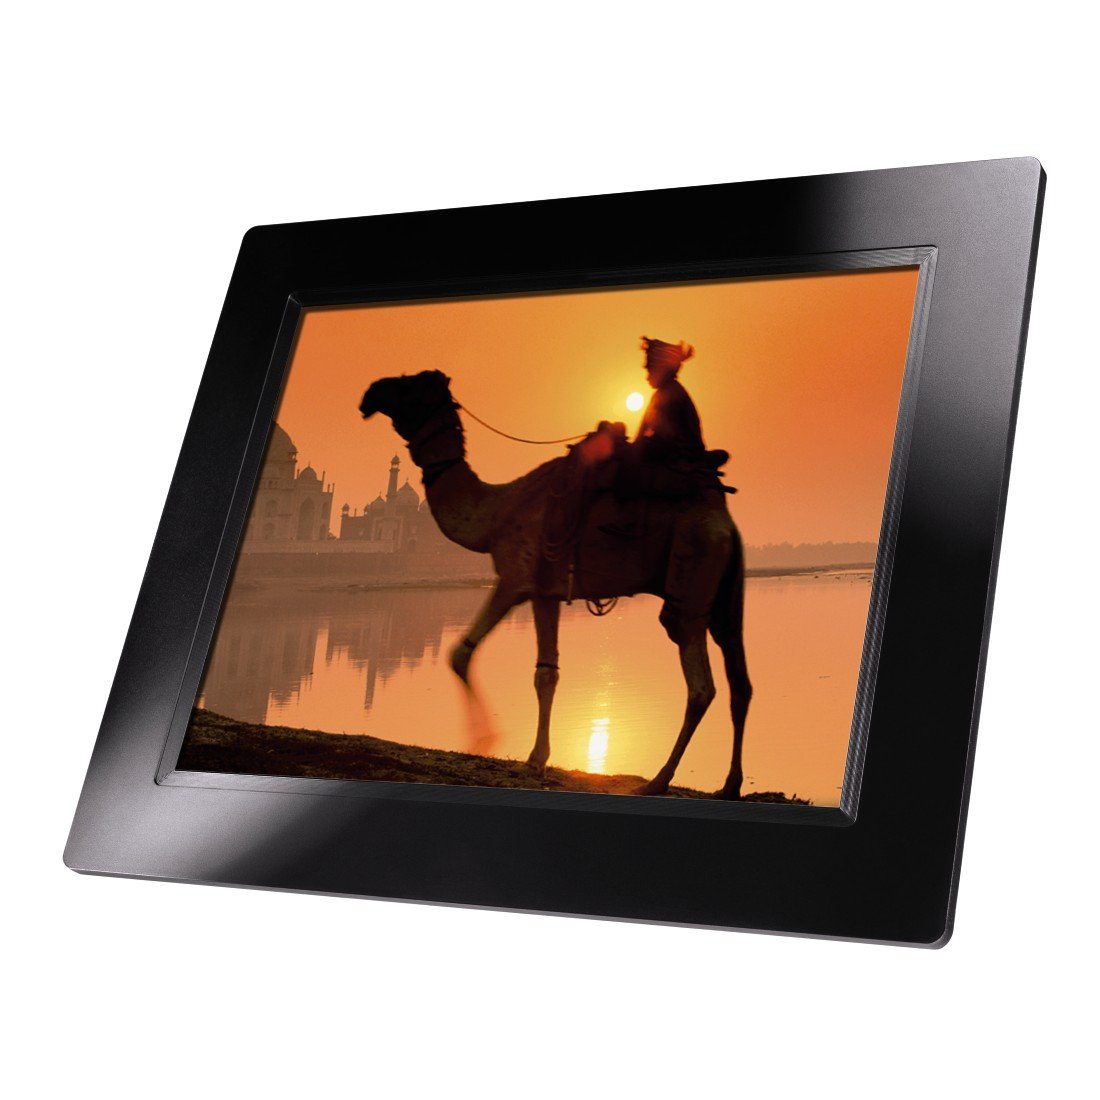
Abbildung 4.1: Front view of the Hama 95236 Digital Photo Frame, showing the 8-inch LCD screen.

Abbildung 4.2: Seite view of the digital photo frame, highlighting the various input ports including the SD/MMC/MS card slot, USB port, and DC IN power port.

Abbildung 4.3: Hinteren view of the digital photo frame, showing the stand attachment point, ventilation grilles, and the control panel with power, navigation, and menu buttons.
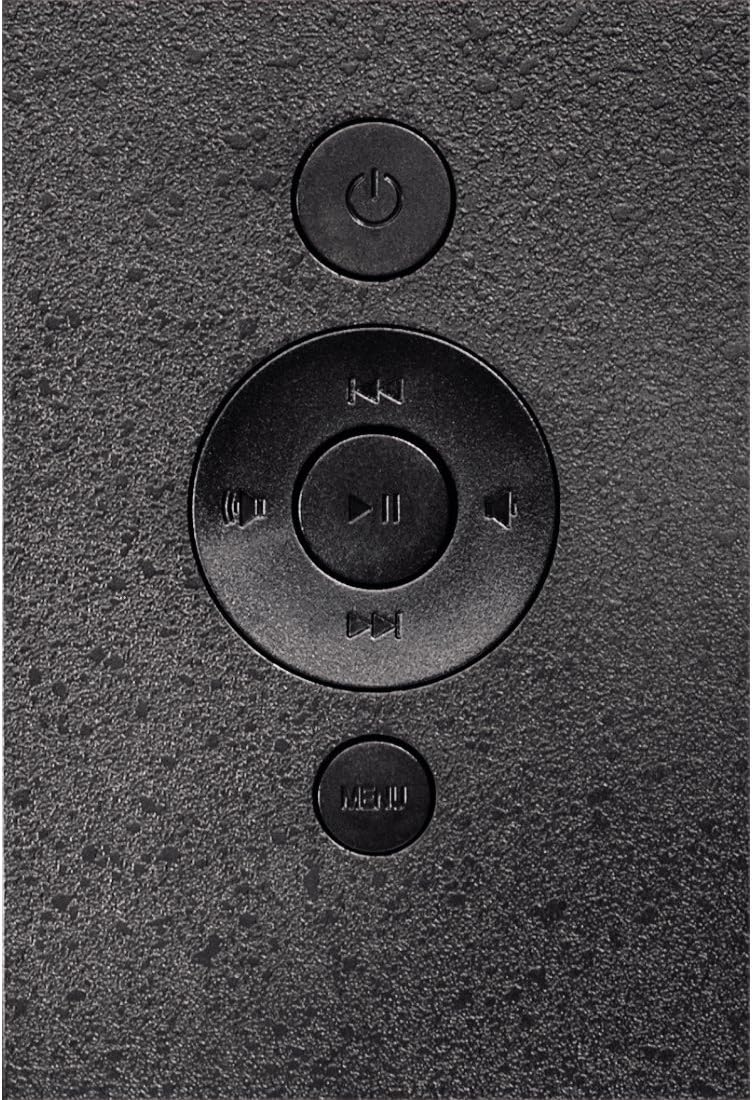
Abbildung 4.4: Close-up of the control buttons located on the back of the frame. These include the power button, directional navigation buttons (up, down, left, right), play/pause/enter button, and the menu button.
4.1. Anschlüsse und Bedienelemente
- SD/MMC/MS Card Slot: For inserting memory cards to display photos and videos.
- USB-Anschluss: For connecting USB flash drives or other compatible USB storage devices.
- DC IN: Power input for connecting the provided power adapter.
- Netzschalter: Schaltet das Gerät ein oder aus.
- Navigationstasten (Auf/Ab/Links/Rechts): Dient zur Navigation durch Menüs und zur Auswahl von Optionen.
- Play/Pause/Enter Button: Confirms selections or controls media playback.
- Menü-Schaltfläche: Öffnet das Hauptmenü für Einstellungen und Optionen.
5. Einrichtung
5.1. Anbringen des Ständers
Insert the metal stand into the designated slot on the back of the digital photo frame. Ensure it is securely fastened to provide stable support for the frame.
5.2. Stromanschluss
- Connect the power adapter to the DC IN port on the back of the photo frame.
- Stecken Sie das Netzteil in eine geeignete Steckdose.
- The frame will typically power on automatically or can be turned on using the power button.
5.3. Inserting a Memory Card or USB Drive
The Hama 95236 supports SD/MMC/MS memory cards and USB flash drives.
- Locate the SD/MMC/MS card slot or the USB port on the side of the frame (refer to Figure 4.2).
- Carefully insert your memory card or USB drive into the corresponding slot/port. Ensure it is inserted correctly to avoid damage.
- The frame should automatically detect the storage device and prompt you to view den Inhalt anzeigen oder eine Diashow starten.
6. Bedienungsanleitung
6.1. Grundlegende Navigation
Use the navigation buttons on the back of the frame to move through menus and options. The Play/Pause/Enter button confirms your selection.
6.2. Hauptmenü
Drücken Sie die SPEISEKARTE button to access the main menu. From here, you can select different modes and settings:
- Foto: View photos in a slideshow or individually.
- Musik: Audio wiedergeben files.
- Video: Video abspielen files.
- Kalender/Uhr: Display the calendar and time.
- Einstellungen: Adjust various device parameters.
6.3. Photo Playback
- Wählen Sie im Hauptmenü Foto.
- Navigate to your desired folder or select all photos.
- Drücken Sie die Wiedergabe/Pause/Eingabe button to start the slideshow.
- During a slideshow, you can use the navigation buttons to skip photos or pause playback.
6.4. Systemeinstellungen
Zugriff auf die Einstellungen menu to customize your photo frame:
- Bildschirmeinstellungen: Adjust brightness, contrast, and display mode.
- Diashow-Einstellungen: Configure transition effects, display time per photo, and repeat mode.
- Datum und Uhrzeit: Stellen Sie das aktuelle Datum und die Uhrzeit ein. Note: Some users have reported that date and time settings may reset after power loss.
- Sprache: Select your preferred language for the menu interface.
- Speicherinformationen: View details about connected storage devices.
7. Wartung
7.1. Reinigen des Geräts
- Trennen Sie das Gerät vor der Reinigung immer von der Stromversorgung.
- Reinigen Sie den Bildschirm und die Außenflächen mit einem weichen, trockenen, fusselfreien Tuch.
- Do not use aggressive cleaning agents, solvents, or abrasive materials.
7.2. Speicherung
Wenn Sie das Gerät über einen längeren Zeitraum lagern, trennen Sie es vom Stromnetz und bewahren Sie es an einem kühlen, trockenen Ort fern von direkter Sonneneinstrahlung und extremen Temperaturen auf.
8. Fehlerbehebung
| Problem | Mögliche Ursache | Lösung |
|---|---|---|
| Gerät lässt sich nicht einschalten. | Netzteil nicht angeschlossen oder defekt. | Ensure the power adapter is securely connected to both the frame and the power outlet. Test the outlet with another device. |
| Es werden keine Bilder angezeigt. | No memory card/USB drive inserted or files wird nicht unterstützt. | Insert a compatible memory card or USB drive with supported image formats (e.g., JPEG). Check if the storage device is properly inserted. |
| Datum und Uhrzeit werden nach dem Ausschalten zurückgesetzt. | Keine interne Batterie als Notstromversorgung für die Uhr. | This model may not retain date/time settings without continuous power. Re-enter settings if necessary after power interruption. |
| Video playback is choppy or distorted. | Unsupported video format or high bitrate. | Video sicherstellen files are in a supported format and resolution. Convert videos to a lower resolution or bitrate if issues persist. |
| Tasten reagieren nicht. | Vorübergehender Softwarefehler. | Disconnect the power adapter, wait a few seconds, then reconnect it to restart the device. |
9. Spezifikationen
| Besonderheit | Detail |
|---|---|
| Modellnummer | 00095236 |
| Bildschirmgröße | 8 Zoll |
| Bildschirmauflösung | 800 x 600 Pixel |
| Seitenverhältnis | 4:3 |
| Interner Speicher | 2 GB (2048 MB) |
| Konnektivität | USB, SD/MMC/MS Card Slot |
| Abmessungen (L x B x H) | 2.6 x 22.2 x 17.8 cm |
| Gewicht | 550 g |
| Hersteller | Hama |
10. Garantieinformationen
Hama GmbH & Co KG provides a manufacturer's warranty for this product. The specific terms and conditions of the warranty period and coverage are subject to the purchase date and the region of purchase. Please retain your proof of purchase (receipt) for any warranty claims.
For detailed warranty information, please refer to the official Hama webBesuchen Sie die Website oder kontaktieren Sie direkt deren Kundendienst.
11. Kundendienst
Should you have any questions regarding this product, please contact Hama Customer Support:
- WebWebsite: Besuchen Sie die offizielle Hama-Website. website for FAQs, drivers, and further product information. www.hama.com
- Kontakt: Siehe den Kontaktbereich auf der Hama-Website. webWebsite für Telefonnummern oder E-Mail-Support in Ihrer Region.
Bitte halten Sie Ihre Modellnummer (00095236) und den Kaufbeleg bereit, wenn Sie sich an den Support wenden.