Einführung
The Keter Master Pro Series Cart 17181110 Tool Box is designed for professionals and DIY enthusiasts requiring robust and reliable tool storage and transport. This system combines a durable tool chest with a versatile tool box, offering ample space for various tools and accessories. Constructed from robust plastic with metal components, it is built for long-lasting performance in demanding environments.
This manual provides essential information for the proper setup, operation, maintenance, and troubleshooting of your Keter Master Pro Series Cart.
Sicherheitshinweise
- Always ensure the tool chest and tool box are securely latched before transport to prevent contents from spilling.
- Do not overload the tool chest or tool box beyond their intended capacity. Refer to the Specifications section for weight limits if available.
- When moving the cart, ensure the path is clear of obstacles to prevent tipping or accidents.
- Exercise caution when lifting or lowering the tool box from the cart to avoid injury.
- Keep hands and fingers clear of moving parts, such as wheels and extendable handles, during operation.
- Store the tool cart on a stable, level surface when not in use.
Packungsinhalt
Prüfen Sie beim Auspacken, ob alle Komponenten vorhanden und unbeschädigt sind.
- 1 x Keter Master Pro Series Tool Chest (bottom unit with wheels)
- 1 x Keter Master Pro Series Tool Box (top unit)
- 1 x Removable Carrying Insert (for tool box)
- 1 x Removable Organizer (for tool box)

Figure 1: The Keter Master Pro Series Cart, showing the assembled tool chest and tool box.
Aufstellen
Zusammenbau des Wagens
- Place the tool chest (bottom unit) on a stable, flat surface.
- Ensure the extendable handle on the tool chest is fully retracted before placing the tool box on top.
- Align the tool box (top unit) with the designated grooves or locking points on the lid of the tool chest. The lid is designed to securely hold the tool box during transport.
- Gently lower the tool box onto the tool chest until it sits firmly.

Figure 2: The Keter Master Pro Series Cart with the top tool box detached from the main tool chest, illustrating the two main components.

Figure 3: Demonstrating the process of detaching the top tool box from the main cart unit.
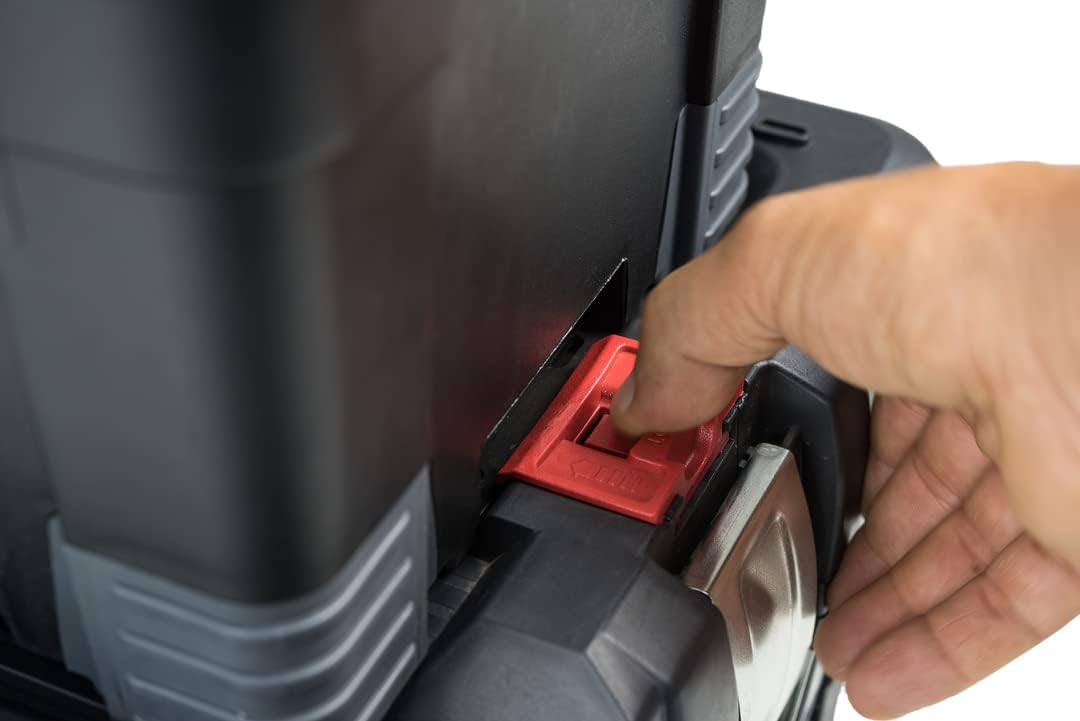
Abbildung 4: Eine Nahaufnahme view of the red latch mechanism used to secure or release the top tool box from the cart.
Organizing the Tool Box
The top tool box includes a removable carrying insert and a removable organizer for smaller items.
- Place the removable carrying insert inside the tool box for frequently used hand tools.
- Utilize the removable organizer for small parts such as screws, nuts, bolts, or electrical connectors.

Figure 5: The removable organizer being taken out of the top tool box, highlighting its portability and utility for small components.

Figure 6: The removable organizer insert being carried, demonstrating its convenience for transporting small items independently.
Bedienungsanleitung
Transporting the Cart
- Ensure the tool box is securely seated on the tool chest.
- Extend the telescopic handle of the tool chest to a comfortable height.
- Tilt the cart slightly backward onto its two profile wheels and pull it to your desired location.
- When stationary, lower the cart back onto its base for stability.
Accessing Contents
- To access tools in the top tool box, unlatch its metal clasps and open the lid.
- To access tools in the tool chest, you may either remove the top tool box or open the tool chest lid directly if the top box is not obstructing it.
- The tool box features metal clasps for secure closure and rubberized corners for a secure stand when placed on surfaces.

Figure 7: The top tool box features a design that allows for the attachment of a padlock (not included) for added security of your tools.
Wartung
- Reinigung: Wischen Sie die Kunststoffoberflächen mit einem Tuch ab.amp cloth and mild soap as needed. Avoid abrasive cleaners or solvents that could damage the plastic.
- Inspektion: Periodically inspect the metal clasps, hinges, wheels, and extendable handle for any signs of wear or damage.
- Schmierung: If the extendable handle or wheels become stiff, apply a small amount of silicone-based lubricant to the moving parts.
- Lagerung: Store the tool cart in a dry, cool place away from direct sunlight to prolong its lifespan.
Fehlerbehebung
| Problem | Mögliche Ursache | Lösung |
|---|---|---|
| Tool box does not sit securely on tool chest. | Fehlausrichtung oder Blockierung. | Ensure the tool box is correctly aligned with the grooves on the tool chest lid. Check for any debris obstructing the fit. |
| Extendable handle is stiff or difficult to operate. | Schmutzablagerungen oder mangelnde Schmierung. | Clean the handle mechanism and apply a silicone-based lubricant to the sliding parts. |
| Die Räder rollen nicht reibungslos. | In Rädern oder Achsen verfangene Fremdkörper. | Remove any debris from the wheels and axle. Lubricate the axle if necessary. |
| Metal clasps are difficult to close/open. | Fehlausrichtung oder Verschleiß. | Check for proper alignment. If worn, contact customer support for potential replacement parts. |
Technische Daten
| Besonderheit | Detail |
|---|---|
| Modellnummer | 239989 |
| Teilenummer | 17181110 |
| Material | Plastic with Metal Components |
| Farbe | Rot/Silber |
| Artikelgewicht | Ungefähr 25.5 Pfund (11.57 kg) |
| Produktabmessungen (insgesamt) | Ungefähr 10.63 x 1.69 x 1.69 Zoll (27 x 4.3 x 4.3 cm) |
| Tool Chest Dimensions (L x W x H) | Ungefähr 64.5 x 37.3 x 44.9 cm (25.4 x 14.7 x 17.7 Zoll) |
| Tool Box Dimensions (L x W x H) | Ungefähr 21.5 x 11 x 9.6 Zoll (54.6 x 27.9 x 24.4 cm) |
| Stückzahl | 2 (Tool Chest, Tool Box) |
| Besondere Merkmale | Removable top tool box, extendable handle, 2 profile wheels, metal clasps, rubberized corners, removable carrying insert, removable organizer. |
Note: Dimensions are approximate and may vary slightly. The overall product dimensions provided in some specifications may refer to packaging or a specific component.
Garantie und Support
Keter products are designed for durability and long-term use. For specific warranty information, please refer to the documentation included with your purchase or visit the official Keter website. In case of issues or for technical support, please contact Keter customer service.
For more information about Keter products, you can visit the Keter Store on Amazon.


