1. Einleitung
This manual provides detailed instructions for the installation, operation, and maintenance of your SpeaKa Professional DL-1117 In-Wall/Ceiling Speaker. Please read this manual thoroughly before installation and use to ensure proper function and safety. Keep this manual for future reference.
2. Produktüberschreitungview
The SpeaKa Professional DL-1117 is a high-quality in-wall/ceiling speaker designed for various audio applications in both residential and industrial environments. Its robust metallic construction ensures durability and reliable performance.

Abbildung 2.1: Front view of the SpeaKa Professional DL-1117 In-Wall/Ceiling Speaker. This image shows the speaker's front grille and mounting frame.
Hauptmerkmale:
- Ideal for wall and ceiling mounting.
- Suitable for industrial and residential spaces.
- Solid metallic construction for enhanced durability.
3. Spezifikationen
| Spezifikation | Wert |
|---|---|
| Marke | SpeakaKa Professional |
| Modellname | DL-1117 |
| Artikelmodellnummer | SP-1207908 |
| Lautsprechertyp | In-Wall/Ceiling Speaker |
| Lautsprechergröße | 8 Inches (77mm INWALL SPEAKER as per label) |
| Impedanz | 8 Ohm |
| Power (Nominal) | 15 Watt |
| Maximale Lautsprecherausgangsleistung | 25 Watt |
| Frequenzgang | 90Hz - 17,000Hz (as per label) |
| Montagetyp | Deckenmontage (auch für Wandmontage geeignet) |
| Produktabmessungen (L x B x H) | 11 x 11 x 7 cm |
| Artikelgewicht | 520 Gramm |
| Farbe | Schwarz |
| Anzahl der Einheiten | 1 Einheit |
| Empfohlene Verwendung | For computer (audio output), general audio systems |
| Kompatible Geräte | Desktop computer, Laptop (via ampVerstärker/Empfänger) |

Abbildung 3.1: Dimensional drawing of the SpeaKa Professional DL-1117 speaker. This diagram illustrates the speaker's diameter (Ø100mm), depth (49mm), and cutout dimensions (Ø74mm, Ø81mm).
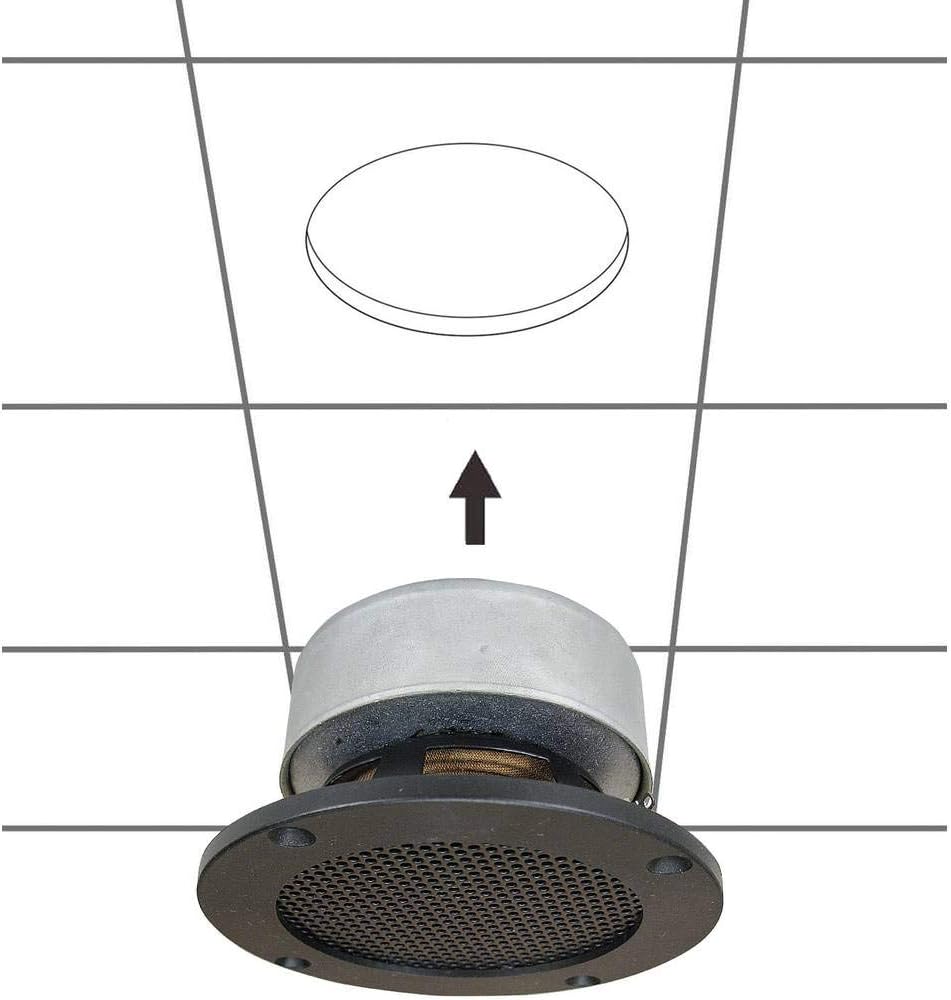
Abbildung 3.2: Zurück view of the SpeaKa Professional DL-1117 speaker, showing the product label with model number DL-1117BK8, frequency response, power rating, and impedance.
4. Sicherheitshinweise
Bitte beachten Sie die folgenden Sicherheitsvorkehrungen, um Verletzungen oder Schäden am Produkt zu vermeiden:
- Elektrische Sicherheit: Ensure all power to the audio system is disconnected before making any connections or performing installation. Incorrect wiring can cause damage to the speaker or ampschwerer.
- Installation: Installation should be performed by a qualified professional if you are unsure about electrical wiring or structural integrity. Ensure the mounting surface (wall or ceiling) can safely support the weight of the speaker.
- Umfeld: Do not expose the speaker to excessive moisture, extreme temperatures, or direct sunlight.
- Reinigung: Verwenden Sie zum Reinigen ein weiches, trockenes Tuch. Verwenden Sie keine flüssigen Reinigungsmittel oder Sprays.
- Demontage: Versuchen Sie nicht, den Lautsprecher zu zerlegen oder zu verändern. Dadurch erlischt die Garantie und es können Schäden oder Verletzungen entstehen.
5. Einrichtung und Installation
Follow these steps for proper installation of your in-wall/ceiling speaker:
5.1 Erforderliches Werkzeug
- Bohren
- Hole saw (matching cutout diameter, approx. Ø74-81mm)
- Schraubendreher
- Abisolierzange
- Speaker wire (appropriate gauge for your amplifier and cable length)
5.2 Montageort
Choose a suitable location in your wall or ceiling. Ensure there are no electrical wires, plumbing, or structural elements behind the chosen area. Use a stud finder if necessary.
5.3 Öffnung ausschneiden
- Carefully mark the desired cutout diameter on the wall or ceiling. Refer to the dimensions in Figure 3.1.
- Using a hole saw, carefully cut the opening.
5.4 Verkabelung
- Verlegen Sie ein Lautsprecherkabel von Ihrem amplifier/receiver to the cutout opening.
- Entfernen Sie an den Enden des Lautsprecherkabels etwa 1/2 Zoll (12 mm) der Isolierung.
- Connect the speaker wires to the terminals on the back of the DL-1117 speaker. Ensure correct polarity (+ to + and - to -) from the amplifier to the speaker. The terminals are typically screw-type or spring-loaded.
5.5 Installing the Speaker
- Carefully insert the speaker into the cutout opening.
- Secure the speaker using the integrated mounting clips or screws, if applicable. For this model, the design suggests it is inserted and then secured from the front.

Abbildung 5.1: Diagram illustrating the installation process of the SpeaKa Professional DL-1117 speaker into a ceiling opening. The speaker is inserted from below into the pre-cut hole.
6. Bedienungsanleitung
Once the speaker is correctly installed and wired to your ampVerstärker oder Empfänger:
- Stellen Sie sicher, dass alle Verbindungen sicher sind.
- Schalten Sie Ihr amplifier/Empfänger.
- Start playing audio through your connected source.
- Stellen Sie die Lautstärke an Ihrem ein amplifier/receiver to a comfortable listening level. Avoid excessively high volumes that could distort the sound or damage the speaker.
7. Wartung
The SpeaKa Professional DL-1117 speaker requires minimal maintenance:
- Reinigung: Periodically wipe the speaker grille and frame with a soft, dry cloth to remove dust. Do not use abrasive cleaners or solvents.
- Inspektion: Occasionally check the speaker for any visible damage or loose connections.
8. Fehlerbehebung
Sollten Sie Probleme mit Ihrem Lautsprecher haben, beachten Sie bitte die folgenden häufig auftretenden Probleme und Lösungen:
| Problem | Mögliche Ursache | Lösung |
|---|---|---|
| Kein Ton vom Lautsprecher | Lose oder falsche Verkabelung Amplifier/receiver off or muted Das Quellgerät gibt keinen Ton wieder. | Prüfen Sie alle Lautsprecherkabelanschlüsse auf korrekte Polarität und festen Sitz. Sicherstellen amplifier/receiver is on and not muted, and volume is up. Verify audio is playing from the source device. |
| Verzerrter Ton | Volumen zu hoch Schlechte Qualität der Audioquelle Beschädigtes Lautsprecherkabel | Reduzieren Sie die Lautstärke Ihres amplifier/Empfänger. Try a different audio source to rule out source issues. Inspect speaker wires for fraying or damage and replace if necessary. |
| Unterbrochener Ton | Lose Verbindungen Fehlerhaft ampLifier-Kanal | Überprüfen und sichern Sie alle Lautsprecherkabelverbindungen. Test the speaker with a different amplifier channel or a known working ampschwerer. |
If the problem persists after trying these solutions, please contact SpeaKa Professional customer support.
9. Garantie und Support
For warranty information and customer support, please refer to the documentation provided with your purchase or visit the official SpeaKa Professional webBewahren Sie Ihren Kaufbeleg für Garantieansprüche auf.
Hersteller: SpeakaKa Professional
ASIN: B00CS2V1AQ


