1. Sicherheitshinweise
Please read these instructions carefully before using the Ferplast ATLAS BIKE 20 Rapid bicycle basket. Failure to follow these instructions may result in injury to your pet or yourself.
- This bicycle basket is designed for small dogs weighing a maximum of 7 kg (15 lbs). Do not exceed this weight limit.
- Always secure your pet using the integrated safety leash, attaching it to their collar or harness.
- Ensure the basket is securely attached to the bicycle handlebars before each use.
- The front protective grid must always be in place when your pet is in the basket.
- Periodically check all attachment points and components for wear or damage. Do not use if damaged.
- Be aware that adding weight to the handlebars can affect bicycle steering and balance. Practice riding with the empty basket first, then with your pet in a safe, controlled environment.
- Do not leave your pet unattended in the basket.
2. Produktkomponenten
The Ferplast ATLAS BIKE 20 Rapid bicycle basket includes the following components:
- Main plastic basket with integrated quick-release system.
- Removable front protective grid.
- Washable cotton cushion for pet comfort.
- Adjustable safety leash with clip.
- External mesh pockets for accessories.
- Bicycle handlebar attachment bracket (KlickFix compatible).

Abbildung 2.1: All components included with the Ferplast ATLAS BIKE 20 Rapid bicycle basket. This includes the main basket, a soft cushion, a safety leash, the handlebar mounting bracket, and a separate panel with mesh pockets.
3. Einrichtung und Installation
3.1 Attaching the Handlebar Bracket
- Position the quick-release handlebar attachment bracket on your bicycle's handlebars. Ensure it is centered and does not obstruct brake levers or gear shifters.
- Secure the bracket firmly using the provided screws and tools. Make sure it is tight and stable.
- Empfehlung: If you are unsure about the installation, consult a bicycle specialist to ensure secure mounting.

Abbildung 3.1: The quick-release handlebar bracket securely installed on a bicycle handlebar, ready to receive the basket.
3.2 Attaching the Basket to the Bracket
- Align the quick-release mechanism on the back of the basket with the installed handlebar bracket.
- Push the basket firmly downwards onto the bracket until you hear a "click," indicating it is locked into place.
- Gently pull upwards on the basket to confirm it is securely attached and does not wobble.
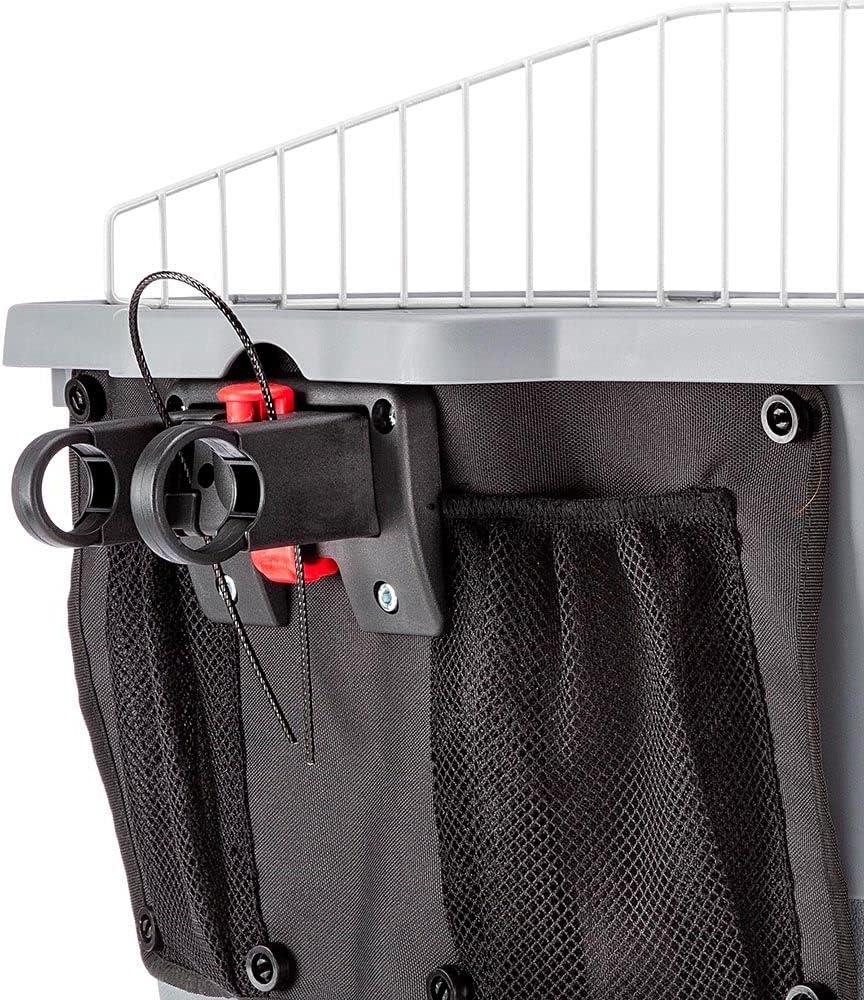
Abbildung 3.2: Detail of the quick-release attachment system on the rear of the basket, showing the locking mechanism.
3.3 Installing the Protective Grid and Cushion
- Insert the front protective grid into the designated slots on the rim of the basket. Ensure it is firmly seated.
- Place the washable cotton cushion inside the basket for your pet's comfort.
- Attach the safety leash to the designated loop inside the basket.

Abbildung 3.3: The interior of the basket, showing the comfortable cushion and the attached safety leash.

Abbildung 3.4: The bicycle basket with the white protective grid securely in place, providing safety for the pet.
4. Bedienungsanleitung
4.1 Placing Your Pet in the Basket
- Ensure the basket is securely mounted on the bicycle.
- Gently place your small dog into the basket.
- Attach the safety leash to your dog's collar or harness. This prevents your pet from jumping out during the ride.
- Ensure the front protective grid is properly installed.
4.2 Korb herausnehmen
The quick-release system allows for easy removal of the basket when not in use or for carrying your pet off the bike.
- Locate the release button/lever on the quick-release mechanism (typically red).
- Press the button/lever and lift the basket upwards from the handlebar bracket.
- The basket can now be carried separately.
5. Wartung
- Reinigen des Korbes: The plastic basket can be wiped clean with a damp cloth and mild detergent. Rinse thoroughly and allow to air dry.
- Kissenpflege: The cotton cushion is washable. Refer to the care label on the cushion for specific washing instructions. Typically, machine wash on a gentle cycle with cold water and air dry.
- Komponenten prüfen: Regularly inspect the quick-release mechanism, safety leash, and protective grid for any signs of wear, cracks, or damage. Replace any damaged parts immediately.
- Lagerung: Store the basket in a clean, dry place when not in use.
6. Spezifikationen
| Besonderheit | Detail |
|---|---|
| Modellname | ATLAS BIKE 20 Rapid |
| Artikelmodellnummer | 73021299W1 |
| Marke | Ferplast |
| Maximales Haustiergewicht | 7 kg |
| Material | Plastic (basket), Cotton (cushion) |
| Produktabmessungen (L x B x H) | 47 x 35.5 x 34.5 cm (18.5 x 13.98 x 13.58 Zoll) |
| Artikelgewicht | 1.5 kg |
| Besondere Merkmale | Quick-release system, Washable cushion, Safety leash, External mesh pockets, Front protective grid |
| Empfohlene Verwendung | Bicycle transport for small dogs |
| Ursprungsland | Italien |

Abbildung 6.1: Überview of the Ferplast ATLAS BIKE 20 Rapid basket with key dimensions (length, width, height) clearly marked.
7. Fehlerbehebung
| Problem | Mögliche Ursache | Lösung |
|---|---|---|
| Basket feels unstable on handlebars. | Handlebar bracket not securely tightened or incorrectly installed. | Ensure the handlebar bracket is tightened according to instructions. Re-install if necessary, consulting a bike specialist if needed. |
| Basket does not click into place. | Misalignment with the bracket or obstruction. | Check for any obstructions. Re-align the basket with the bracket and push down firmly until it locks. |
| Pet attempts to jump out. | Safety leash not attached or too loose. | Always attach the safety leash to your pet's collar or harness. Ensure it is snug but comfortable. |
8. Garantieinformationen
Ferplast products are manufactured to high-quality standards. For specific warranty details, please refer to the warranty card included with your purchase or visit the official Ferplast webBewahren Sie Ihren Kaufbeleg für eventuelle Garantieansprüche auf.
9. Kundendienst
For further assistance, questions, or to purchase replacement parts, please contact Ferplast customer service through their official webWebsite oder der Einzelhändler, bei dem Sie das Produkt gekauft haben.
WebWebsite: www.ferplast.com


