Einführung
This manual provides essential information for the safe and efficient operation of your InFocus IN124a XGA Wireless-Ready Projector. Please read this manual thoroughly before using the projector and retain it for future reference. This projector is designed for displaying content with XGA (1024 x 768) native resolution, offering 3500 lumens of brightness and a 15000:1 contrast ratio.
Sicherheitshinweise
- Elektrische Sicherheit: Always connect the projector to a grounded power outlet. Do not use damaged power cords. Disconnect power before cleaning or servicing.
- Wärme und Belüftung: Ensure adequate ventilation around the projector. Do not block ventilation openings. Avoid placing the projector near heat sources.
- Lamp Sicherheit: Der Projektor lamp operates at high temperatures and pressures. Allow the projector to cool down before moving or replacing the lamp. Do not look directly into the lens when the lamp ist eingeschaltet.
- Handhabung: Behandeln Sie den Projektor vorsichtig. Vermeiden Sie es, ihn fallen zu lassen oder starken Stößen auszusetzen.
- Feuchtigkeit: Setzen Sie den Projektor weder Regen, Feuchtigkeit noch übermäßiger Luftfeuchtigkeit aus.
Packungsinhalt
Überprüfen Sie, ob alle Artikel im Paket vorhanden sind:
- InFocus IN124a Projector
- HDMI-Kabel
- VGA-Kabel
- Netzkabel
- Remote Control (not explicitly listed but standard)
- Optional USB adapter for wireless connectivity (if purchased separately)
Produkt überview
Familiarize yourself with the physical components and connections of your InFocus IN124a projector.

This image displays the rear panel of the InFocus IN124a projector, highlighting various connectivity options including HDMI, VGA (Computer 1 and 2), Monitor Out, S-Video, Video, Audio In (1 and 2), Audio Out, RS-232, USB-B, USB Mini-B, and USB-A ports. The power input is located on the lower left.

The top panel of the InFocus IN124a projector is shown, featuring the control buttons for power, menu navigation (up, down, left, right, enter), source selection, blank screen function, and indicators for temperature and lamp status. The focus and zoom adjustment rings are also visible.

Eine Front view of the InFocus IN124a projector, showing the main projection lens and the power indicator light. The focus and zoom rings are visible near the lens.

Dieses Bild zeigt eine Seite view of the InFocus IN124a projector, emphasizing the ventilation grilles designed for heat dissipation, crucial for maintaining optimal operating temperature.
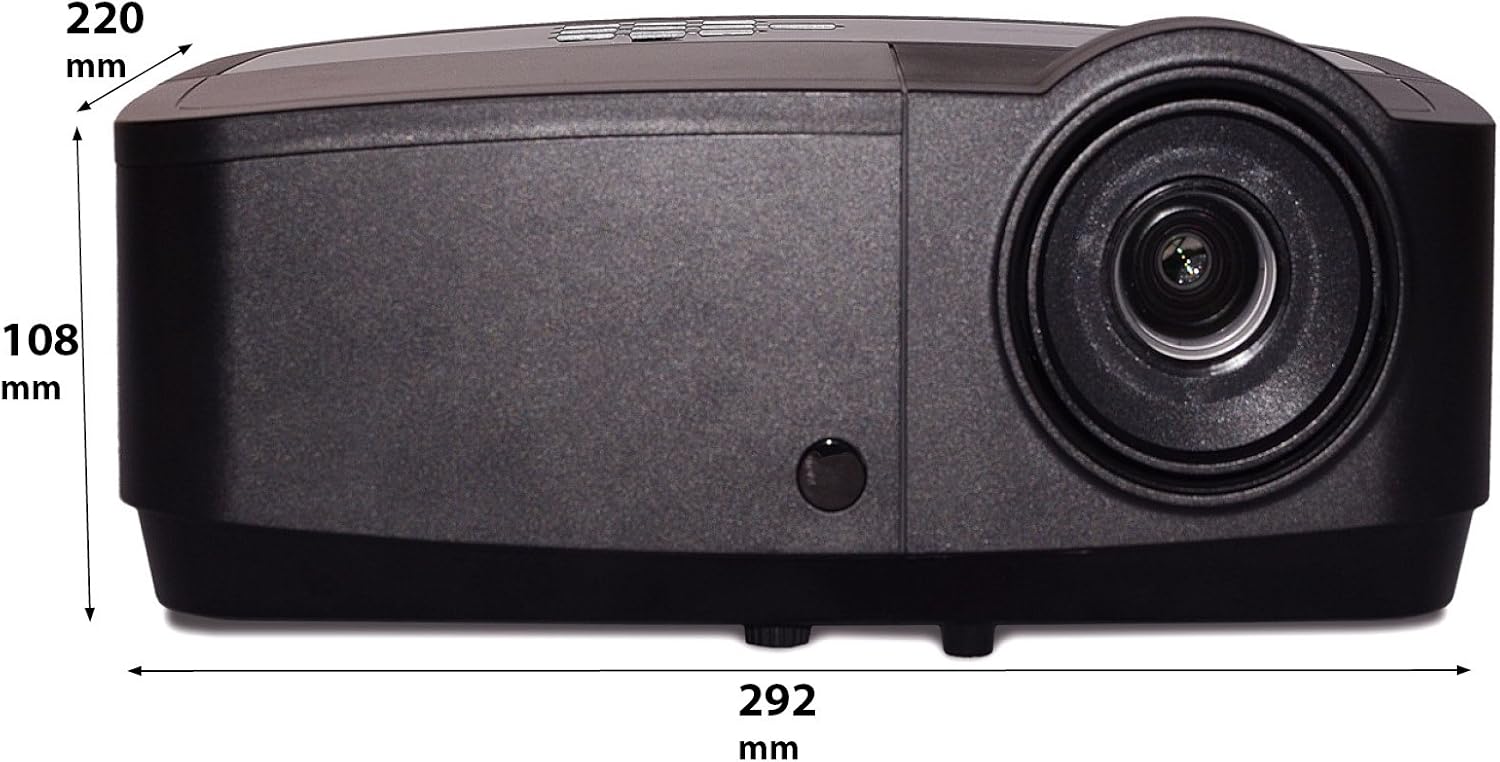
Dieses Bild zeigt eine Seitenansichtfile of the InFocus IN124a projector, illustrating its physical dimensions: approximately 292 mm in length, 108 mm in height, and 220 mm in width.
Aufstellen
1. Platzierung
Position the projector on a stable, flat surface or mount it securely. Ensure the projector is at an appropriate distance from the screen to achieve the desired image size. Avoid direct sunlight or strong ambient light on the screen for optimal viewing.
2. Stromversorgung anschließen
- Schließen Sie das Netzkabel an den Stromeingang des Projektors an.
- Stecken Sie das andere Ende des Netzkabels in eine geerdete Steckdose.
3. Videoquellen verbinden
The IN124a offers multiple connectivity options:
- HDMI: Verbinden Sie Ihr Quellgerät (z. B. Laptop, Blu-ray-Player) mit einem HDMI-Kabel mit dem HDMI-Anschluss des Projektors.
- VGA (Computer 1/2): Use a VGA cable to connect your computer to either the 'COMPUTER 1' or 'COMPUTER 2' port.
- S-Video/Video: For older devices, connect S-Video or composite video cables to the respective ports.
- USB: The USB-A port can be used for displaying content directly from a USB drive. The USB-B port supports USB display functionality.
- Audio: Connect external audio sources to 'AUDIO 1' or 'AUDIO 2' inputs, and use 'AUDIO OUT' for external speakers if needed.
4. Wireless Setup (Optional)
For wireless connectivity, an optional USB adapter is required. Insert the wireless USB adapter into the designated USB port on the projector. Refer to the adapter's specific instructions for software installation and connection procedures on your source device.
Betrieb
1. Ein-/Ausschalten
- Einschalten: Press the 'Power' button on the projector's control panel or remote control. The power indicator light will turn steady blue.
- Ausschalten: Press the 'Power' button again. A confirmation message may appear. Press 'Power' a second time to confirm shutdown. The fan will continue to run briefly to cool the lamp before shutting down completely.
2. Bild anpassen
- Fokus: Rotate the focus ring around the lens until the image appears sharp and clear.
- Zoom: Rotate the zoom ring around the lens to adjust the image size without moving the projector.
- Trapezkorrektur: Wenn das Bild trapezförmig erscheint, verwenden Sie die Trapezkorrekturfunktion im Menü des Projektors, um das Bild zu begradigen.
3. Quellenauswahl
Press the 'Source' button on the control panel or remote control repeatedly to cycle through available input sources (HDMI, Computer 1, Computer 2, S-Video, Video, USB). The projector will automatically detect an active signal.
4. Menünavigation
Press the 'Menu' button to access the On-Screen Display (OSD) menu. Use the arrow buttons to navigate through options and 'Enter' to select. Press 'Menu' or 'Exit' to close the OSD.
5. 3D-Modus
The InFocus IN124a is 3D-Ready. To utilize 3D functionality, you will need compatible 3D content, a 3D-capable source device, and active 3D glasses. Refer to your 3D source device's manual for specific setup instructions. The projector will automatically detect a 3D signal when available.
Wartung
1. Lamp Ersatz
Der Projektor lamp has a lifespan of up to 7,000 hours. When the lamp Das Leben nähert sich seinem Ende, eine Warnmeldung kann erscheinen, oder das Lebenamp indicator light will illuminate. Only replace the lamp with an authorized InFocus replacement lamp. Always allow the projector to cool completely before attempting lamp Ersatz.
2. Reinigung
- Projektor Casing: Verwenden Sie ein weiches, fusselfreies Tuch dampened with a mild, non-abrasive cleaner. Do not use harsh chemicals.
- Linse: Gently wipe the lens with a lens cleaning cloth or lens tissue. Avoid touching the lens surface with your fingers.
- Belüftungsöffnungen: Periodically check and clean the air vents to prevent dust buildup, which can lead to overheating. Use a soft brush or compressed air to clear obstructions.
Fehlerbehebung
Sollten Sie Probleme mit Ihrem Projektor haben, beachten Sie bitte die folgenden häufig auftretenden Probleme und Lösungen:
| Problem | Mögliche Ursache | Lösung |
|---|---|---|
| Kein Bild angezeigt | Power not connected; Incorrect input source; Source device not active. | Check power connection; Select correct input source; Ensure source device is on and outputting signal. |
| Das Bild ist unscharf oder unscharf. | Lens focus not adjusted; Projector too close/far from screen. | Adjust the focus ring on the lens; Adjust projector distance or use zoom ring. |
| Fernbedienung funktioniert nicht | Batteries depleted; Obstruction between remote and projector; Remote sensor blocked. | Replace batteries; Remove obstructions; Ensure remote sensor on projector is clear. |
| Der Projektor überhitzt und schaltet sich ab. | Blocked ventilation; Dusty air filter. | Ensure vents are clear; Clean air filter (if applicable) and vents. |
Technische Daten
| Besonderheit | Spezifikation |
|---|---|
| Native Auflösung | XGA (1024 x 768) |
| Helligkeit | 3500 Lumen |
| Kontrastverhältnis | 15000:1 |
| Lamp Leben | Bis zu 7,000 Stunden (Eco-Modus) |
| Konnektivitätstechnologie | Wireless (with optional adapter), HDMI, USB video |
| Besonderheit | 3D-fähig |
| Technische Daten | 14.25 x 12 x 7.75 Zoll (36.2 x 30.5 x 19.7 cm) |
| Artikelgewicht | 5.4 Pfund (2.45 kg) |
| Empfohlene Verwendung | Innen/Außen |
Garantie und Support
For warranty information and technical support, please refer to the warranty card included with your product or visit the official InFocus webBewahren Sie Ihren Kaufbeleg als Kaufnachweis für Garantieansprüche auf.


