1. Einleitung
Vielen Dank für Ihren Einkauf.asing the SINGER monami Delight SP-70P Computer Sewing Machine. This manual provides essential information for the safe and efficient operation, maintenance, and troubleshooting of your new sewing machine. Please read this manual thoroughly before using the machine and keep it in a safe place for future reference.
The monami Delight SP-70P is designed for ease of use, featuring large, intuitive buttons and a wide sewing base, making it suitable for various sewing projects.
2. Sicherheitshinweise
Um einen sicheren Betrieb zu gewährleisten, beachten Sie bitte stets diese grundlegenden Sicherheitsvorkehrungen:
- Ziehen Sie beim Reinigen, Schmieren oder wenn die Maschine nicht benutzt wird, immer den Netzstecker.
- Halten Sie die Finger von allen beweglichen Teilen fern. Besondere Sorgfalt ist um die Nähmaschinennadel erforderlich.
- Verwenden Sie die richtige Nadelplatte. Die falsche Platte kann zum Nadelbruch führen.
- Verwenden Sie keine gebogenen Nadeln.
- Ziehen oder schieben Sie den Stoff während des Nähens nicht. Dadurch kann die Nadel abgelenkt werden und brechen.
- Tragen Sie beim Bedienen der Maschine eine Schutzbrille.
- Betreiben Sie die Maschine niemals mit blockierten Lüftungsöffnungen. Halten Sie die Lüftungsöffnungen der Nähmaschine und des Fußanlassers frei von Flusen, Staub und losen Stoffresten.
- Dieses Gerät ist nicht für den Gebrauch durch Personen (einschließlich Kinder) mit eingeschränkten physischen, sensorischen oder geistigen Fähigkeiten oder Mangel an Erfahrung und Wissen bestimmt, es sei denn, sie werden von einer für ihre Sicherheit verantwortlichen Person beaufsichtigt oder erhalten Anweisungen zur Verwendung des Geräts.
3. Produktüberschreitungview
The SINGER monami Delight SP-70P is a versatile computer sewing machine designed for various sewing tasks. It features a user-friendly interface and robust construction.
Hauptmerkmale:
- 12 Stickmuster: Offers a variety of practical stitches for different sewing needs.
- Automatischer Nadeleinfädler: Vereinfacht den Threading-Prozess.
- Automatic Thread Tension: Adjusts tension automatically for various fabric types.
- 7-Punkt-Fütterungshund: Ensures smooth fabric feeding.
- Horizontal Full Rotary Hook: Prevents thread tangles and allows easy bobbin setting.
- Freier Arm: Convenient for sewing cylindrical items like sleeves and pant hems.
- LED-Hand Lamp: Provides bright, long-lasting illumination of the sewing area.
- Geräuscharmes Design: Equipped with a small, powerful magnet motor for reduced noise.
Maschinenkomponenten:
Refer to the image below for a visual guide to the main components of your sewing machine.

Abbildung 3.1: Vorderseite view of the SINGER monami Delight SP-70P sewing machine, showcasing sein Design und Bedienfeld.

Abbildung 3.2: Überview of the SINGER monami Delight SP-70P, highlighting key operational areas and design elements.
4. Einrichtung
4.1 Auspacken und Aufstellen
- Nehmen Sie die Maschine vorsichtig aus der Verpackung.
- Stellen Sie die Maschine auf eine stabile, ebene Fläche.
- Ensure there is adequate space around the machine for comfortable operation and fabric handling.
4.2 Stromanschluss
- Connect the power cord to the machine and then to a 100V (50/60Hz) electrical outlet.
- Turn on the power switch, usually located on the side of the machine. The LED hand lamp sollte leuchten.
4.3 Spulenwicklung
The machine features an easy bobbin winding system:
- Setzen Sie eine leere Spule auf die Spulenwickelspindel.
- Follow the numbered guide on the machine for threading the bobbin winding path.
- Schieben Sie die Spulerspindel nach rechts.
- Press the foot controller or start button to begin winding. The machine will automatically stop when the bobbin is full.
- Den Faden abschneiden und die Spulenwickelspindel wieder nach links drehen.
4.4 Einfädeln des Obergewindes
The New Threading System makes upper threading simple:
- Heben Sie den Nähfußhebel an.
- Setzen Sie eine Garnrolle auf den Garnrollenstift.
- Folgen Sie dem auf der Maschine angezeigten nummerierten Einfädelweg und achten Sie darauf, dass der Faden durch alle Führungen und den Fadenhebel geführt wird.
- Use the automatic needle threader by lowering the lever and engaging it with the needle eye.
- Pull the thread loop through the needle eye.
5. Bedienungsanleitung
5.1 Stichauswahl
The monami Delight SP-70P offers 12 practical stitch patterns. Use the direct pattern selection buttons on the control panel to choose your desired stitch.

Figure 5.1: Visual representation of the 12 practical stitch patterns available on the SP-70P.
5.2 Grundlegende Nähkenntnisse
- Select your desired stitch pattern.
- Legen Sie den Stoff unter den Nähfuß.
- Senken Sie den Nähfuß.
- Press the foot controller or start button to begin sewing.
- Use the lock stitch function at the beginning and end of your seam to prevent unraveling.
5.3 Erweiterte Funktionen
- Fully Automatic Buttonhole: Select the buttonhole stitch, place your button in the buttonhole foot, and the machine will automatically sew a buttonhole to the correct size.
- One-Touch Slow Button: Press this button during sewing to reduce the speed, which is useful for intricate details, curves, and corners.
- Needle Up/Down: Control the needle's stopping position (up or down) for easy pivoting or continuous sewing.
- Drop Feed: Lower the feed dog for free-motion sewing, such as quilting or embroidery.
- Leveling Presser Foot Button: Use this button to keep the presser foot level when starting to sew on thick fabrics or multiple layers.
- Stitch Length and Width Adjustment: Adjust the stitch length and width according to your fabric and desired pattern.
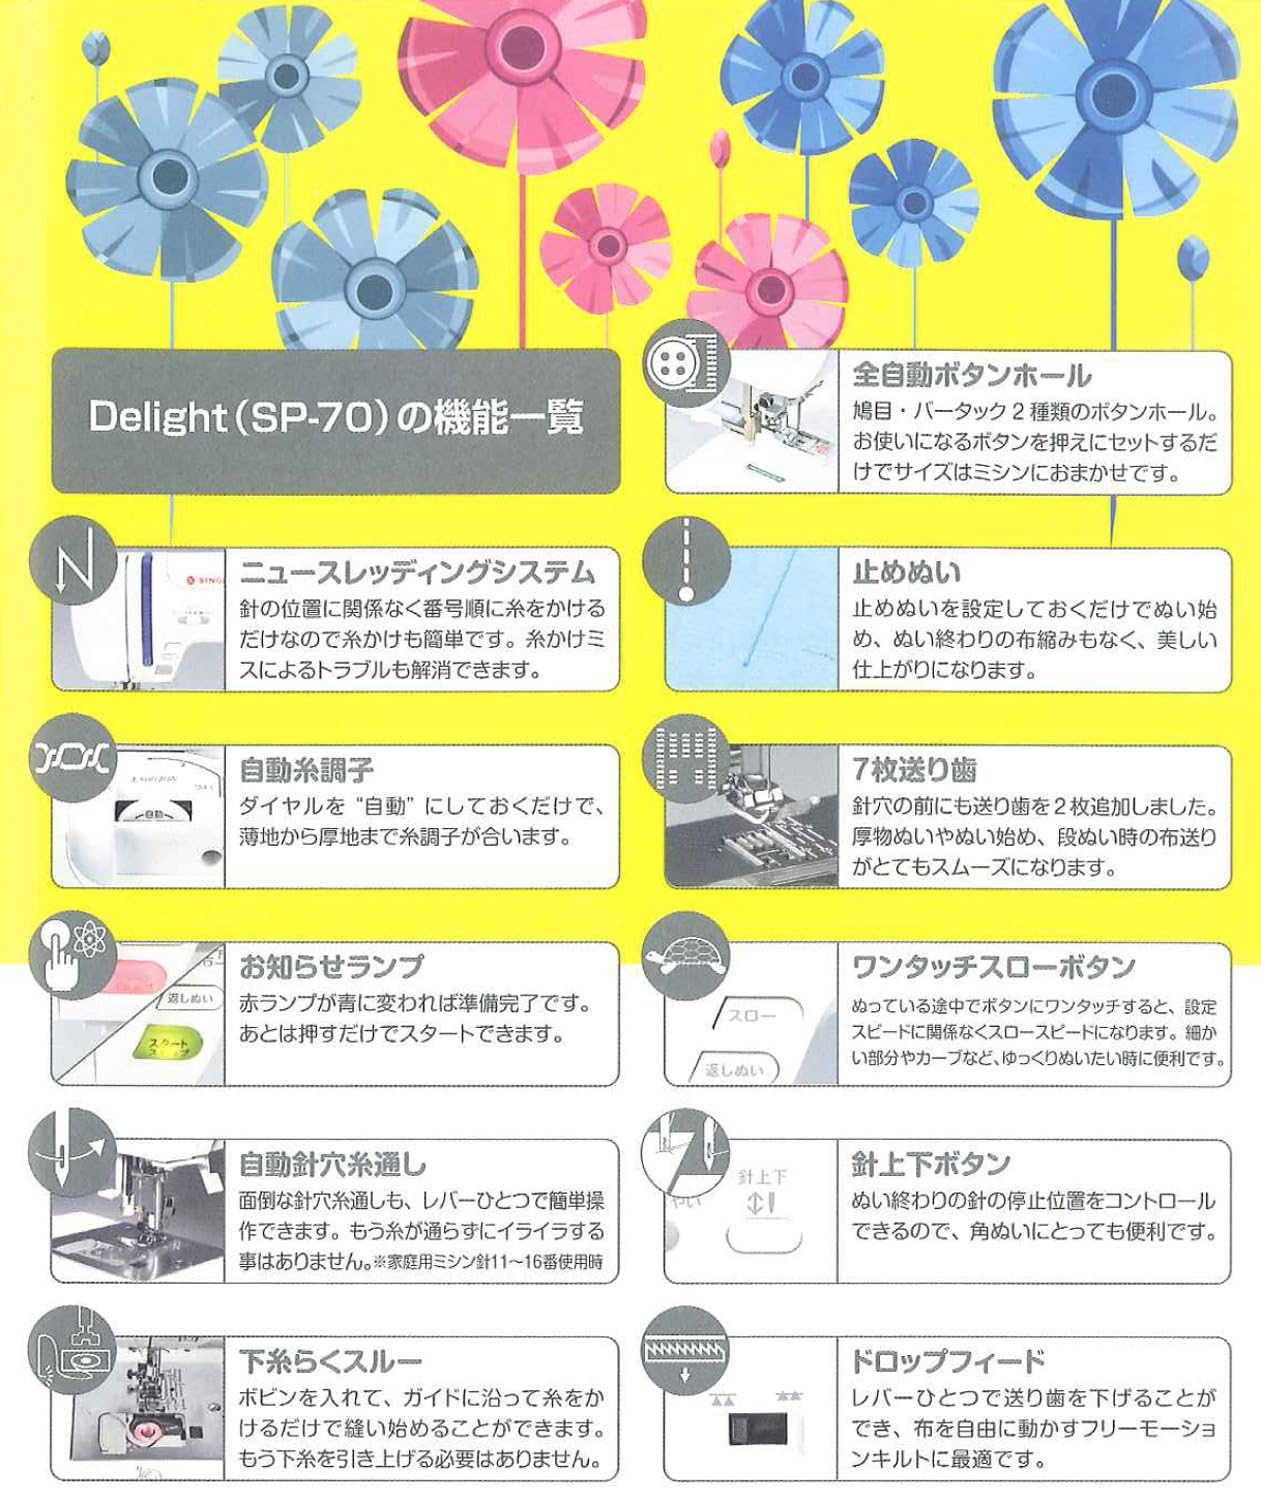
Figure 5.2: Detailed list of functions and features of the SINGER monami Delight SP-70P.

Abbildung 5.3: Überview of additional useful features of the SINGER monami Delight SP-70P.
6. Wartung
Regelmäßige Wartung gewährleistet die Langlebigkeit und optimale Leistung Ihrer Nähmaschine.
6.1 Reinigung
- Trennen Sie die Maschine immer vom Netz, bevor Sie sie reinigen.
- Use the provided brush to remove lint and dust from the bobbin case area and feed dogs.
- Wischen Sie die Außenseite des Geräts mit einem weichen, trockenen Tuch ab. Verwenden Sie keine scharfen Chemikalien oder Scheuermittel.
6.2 Nadelwechsel
- Replace needles regularly, especially if they become bent or dull, to prevent skipped stitches or fabric damage.
- Use the screwdriver to loosen the needle clamp screw, remove the old needle, and insert a new one with the flat side facing the back.
- Ziehen Sie die Nadel clamp fest verschrauben.
7. Fehlerbehebung
Sollten Sie Probleme mit Ihrer Nähmaschine haben, beachten Sie bitte die folgenden häufigen Probleme und Lösungen:
| Problem | Mögliche Ursache | Lösung |
|---|---|---|
| Übersprungene Stiche | Falsche Nadel, verbogene Nadel, falsch eingefädelt. | Replace needle with correct type/size, re-thread the machine correctly. |
| Fadenbruch | Incorrect threading, thread tension too high, burr on needle plate, poor quality thread. | Neu einfädeln, Fadenspannung einstellen, auf Grate prüfen, hochwertiges Garn verwenden. |
| Stoffkräuselung | Thread tension too high, incorrect stitch length, wrong presser foot. | Adjust tension, increase stitch length, use appropriate presser foot. |
| Maschine startet nicht | Power cord not plugged in, power switch off, bobbin winder engaged. | Check power connection, turn on switch, disengage bobbin winder. |
Sollte das Problem nach Anwendung dieser Lösungsansätze weiterhin bestehen, wenden Sie sich bitte an den Kundendienst.
8. Spezifikationen
| Besonderheit | Spezifikation |
|---|---|
| Modellnummer | SP-70P |
| Hersteller | SINGER |
| Körpergröße (B x T x H) | 43.9 x 19.5 x 28.7 cm |
| Körpergewicht | 8.2 kg |
| Stromversorgung | 100V (50/60Hz) |
| Energieaufnahme | 45 W |
| Stichmuster | 12 Typen |
| Farbe | Candy Berry Pink |
| Zubehör | Soft cover, needle set (No. 11 x 1, No. 14 x 2), bobbins (3 pcs), brush, screwdriver, seam ripper, overcasting foot, zipper foot, buttonhole foot, zigzag foot, spool cap, power cord. |
9. Garantie und Support
For warranty information, please refer to the warranty card included with your product or visit the official SINGER webBewahren Sie Ihren Kaufbeleg für Garantieansprüche auf.
For technical support, spare parts, or service, please contact your local SINGER authorized dealer or customer service center. Contact details can typically be found on the SINGER official weboder auf Ihrer Produktverpackung.


