1. Einleitung
Thank you for choosing the HMF FS-20A Electronic Biometric Safe. This safe is designed to provide secure storage for your valuables using advanced fingerprint recognition technology and a robust electronic locking system. Please read this manual carefully before operating the safe to ensure proper use, optimal performance, and safety.
Bewahren Sie dieses Handbuch zum späteren Nachschlagen auf.
2. Sicherheitshinweise
- Notfallschlüssel: Always keep the emergency override keys in a secure location, separate from the safe itself. Never store them inside the safe.
- Batteriesicherheit: Use only the specified type and size of batteries. Do not mix old and new batteries, or different types of batteries. Remove batteries if the safe will not be used for an extended period.
- Platzierung: Ensure the safe is installed on a stable surface or securely mounted to a wall as instructed.
- Kinder: Bewahren Sie den Tresor und seine Schlüssel außerhalb der Reichweite von Kindern auf.
- Feuchtigkeit: Avoid placing the safe in areas with high humidity or direct exposure to water.
3. Packungsinhalt
Bitte überprüfen Sie den Packungsinhalt, um sicherzustellen, dass alle Artikel vorhanden sind:
- HMF FS-20A Electronic Biometric Safe
- Emergency Override Keys (2x)
- Externer Akkukasten
- AA-Batterien (4x)
- Mounting Bolts (2x)
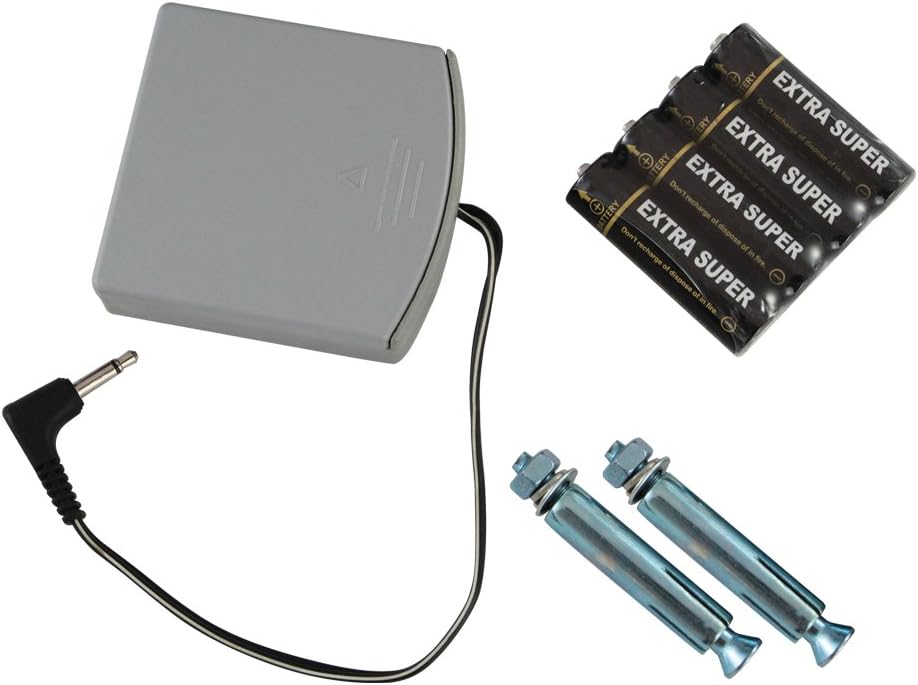
Abbildung 3.1: Included accessories for the HMF FS-20A safe, featuring an external battery box, four AA batteries, and two mounting bolts for installation.
4. Einrichtung
4.1 Eröffnung
Upon receiving your safe, it will be in a locked state. To open it for the first time:
- Locate the emergency keyhole, usually concealed behind a cover on the front panel.
- Stecken Sie einen der mitgelieferten Notfallschlüssel in das Schlüsselloch und drehen Sie ihn im Uhrzeigersinn.
- While holding the key turned, rotate the handle to open the safe door.

Abbildung 4.1: The HMF FS-20A safe with its door open, revealing the internal compartment and the electronic biometric locking system on the door panel.
4.2 Einlegen der Batterie
The safe requires 4 AA batteries for its electronic system. The battery compartment is typically located on the inside of the safe door.
- Open the safe door using the emergency key (if not already open).
- Suchen Sie die Abdeckung des Batteriefachs an der Innenseite der Tür.
- Remove the cover and insert 4 AA batteries, ensuring correct polarity (+/-).
- Bringen Sie die Abdeckung des Batteriefachs wieder an.
- You should hear a beep, indicating the safe is powered on.
4.3 Montage des Tresors
The HMF FS-20A safe can be securely mounted to a wall or floor. This provides additional security against theft. Mounting hardware is included.
- Wählen Sie einen geeigneten Montageort. Stellen Sie sicher, dass die Oberfläche ausreichend stabil ist, um das Gewicht des Tresors und seines Inhalts zu tragen.
- Open the safe door. Locate the pre-drilled mounting holes on the back or bottom of the safe.
- Position the safe and mark the drilling points on the wall or floor through the mounting holes.
- Drill pilot holes at the marked locations using an appropriate drill bit for your wall/floor material.
- Align the safe with the drilled holes and secure it using the provided mounting bolts. Tighten firmly.

Abbildung 4.2: Rear panel of the HMF FS-20A safe, illustrating the two pre-drilled holes designed for secure mounting to a wall or floor surface.
5. Bedienungsanleitung
5.1 Registrierung von Fingerabdrücken
The safe allows you to register multiple fingerprints for convenient access. Refer to your specific model's internal instructions for the exact programming button location (often a small button inside the safe door near the battery compartment).
- With the safe door open, press the internal programming button (usually a red or green button). The indicator light on the fingerprint scanner will illuminate.
- Place the pad of the finger you wish to register firmly on the fingerprint scanner.
- Lift your finger and repeat the scan approximately 3-5 times, slightly adjusting the angle each time, until the safe confirms successful registration (e.g., a long beep or green light).
- To register additional fingerprints, repeat steps 1-3 for each finger.
- Test all registered fingerprints before closing the safe door.

Abbildung 5.1: A user's finger positioned on the biometric sensor of the HMF FS-20A safe, demonstrating the interaction point for fingerprint recognition.
5.2 Öffnen mit Fingerabdruck
To open the safe using a registered fingerprint:
- Legen Sie einen registrierten Finger fest und vollständig auf den Fingerabdruckscanner.
- If the fingerprint is recognized, the indicator light will turn green, and you will hear a beep. The lock mechanism will disengage.
- Within a few seconds, rotate the handle clockwise to open the safe door.
- If the fingerprint is not recognized, the indicator light may turn red, and you will hear an error beep. Try again, ensuring your finger is clean and properly positioned.
5.3 Öffnen mit dem Notfallschlüssel
In case of battery failure, forgotten fingerprints, or electronic malfunction, the safe can be opened using the emergency override key:
- Locate the emergency keyhole cover on the front panel and remove it.
- Insert the emergency key into the keyhole and turn it clockwise.
- While holding the key turned, rotate the handle to open the safe door.
- Once open, you can replace the batteries if needed.
6. Wartung
6.1 Batteriewechsel
When the batteries are low, the safe will typically indicate this with a warning light or a series of beeps during operation. Replace all 4 AA batteries promptly to ensure continuous functionality.
- Öffnen Sie die Tresortür.
- Entfernen Sie die Abdeckung des Batteriefachs.
- Entfernen Sie die alten Batterien und entsorgen Sie diese ordnungsgemäß.
- Legen Sie vier neue AA-Batterien ein und achten Sie dabei auf die richtige Polarität.
- Bringen Sie die Abdeckung des Batteriefachs wieder an.
Using the External Battery Box: If the internal batteries are completely depleted and you cannot open the safe with your fingerprint, connect the external battery box to the emergency power port on the safe's front panel. This will provide temporary power to open the safe, allowing you to replace the internal batteries.
6.2 Reinigung
Um das Aussehen und die Funktionalität Ihres Tresors zu erhalten:
- Wischen Sie die Außenseite mit einem weichen,amp Mit einem Tuch abwischen. Vermeiden Sie scheuernde Reiniger oder Lösungsmittel.
- Gently clean the fingerprint scanner surface with a soft, lint-free cloth to ensure optimal recognition.
7. Fehlerbehebung
| Problem | Mögliche Ursache | Lösung |
|---|---|---|
| Der Tresor lässt sich nicht per Fingerabdruck öffnen. | Fingerprint not registered, finger dirty/wet, incorrect placement, low batteries. | Ensure finger is clean and dry. Reposition finger firmly on scanner. Re-register fingerprint if necessary. Replace batteries. Use emergency key. |
| No power/Safe is unresponsive. | Defekte oder falsch eingesetzte Batterien. | Replace all 4 AA batteries, ensuring correct polarity. Use the external battery box for temporary power. |
| Tür schließt nicht richtig. | Obstruction in the door frame, locking bolts misaligned. | Check for any objects blocking the door. Ensure the safe is on a level surface or securely mounted. |
| Der Notfallschlüssel funktioniert nicht. | Key not fully inserted, wrong key, lock mechanism jammed. | Ensure the key is fully inserted and turned correctly. Do not force the key. Contact customer support if issues persist. |
8. Spezifikationen
| Besonderheit | Detail |
|---|---|
| Modell | FS-20A (Manufacturer ID: 49121) |
| Abmessungen (H x B x T) | Ca. 19.99 cm x 30.99 cm x 19.99 cm |
| Gewicht | Ca. 7.02 kg |
| Material | Legierter Stahl |
| Sperrtyp | Electronic Biometric (Fingerprint) with Emergency Key Override |
| Stromquelle | 4 AA-Batterien (im Lieferumfang enthalten) |
| Montagetyp | Wall Mountable (mounting hardware included) |
| Besondere Merkmale | Portable design, External Battery Box for emergency power |
9. Garantie und Support
HMF products are manufactured to high-quality standards. For warranty information or technical support, please refer to the documentation provided with your purchase or visit the official HMF webBewahren Sie Ihren Kaufbeleg für eventuelle Garantieansprüche auf.
If you encounter issues not covered in this manual, please contact HMF customer service for assistance.


