1. Einleitung
Thank you for choosing the Clatronic VL 3603 S Pedestal Fan. This manual provides important information regarding the safe assembly, operation, maintenance, and troubleshooting of your new fan. Please read these instructions carefully before using the appliance and keep them for future reference.
2. Sicherheitshinweise
- Always unplug the fan from the power outlet before cleaning, assembling, or disassembling parts.
- Stellen Sie sicher, dass die LautstärketagDie auf dem Typenschild angegebene Lautstärke entspricht der Lautstärke Ihres Netzgeräts.tage bevor Sie das Gerät anschließen.
- Betreiben Sie den Ventilator nicht mit einem beschädigten Netzkabel oder Stecker. Ist das Netzkabel beschädigt, muss es vom Hersteller, dessen Kundendienst oder einer ähnlich qualifizierten Person ausgetauscht werden, um Gefahren zu vermeiden.
- Keep hands, hair, clothing, and other objects away from the fan blades during operation to prevent injury or damage.
- Benutzen Sie den Ventilator nicht bei Nässe oder damp locations, such as bathrooms or laundries, or near water.
- Stellen Sie den Ventilator auf eine stabile, ebene Fläche, damit er nicht umkippt.
- Dieses Gerät ist nicht für den Gebrauch durch Personen (einschließlich Kinder) mit eingeschränkten physischen, sensorischen oder geistigen Fähigkeiten oder Mangel an Erfahrung und Wissen bestimmt, es sei denn, sie werden von einer für ihre Sicherheit verantwortlichen Person beaufsichtigt oder erhalten Anweisungen zur Verwendung des Geräts.
- Kinder sollten beaufsichtigt werden, um sicherzustellen, dass sie nicht mit dem Gerät spielen.
3. Produktüberschreitungview
The Clatronic VL 3603 S is a pedestal fan designed for efficient air circulation. It features adjustable height, tilt, and an oscillation function for widespread cooling.

Figure 1: Fully assembled Clatronic VL 3603 S Pedestal Fan, white color, with its protective grille and control panel.
Komponenten:
- Front and Rear Protective Grille
- Lüfterflügel
- Motorgehäuse
- Control Panel (Speed Selector, Oscillation Button)
- Height Adjustable Stand Pole
- Kreuzbasis
- Netzkabel mit Stecker

Abbildung 2: Nahaufnahme views of the fan's control panel with speed settings, practical carrying handle, durable motor, and stable cross base.
4. Aufbau und Montage
Follow these steps to assemble your Clatronic VL 3603 S Pedestal Fan:
- Zusammenbau der Basis: Connect the two parts of the cross base together. Secure them with the provided screws and washers.
- Attach the Stand Pole: Insert the lower part of the stand pole into the assembled cross base. Tighten the securing knob at the bottom of the base to fix the pole firmly.
- Mount the Motor Housing: Place the motor housing onto the top of the stand pole. Ensure it is securely seated and tighten any securing screws or knobs.
- Einbau des Heckgrills: Position the rear protective grille onto the motor housing, aligning the mounting holes. Secure it with the provided nuts or clips.
- Bringen Sie die Lüfterflügel an: Slide the fan blades onto the motor shaft. Ensure they are correctly oriented and secure them with the spinner cap, turning it counter-clockwise to tighten.
- Frontgrill montieren: Place the front protective grille over the fan blades, aligning it with the rear grille. Secure the two grilles together using the clips or screws provided around the edge.

Figure 3: Visual representation of the fan's adjustable height up to 125 cm and 40 cm diameter, along with its 4-step switch (0/1/2/3), 45W power, and oscillation function.
5. Bedienungsanleitung
Stromanschluss:
Stecken Sie das Netzkabel in eine geeignete Steckdose (220-240 V, 50 Hz).
Geschwindigkeitskontrolle:

Figure 4: Close-up of the fan's control panel with buttons for speed settings (0, 1, 2, 3) and oscillation.
- The fan features a 4-step switch (0/1/2/3) located on the control panel.
- Press '0' to turn the fan OFF.
- Press '1' for low speed.
- Press '2' for medium speed.
- Press '3' for high speed.
Oszillationsfunktion:

Figure 5: The fan demonstrating its 120-degree oscillation feature, distributing air across a wide area in a living room setting.
- To activate the oscillation function, press the oscillation button located on the top of the motor housing. The fan head will begin to rotate from side to side, distributing air over a wider area.
- To stop oscillation, pull the oscillation button upwards. The fan will then blow air in a fixed direction.
Höhe und Neigung einstellen:
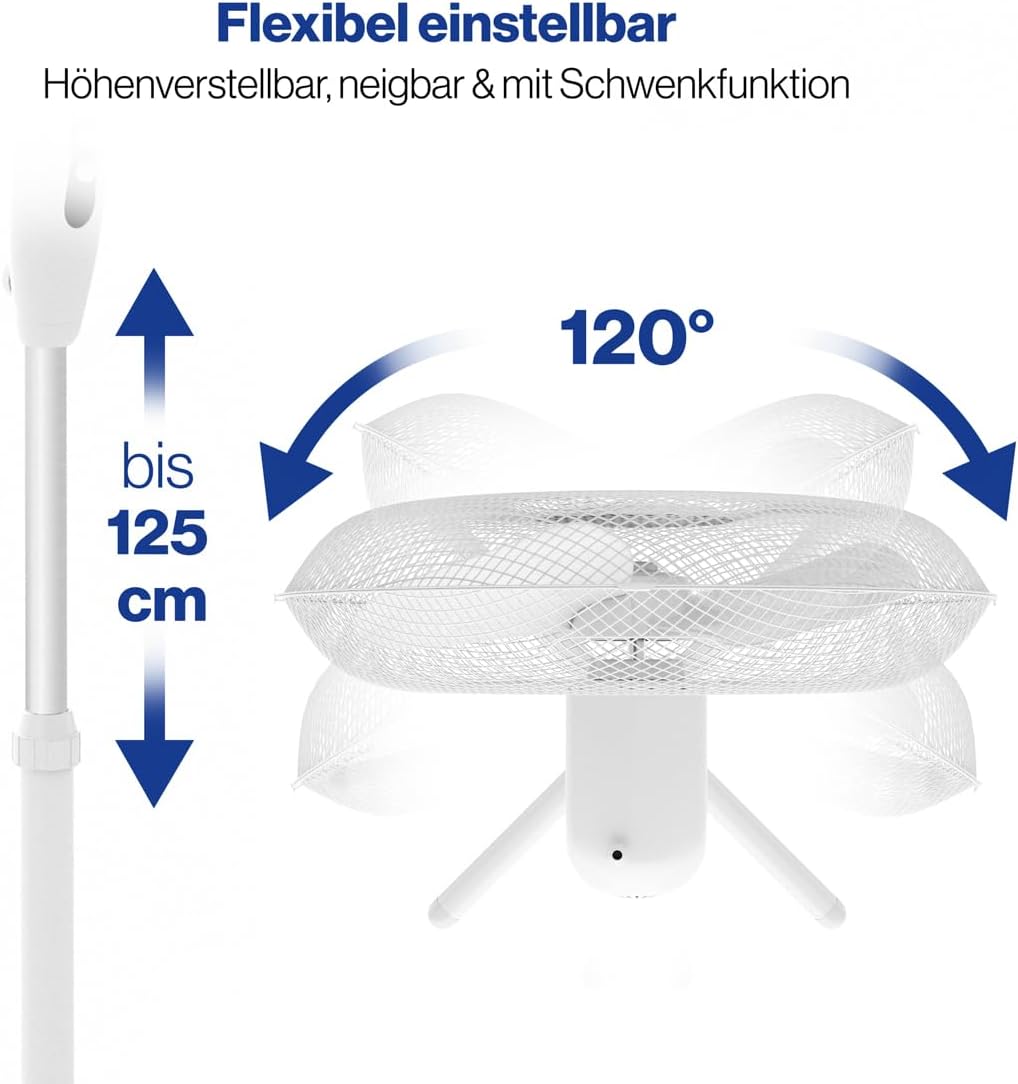
Figure 6: Illustration of the fan's flexible adjustment capabilities, including height adjustment up to 125 cm and tilt functionality.
- Höhenverstellung: Loosen the height adjustment knob on the stand pole. Adjust the pole to the desired height (up to 125 cm) and then securely tighten the knob.
- Neigungseinstellung: Loosen the tilt adjustment knob located on the side of the motor housing. Tilt the fan head up or down to direct the airflow as needed, then tighten the knob to secure the position.

Figure 7: The Clatronic VL 3603 S fan operating quietly in a bedroom, highlighting its suitability for undisturbed sleep.
6. Wartung und Reinigung
Regular cleaning will help maintain the performance and extend the life of your fan.
- Den Ventilator immer vom Stromnetz trennen. Vor der Reinigung vom Stromnetz trennen.
- Verwenden Sie ein weiches,amp Verwenden Sie ein Tuch, um die Außenflächen des Ventilators abzuwischen. Verwenden Sie keine Scheuermittel oder Lösungsmittel.
- To clean the fan blades and inside the protective grilles, you may need to carefully remove the front grille. Refer to the assembly instructions in Section 4 for guidance on disassembling the grille.
- Stellen Sie sicher, dass alle Teile vollständig trocken sind, bevor Sie den Ventilator wieder zusammenbauen und in Betrieb nehmen.
- Do not immerse the fan or its electrical components in water or any other liquid.
7. Fehlerbehebung
Sollten Sie Probleme mit Ihrem Lüfter haben, beachten Sie bitte die folgenden häufig auftretenden Probleme und Lösungen:
| Problem | Mögliche Ursache | Lösung |
|---|---|---|
| Der Ventilator schaltet sich nicht ein. | Keine Stromversorgung. Der Ventilator ist nicht angeschlossen. Speed setting is '0'. | Steckdose überprüfen. Stellen Sie sicher, dass der Stecker vollständig eingesteckt ist. Select a speed setting (1, 2, or 3). |
| Schwacher Luftstrom. | Niedrige Geschwindigkeitseinstellung. Grilles are obstructed/dirty. | Geschwindigkeitseinstellung erhöhen. Clean the protective grilles and blades. |
| Lüfter ist laut. | Lose Teile. Der Ventilator steht nicht auf einer ebenen Fläche. | Check all screws and connections are tight. Stellen Sie den Ventilator auf eine stabile, ebene Fläche. |
| Oszillation funktioniert nicht. | Oscillation button not engaged. | Ensure the oscillation button on top of the motor housing is pressed down. |
Wenn das Problem nach dem Ausprobieren dieser Lösungen weiterhin besteht, wenden Sie sich bitte an den Kundensupport.
8. Spezifikationen
- Modell: VL 3603 S
- Hersteller: Clatronic
- Leistung: 45 Watt
- Bandtage: 220-240 V, 50 Hz
- Lüfterdurchmesser: Ungefähr 40cm
- Einstellbare Höhe: Bis zu 125 cm
- Geschwindigkeitseinstellungen: 3 (plus Off)
- Merkmale: Oscillation, Adjustable Tilt, Metal Protective Grille, Carrying Handle
- Material: Metal (grille), Plastic (housing, base)
- Geräuschpegel: Approximately 45 Decibels
- Produktabmessungen: 43D x 64W x 125H cm (fully extended)
- Gewicht: 2.3 kg
- Zertifizierung: CE
9. Garantie und Support
For warranty information, product support, or service inquiries, please refer to the warranty card included with your purchase or visit the official Clatronic webBewahren Sie Ihren Kaufbeleg für eventuelle Garantieansprüche auf.


