1. Einleitung
This manual provides detailed instructions for the assembly, operation, and maintenance of your Sharkoon VS4-W Series ATX/MicroATX Mid-Tower PC Case, model SHA-VS4-WBK. Please read this manual thoroughly before beginning installation to ensure proper setup and to maximize the lifespan of your product.
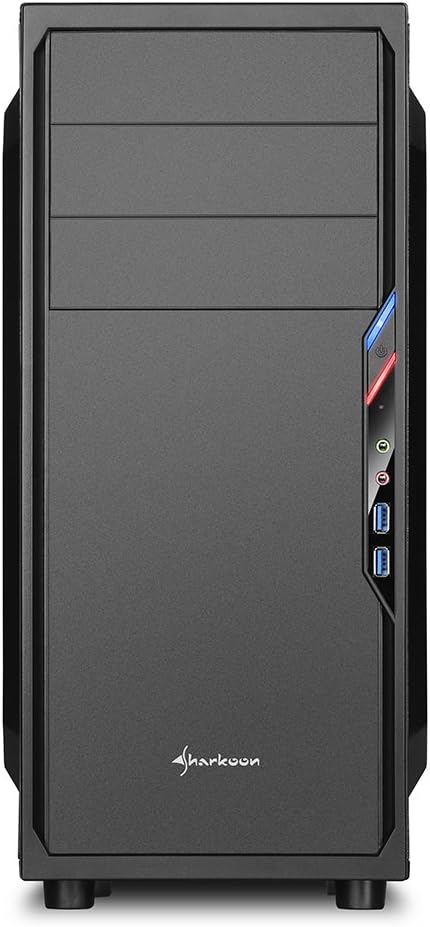
The Sharkoon VS4-W Series is designed for users seeking a cost-effective and functional PC case. It features a full-black aesthetic with an acrylic side window panel, offering a clear view of your internal components. The case supports ATX and Micro-ATX motherboards and provides ample space for various components, including multiple storage drives and long graphics cards.
2. Produktüberschreitungview
2.1. Hauptmerkmale
- Seitliche Acrylglasscheibe zur besseren Sichtbarkeit der Bauteile.
- Full-black interior and exterior design.
- Support for ATX and Micro-ATX motherboards.
- Three 5.25-inch drive bays, two with tool-less mechanisms.
- Seven drive bays for storage: three 3.5-inch and four 2.5-inch.
- Generous expansion card space, up to 385mm with 2.5-inch cage removed.
- Cable management space behind the motherboard tray due to a bulged side panel design.
- Unterstützt CPU-Kühler mit einer Höhe von bis zu 160 mm.
- Front I/O panel with 2x USB 3.0 and 2x USB 2.0 ports, plus HD Audio.
- Pre-installed 120mm front fan and 120mm blue LED rear fan.
2.2. Komponentenidentifikation


3. Einrichtung und Installation
3.1. Vorbereitung des Falls
- Packen Sie das PC-Gehäuse aus und entfernen Sie sämtliches Verpackungsmaterial.
- Stellen Sie das Gehäuse auf eine stabile, ebene Fläche.
- Die Seitenwände lassen sich entfernen, indem man die Rändelschrauben an der Rückseite des Gehäuses löst.
3.2. Motherboard-Installation
- Installieren Sie die mit Ihrem Motherboard gelieferte I/O-Blende in die Aussparung an der Rückseite des Gehäuses.
- Ensure standoffs are correctly aligned for your ATX or Micro-ATX motherboard. Install additional standoffs if necessary.
- Carefully place the motherboard into the case, aligning it with the standoffs and I/O shield.
- Befestigen Sie das Motherboard mit Schrauben.
3.3. Installation des Netzteils
- Mount the power supply unit (PSU) in the designated area at the bottom rear of the case.
- Befestigen Sie das Netzteil mit Schrauben von der Rückseite des Gehäuses.
- Verlegen Sie die benötigten Stromkabel durch die Kabeldurchführungen.
3.4. Laufwerkinstallation
- 5.25-Zoll-Laufwerke: For tool-less bays, slide the drive in until it clicks into place. For other bays, secure with screws.
- 3.5-Zoll-Laufwerke: Slide the 3.5-inch drives into the designated bays and secure them.
- 2.5-Zoll-Laufwerke: Mount 2.5-inch SSDs/HDDs onto the dedicated mounting points.
3.5. Installation der Erweiterungskarte
- Entfernen Sie die erforderlichen PCI-Steckplatzabdeckungen von der Rückseite des Gehäuses.
- Stecken Sie Ihre Grafikkarte oder andere Erweiterungskarten in die entsprechenden PCI-E-Steckplätze auf dem Motherboard.
- Secure the cards with screws. For longer graphics cards, the 2.5-inch drive cage can be removed to provide up to 385mm of space.
3.6. Kabelmanagement
Utilize the space behind the motherboard tray and the various cable routing holes to organize cables. This improves airflow and aesthetics.
4. Bedienungsanleitung
Once all components are installed and connected, replace the side panels and secure them with the thumbscrews. Connect your peripherals (monitor, keyboard, mouse, etc.) to the motherboard's I/O ports. Connect the power cable to the PSU and a wall outlet. Press the power button on the front panel to start your system.
5. Wartung
5.1. Reinigung
- Regularly clean dust filters (if present) to maintain optimal airflow.
- Verwenden Sie Druckluft, um Staub von den internen Bauteilen und Lüftern zu entfernen.
- Wischen Sie die Außenseite des Gehäuses mit einem weichen, fusselfreien Tuch ab.amp Tuch. Scheuermittel vermeiden.
5.2. Lüfterwartung
Ensure fans are free from obstructions and spinning correctly. If a fan becomes noisy or stops working, consider replacing it to maintain proper cooling.
6. Fehlerbehebung
6.1. System lässt sich nicht einschalten
- Check all power connections, including the PSU to the wall, and internal connections to the motherboard and components.
- Ensure the power button cable from the case is correctly connected to the motherboard's front panel header.
- Prüfen Sie, ob sich der Netzteilschalter in der Position „EIN“ befindet.
6.2. Poor Airflow/Overheating
- Reinigen Sie alle Staubfilter und internen Bauteile.
- Ensure fans are operating correctly and oriented for optimal airflow (intake/exhaust).
- Verbessern Sie das Kabelmanagement, um Behinderungen des Luftstroms zu reduzieren.
6.3. Front Panel USB/Audio Not Working
- Verify that the front panel USB and HD Audio cables are securely connected to the corresponding headers on your motherboard.
7. Spezifikationen
| Modellname | VS4-W Series |
| Produktmodellnummer | SHA-VS4-WBK |
| Gehäusetyp | Mittlerer Turm |
| Material | Stahl, Kunststoff, Acryl |
| Farbe | Schwarz |
| Motherboard-Kompatibilität | ATX, Micro-ATX |
| 5.25"-Laufwerksschächte | 3 (2 with tool-less mechanism) |
| 3.5-Zoll-interne Laufwerksschächte | 3 |
| 2.5"-Laufwerksschächte | 4 |
| PCI Erweiterungssteckplätze | 7 |
| max. Grafikkartenlänge | 310mm (385mm with 2.5" cage removed) |
| max. Höhe des CPU-Kühlers | 160 mm |
| max. Netzteillänge | 260 mm |
| Front I / O Ports | 2x USB 3.0, 2x USB 2.0, HD Audio (Mic/Headphone) |
| Vorinstallierte Lüfter | Front: 1x 120mm, Rear: 1x 120mm Blue LED |
| Kühlmethode | Luftkühlung |
| Produktabmessungen (L x B x H) | 44.5 x 20 x 43 cm |
| Artikelgewicht | 3.5 kg |
8. Garantie und Support
Informationen zur Garantie und zum technischen Support finden Sie auf der offiziellen Sharkoon-Website. webBesuchen Sie unsere Website oder wenden Sie sich an Ihren Händler vor Ort. Bewahren Sie Ihren Kaufbeleg für Garantieansprüche auf.
Offizieller Sharkoon WebWebsite: www.sharkoon.com


