Einführung
This manual provides comprehensive instructions for the Orbit Digital Hose Sprinkler Irrigation Timer, designed for efficient watering of lawns, plants, and gardens. It features an overmolded brass hose faucet swivel, rain delay, and manual watering functions. The timer has a 5/8 inch inner diameter input and output, standard for US garden hoses.
The product ships with all relevant accessories.
Aufstellen
Before first use, ensure the timer is properly set up.
Einlegen der Batterie
The Orbit Digital Hose Sprinkler Irrigation Timer requires 2 AA batteries for operation. Locate the battery compartment on the back of the unit, open it, insert the batteries, and securely close the compartment.
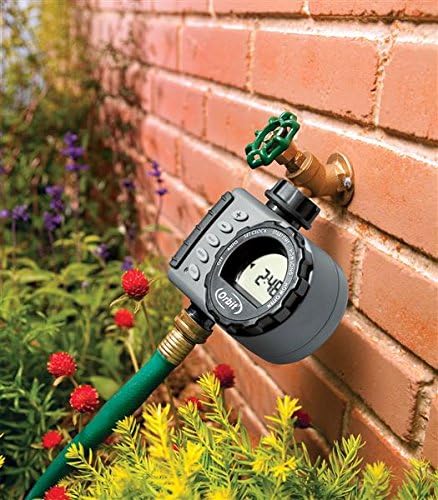
Bild: Rückseite view of the Orbit timer, highlighting the battery compartment which requires 2x 1.5V AA alkaline batteries.
Connecting to Faucet
Attach the timer to your outdoor hose faucet. Ensure a snug fit to prevent leaks. Connect your garden hose to the outlet of the timer.

Bild: Vorderseite view of the Orbit Digital Hose Sprinkler Irrigation Timer, showing its display, control dial, and buttons, connected to a hose.
Bedienungsanleitung
Programming the Orbit timer is straightforward using its intuitive dial and buttons. The following steps guide you through setting up your watering schedule.
Programmieren Ihres Timers
Programming is done by turning the dial counter-clockwise through the various settings.

Image: A diagram illustrating the various features of the Orbit timer, including the hose tap connection, filter, dial, +/- buttons, delay, manual, clear, reset buttons, outlet, and low battery indicator.
- Uhr einstellen: Turn the dial to "SET CLOCK". Use the '+' and '-' buttons to select the current time of day. Hold down the buttons to scroll more quickly. Pay particular attention to AM and PM.
- Startzeit: Once the current time is set, turn the dial to "START TIME". Use the '+' and '-' buttons to navigate to the time you would like watering to begin.
- Wie lang: After setting the watering start time, turn the dial to "HOW LONG". Enter how long you want the timer to water, from 1 to 240 minutes, using the '+' and '-' buttons.
- Wie oft: Once you've set the watering duration, turn the dial to "HOW OFTEN". You'll want to tell the timer how often to water. Select intervals every 6 hours, every 12 hours, or once a day up to every 7th day. Use the '+' and '-' buttons to select your watering frequency.
- Auto: Once you've set the watering interval, turn the dial to "AUTO". Your timer is now programmed. Ensure your dial is on "AUTO" to allow your timer to water according to the programmed time, duration, and frequency.
Manuelle Bewässerung
To use your faucet manually without interrupting the set program, simply press the "MANUAL" button while the dial is turned to "AUTO". When you first press the "MANUAL" button, the timer will display 10 minutes automatically. Using the '+' and '-' buttons, you can select watering times from 1 to 240 minutes. Once manual watering has finished, the timer will automatically resume your programmed watering schedule.
To stop manual watering, turn the dial to "OFF", then turn the dial back to "AUTO" to resume your programmed watering schedule.
Regenverzögerung
Rain delay allows you to postpone watering for a set period of time. To access the rain delay, press the '+' button with the dial turned to "AUTO". Select 24, 48, or 72 hours. After the set period of time, the timer will resume the scheduled program.
To manually remove rain delay, turn the dial to "OFF" and then back to "AUTO".
Official Product Video: How to Program an Orbit Single Outlet Timer
Video: This official Orbit video provides a step-by-step guide on how to program your Orbit Single Outlet Hose Tap Timer, covering setting the clock, start time, watering duration, and frequency, as well as using manual watering and rain delay functions.
Wartung
Proper maintenance and winterizing are important to prolong the life of your hose faucet timer.
Winterfest machen
When expecting freezing temperatures, timers should be removed from the hose faucet and stored indoors, above freezing temperatures, to avoid potential freeze damage.

Image: A hand unscrewing the Orbit timer from a faucet, demonstrating removal for winter storage.
Reinigen des Einlassfilters
The inlet filter traps dirt particles. Clean the filter regularly and replace if worn to ensure optimal performance and prevent blockages.

Bild: Eine Nahaufnahme view of the Orbit timer's inlet, showing the mesh filter designed to trap dirt particles.
Fehlerbehebung
If you encounter issues with your Orbit Digital Hose Sprinkler Irrigation Timer, consider the following common troubleshooting steps:
- No Display or Malfunction: Check the batteries. Ensure they are fresh and correctly installed. Low batteries can cause erratic behavior or a blank display.
- Kein Wasserfluss: Verify that the hose faucet is fully open. Check the inlet filter for any debris or blockages and clean it if necessary.
- Timer wird nicht aktiviert: Ensure the dial is set to "AUTO" for programmed watering. If using manual mode, confirm the duration is set correctly.
- Watering at Incorrect Times: Re-verify your "SET CLOCK" and "START TIME" settings, paying close attention to AM/PM.
For persistent issues, refer to the warranty and support information below.
Technische Daten
| Besonderheit | Detail |
|---|---|
| Marke | Orbit |
| Modell | 24600 |
| Farbe | Messing |
| Material | Messing |
| Artikelgewicht | 14.4 Unzen (0.9 Pfund) |
| Technische Daten | 5 x 2.5 x 5.5 Zoll |
| Anzahl der Einstellungen | 2 |
| Batterien erforderlich | 2 AA-Batterien |
| UPC | 046878246003 |
| Datum der ersten Verfügbarkeit | 18. März 2015 |
Garantie und Support
The Orbit Digital Hose Sprinkler Irrigation Timer comes with a 6-year warranty, as indicated on the product packaging.

Image: Product packaging for the Orbit Timer, clearly displaying "6 Year Warranty".
For customer service and support, you may contact Orbit directly:
- Telefon: 1-800-488-6156
- WebWebsite: orbitonline.com

Image: Back of the Orbit timer packaging, showing customer service contact details including phone number and webWebsite.


