1. Einleitung
This manual provides detailed instructions for the setup, operation, and maintenance of your EMOS E0114 Digital Thermometer and Hygrometer. This device accurately measures indoor temperature and humidity, and also functions as a quartz clock with an alarm, snooze feature, and date display. Please read this manual thoroughly before using the product to ensure correct operation and to prevent damage.
2. Sicherheitshinweise
- Das Gerät sollte vor extremen Temperaturen, direkter Sonneneinstrahlung und hoher Luftfeuchtigkeit geschützt werden.
- Setzen Sie das Gerät weder Wasser noch anderen Flüssigkeiten aus.
- Versuchen Sie nicht, das Gerät zu zerlegen oder zu verändern. Dadurch erlischt die Garantie.
- Entsorgen Sie gebrauchte Batterien verantwortungsvoll gemäß den örtlichen Vorschriften.
- Bewahren Sie Batterien außerhalb der Reichweite von Kindern auf.
3. Packungsinhalt
Bitte überprüfen Sie den Packungsinhalt nach dem Auspacken:
- EMOS E0114 Digital Thermometer and Hygrometer
- Bedienungsanleitung
Note: 1 AA Mignon 1.5 V battery is required and not included in the package.

Figure 3.1: EMOS E0114 device in its retail packaging.
4. Produktüberschreitungview
Familiarize yourself with the components of your EMOS E0114 device.
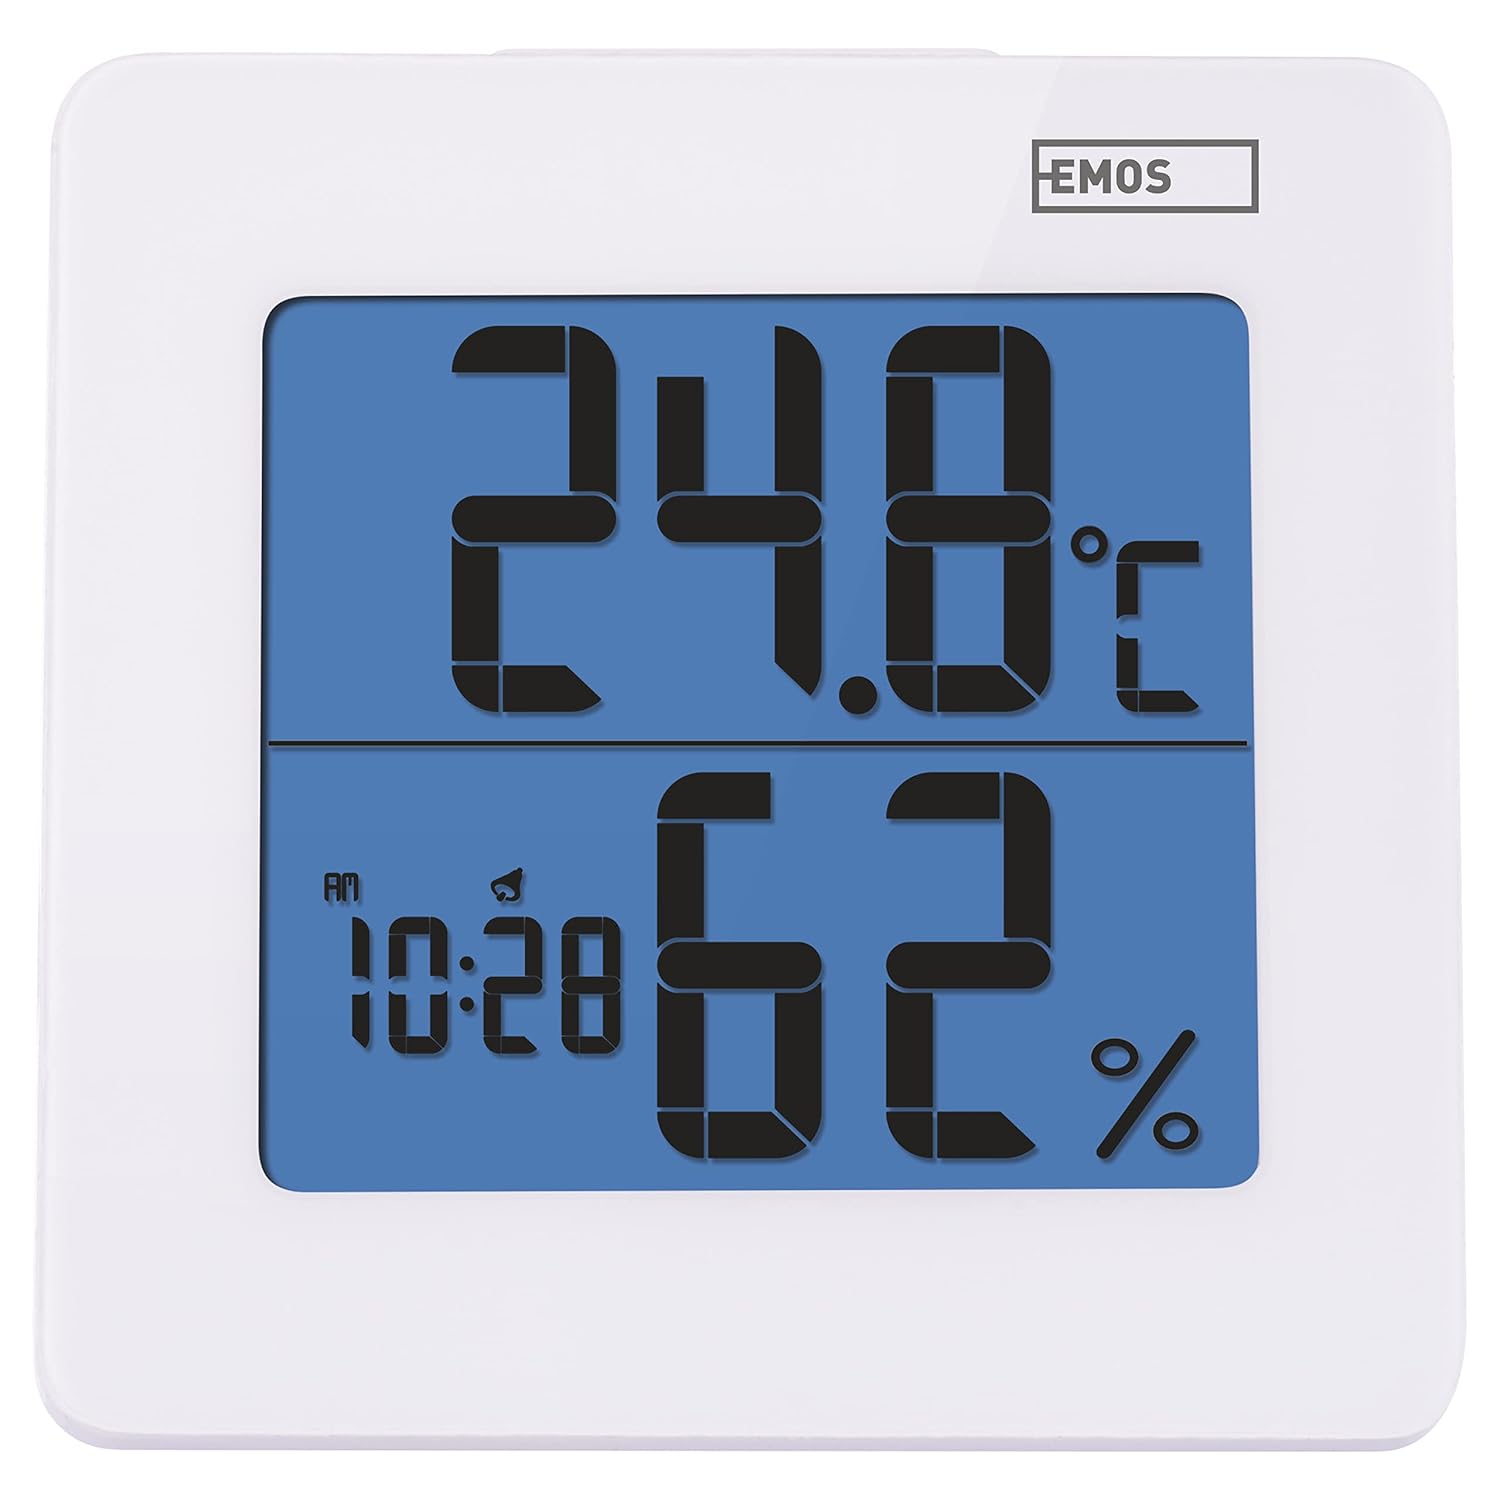
Abbildung 4.1: Vorderseite view of the EMOS E0114 display, showing temperature, humidity, and time.

Abbildung 4.2: Zurück view of the EMOS E0114, highlighting the control buttons and battery compartment.
Bedientasten:
- MODUS: Switches between time display, alarm setting, and date setting.
- UP: Increases values during setting, activates/deactivates alarm.
- SPEICHER: Displays maximum and minimum temperature/humidity records.
- C/F: Schaltet zwischen Celsius und Fahrenheit als Temperatureinheiten um.
- ZURÜCKSETZEN: Setzt das Gerät auf die Werkseinstellungen zurück.
- SNOOZE/LIGHT (Top Bar): Activates snooze function during alarm, illuminates the display backlight.
5. Einrichtung
5.1 Einlegen der Batterie
- Suchen Sie das Batteriefach auf der Rückseite des Geräts (siehe Abbildung 4.2).
- Öffnen Sie die Abdeckung des Batteriefachs.
- Insert one (1) AA Mignon 1.5 V battery, ensuring correct polarity (+/-).
- Schließen Sie den Batteriefachdeckel fest.
5.2 Erstes Einschalten
Upon battery installation, the device will power on automatically and display the current time (default 12:00 AM), temperature, and humidity. The backlight will briefly illuminate.
6. Bedienungsanleitung
6.1 Uhrzeit und Datum einstellen
- Drücken Sie im normalen Zeitanzeigemodus die Taste MODUS Durch einmaliges Drücken der Taste gelangen Sie in den Zeiteinstellungsmodus. Die Stundenziffern blinken.
- Verwenden Sie die UP Taste, um die Stunde einzustellen.
- Drücken MODUS again to set the minutes. The minute digits will flash. Use the UP Taste zum Einstellen der Minuten.
- Drücken MODUS again to set the year. The year digits will flash. Use the UP Knopf, um das Jahr einzustellen.
- Drücken Sie weiter MODUS to set the month and then the day, adjusting each with the UP Taste.
- Nachdem Sie den Tag eingestellt haben, drücken Sie MODUS to exit setting mode and return to normal time display.
6.2 Wecker stellen
- Drücken Sie im normalen Zeitanzeigemodus die Taste MODUS button twice to enter alarm setting mode. The alarm time will be displayed, and the hour digits will flash.
- Verwenden Sie die UP Taste, um die Weckzeit einzustellen.
- Drücken MODUS again to set the alarm minutes. The minute digits will flash. Use the UP Taste zum Einstellen der Alarmminuten.
- Drücken MODUS Alarmeinstellungsmodus verlassen.
- Zum Aktivieren oder Deaktivieren des Alarms drücken Sie die Taste UP button once in normal time display mode. An alarm icon will appear on the display when activated.
6.3 Using Snooze and Backlight
- Wenn der Alarm ertönt, drücken Sie die SNOOZE / LICHT bar on top of the device to activate the snooze function. The alarm will pause for approximately 5 minutes and then sound again.
- To turn off the alarm completely, press any other button (MODE, UP, MEM, C/F) on the back of the device.
- Drücken Sie die SNOOZE / LICHT bar at any time to briefly illuminate the display backlight for better visibility in low light conditions.
6.4 Schalttemperatureinheiten (°C/°F)
Drücken Sie im normalen Anzeigemodus die Taste C / F. button on the back of the device to toggle between Celsius (°C) and Fahrenheit (°F) temperature readings.
6.5 Viewing Maximum and Minimum Records
The device stores the maximum and minimum temperature and humidity values recorded since the last reset or battery change.
- Drücken Sie die MEM button once to display the maximum recorded temperature and humidity.
- Drücken Sie die MEM button again to display the minimum recorded temperature and humidity.
- Drücken MEM Ein drittes Mal, um zur aktuellen Temperatur- und Luftfeuchtigkeitsanzeige zurückzukehren.
- To clear the maximum/minimum records, press and hold the MEM Taste etwa 3 Sekunden lang gedrückt, während viewdie Aufzeichnungen.
7. Wartung
7.1 Reinigung
- Wischen Sie das Gerät mit einem weichen, trockenen Tuch ab.
- Do not use abrasive cleaners, solvents, or chemical agents, as these may damage the display or casing.
7.2 Batteriewechsel
When the display becomes dim or the device stops functioning, it is time to replace the battery.
- Öffnen Sie den Batteriefachdeckel auf der Rückseite des Geräts.
- Die alte AA-Batterie entfernen.
- Insert a new AA Mignon 1.5 V battery, observing correct polarity.
- Schließen Sie den Batteriefachdeckel.
- You may need to reset the time and date after battery replacement.
8. Fehlerbehebung
| Problem | Mögliche Ursache | Lösung |
|---|---|---|
| Keine oder nur schwache Anzeige | Schwache oder leere Batterie; falsche Batterieinstallation. | Replace the battery with a new AA 1.5V battery. Ensure correct polarity. |
| Falsche Uhrzeit/Datum | Nach dem Einlegen der Batterie oder dem Zurücksetzen wurden Uhrzeit und Datum nicht korrekt eingestellt. | Befolgen Sie die Anweisungen in Abschnitt 6.1, um Uhrzeit und Datum einzustellen. |
| Temperature/humidity readings seem inaccurate | Device placed in an unsuitable location (e.g., near heat source, vent, direct sunlight). | Relocate the device to a stable indoor environment away from direct influences. Allow 30 minutes for readings to stabilize. |
| Alarm ertönt nicht | Der Alarm ist nicht aktiviert. | Ensure the alarm icon is visible on the display (refer to Section 6.2). |
| Gerät reagiert nicht | Vorübergehende elektronische Störung. | Drücken Sie die ZURÜCKSETZEN button on the back of the device using a thin object (e.g., paperclip). Note: This will clear all settings. |
9. Spezifikationen
- Modell: E0114
- Marke: EMOS
- Temperaturmessbereich: 0 °C bis +50 °C (32 °F bis 122 °F)
- Temperaturauflösung: 0.1 °C / 0.1 °F
- Luftfeuchtigkeitsmessbereich: 20 % bis 90 % relative Luftfeuchtigkeit (RH)
- Luftfeuchtigkeit auflösung: 1% relative Luftfeuchtigkeit
- Uhr: Quartz with 12/24 hour format
- Alarm: Ja, mit Schlummerfunktion
- Anzeige: LCD mit Hintergrundbeleuchtung
- Speicherfunktion: Max./Min. Temperatur und Luftfeuchtigkeit
- Stromversorgung: 1 x AA Mignon 1.5 V battery (not included)
- Abmessungen (L x B x H): 3.7 x 9.3 x 9.3 cm (ungefähr 1.46 x 3.66 x 3.66 Zoll)
- Bildschirmabmessungen: 60 x 65 mm (approximately 2.36 x 2.56 inches)
- Gewicht: 109 Gramm (ungefähr 3.84 Unzen)
- Montageart: Wall mountable (integrated stand)
- Farbe: White (with blue display backlight)

Figure 9.1: Dimensions of the EMOS E0114 device.
10. Garantie und Support
EMOS products are designed for reliability and performance. For warranty information or technical support, please refer to the warranty card included with your purchase or visit the official EMOS webBitte bewahren Sie Ihren Kaufbeleg für eventuelle Garantieansprüche auf.


