1. Produktüberschreitungview
The Orbit 69525 Micro Bubbler Drip Irrigation Watering Kit is designed to provide efficient and targeted watering for your plants. This all-in-one system is easy to install and helps conserve water by delivering it directly to the plant roots, minimizing waste. The kit covers up to 250 square feet, making it suitable for flowerbeds, potted plants, and gardens.
- Einfache Installation: The system can be installed in as little as 15 minutes.
- Wassereinsparung: Saves up to 70% more water compared to traditional spray heads.
- Targeted Watering: Simple stake and micro-bubbler placement ensures water reaches plants directly, avoiding landscape or weeds.
- Flexibles Design: Tubing allows for easy routing around existing landscaping features.
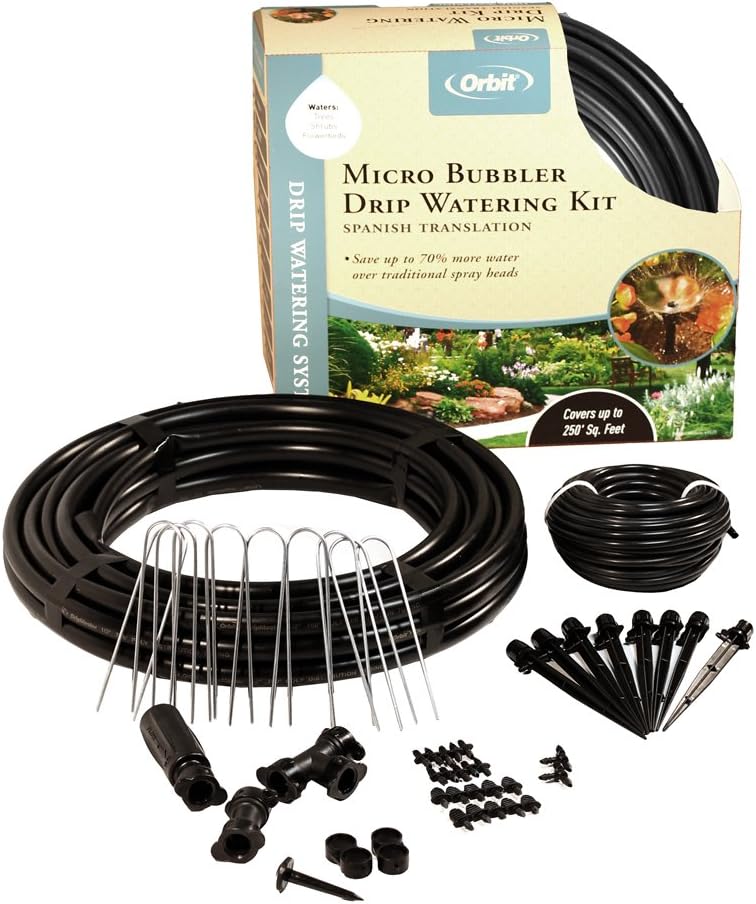
Figure 1: Complete contents of the Orbit 69525 Micro Bubbler Drip Irrigation Watering Kit.
2. Einrichtung und Installation
Befolgen Sie diese Schritte, um Ihr Tropfbewässerungssystem einzurichten:
2.1. Planung Ihres Layouts
- Pflanzabstand: Consult plant tags or online resources for recommended spacing for your specific plants (e.g., tomatoes, peppers, eggplants).
- Wasserquelle: Identify the nearest hose or faucet for connection.
- Benötigte Werkzeuge: Measuring tape, scissors or tubing cutter, and a container of hot water (optional).
2.2. Assembling Components
- Mark Plant Locations: Use craft sticks or similar markers to indicate where each plant will be located.
- Rohre auslegen: Position the 1/4-inch main tubing along your planting area. Secure it with the included loop stakes every couple of feet to prevent coiling.
- Cut and Insert T-Fittings: Use scissors or a tubing cutter to cut the main tubing at desired points and insert T-fittings. These fittings will branch off to individual plants.
- Vorbereitung der Schläuche für die Fittings: If tubing is stiff, leave it in the sun for 30 minutes or soak it in warm water for 10 seconds to soften it, making insertion easier.
- Attach Branch Lines: Measure and cut smaller tubing lengths from the T-fittings to each plant location (approximately 3-4 inches away from the plant).
- Emitter installieren: Attach a drip emitter to the end of each branch line. The kit provides two drippers per plant for optimal root watering.
- Anschluss an die Wasserquelle: Screw the faucet drip filter onto your hose or faucet. Then, screw the hose-to-drip line adapter onto the filter's side inlet.
- Secure Tubing to Adapter: Push the 1/4-inch main tubing firmly into the adapter until it's fully seated. Rotate the lock symbol on the collar to align with the arrow on the fitting to secure.

Figure 2: Individual components of the Orbit 69525 kit.
2.3. Installationsvideo
Video 1: Drip-Lock Product Overview. This video demonstrates the general installation process for Orbit drip irrigation components.
3. Bedienungsanleitung
3.1. Erster Systemtest
- Drehen Sie die Wasserzufuhr langsam auf.
- Observe each dripper to ensure water is being emitted. The flow will be small, approximately 1 gallon per hour per emitter.
- Check for any leaks at connections. If leaks occur, tighten connections or use couplings.
- Once the system is confirmed to be working correctly, you can proceed with planting starter plants or seeds.

Figure 3: A micro bubbler delivering water directly to a plant.
3.2. Watering Schedule
The ideal watering schedule depends on plant type, soil conditions, and local climate. Monitor your plants and soil regularly.
- New Plants: Keep the soil consistently moist but not waterlogged. Check soil moisture daily.
- Established Plants: Aim to keep the soil damp 1-2 inches below the surface. Water when the soil feels dry at this depth.
- Anpassung: As plants grow and weather conditions change, you may need to adjust watering frequency and duration. Test your system for 10-minute intervals to determine how deep the water penetrates.
- Automatische Bewässerung: For convenience, consider adding an Orbit watering timer (sold separately) to automate your watering schedule.
4. Wartung
- Regelmäßige Inspektion: Periodically check all tubing and emitters for clogs, damage, or leaks.
- Filter reinigen: The faucet drip filter should be cleaned regularly to prevent sediment buildup, which can restrict water flow.
- Adjust Emitters: As plants grow, adjust the position of the drippers to ensure water is delivered to the expanding root zone.
- Überwinterung: In freezing climates, disconnect the system from the water source and drain all water from the tubing to prevent freezing and damage. Store components indoors during winter.
5. Fehlerbehebung
- Kein Wasserdurchfluss / Geringer Wasserdurchfluss:
- Check if the water source is fully open.
- Inspect the faucet drip filter for clogs and clean if necessary.
- Look for kinks or blockages in the tubing.
- Stellen Sie sicher, dass alle Verbindungen sicher sind.
- Leaks bei Connections:
- Ziehen Sie alle Verbindungen fest.
- If tubing is rigid, use the warm water softening method before inserting fittings.
- Use repair couplings for damaged sections of tubing.
- Ungleichmäßige Bewässerung:
- Adjust individual emitters to ensure even distribution.
- Ensure sufficient water pressure from the source.
- Tubing is Too Rigid to Connect:
- Leave the tubing in direct sunlight for 30 minutes to soften it.
- Soak the ends of the tubing in a bowl of warm water for 10 seconds before inserting fittings.
6. Spezifikationen
| Besonderheit | Spezifikation |
|---|---|
| Marke | Orbit |
| Modellnummer | 69525 |
| Artikelgewicht | 4.45 Pfund |
| Technische Daten | 4.5 x 15.25 x 15.25 Zoll |
| Stromquelle | Wasserdruckbetrieben |
| Besonderheit | Einstellbar |
| Abdeckungsbereich | Bis zu 250 Quadratmeter |
| Material | Kunststoff, Gummi |
| UPC | 046878695252 |
7. Garantie und Support
For warranty information or technical support, please contact Orbit customer service. Refer to the product packaging for specific warranty details or visit the official Orbit webWebsite für Kontaktinformationen.


