1. Zu Endeview
The Waveshare High-Precision AD/DA Expansion Board is designed to add advanced analog-to-digital (AD) and digital-to-analog (DA) conversion capabilities to your Raspberry Pi. This board integrates the ADS1256, an 8-channel 24-bit high-precision ADC, and the DAC8552, a 2-channel 16-bit high-precision DAC. It is compatible with Raspberry Pi and provides a robust solution for applications requiring precise analog signal processing.
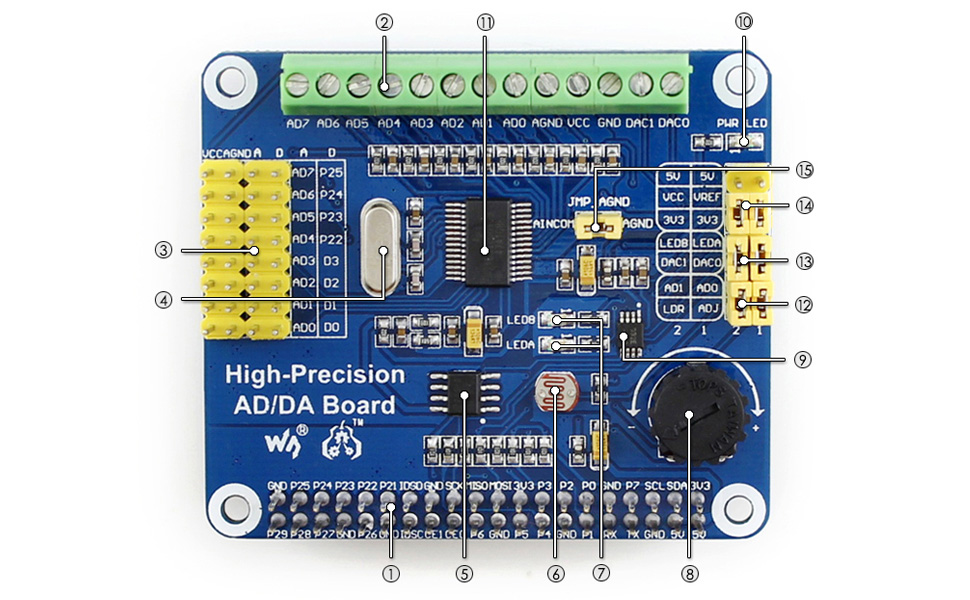
Abbildung 1: Überview of the Waveshare High-Precision AD/DA Board connected to a Raspberry Pi.
2. Funktionen
- Standard Raspberry Pi 40PIN GPIO extension header for direct connection.
- Onboard ADS1256, an 8-channel 24-bit high-precision ADC (4-channel differential input) with a 30ksps sampling-Rate.
- Onboard DAC8552, a 2-channel 16-bit high-precision DAC.
- Input interface via pinheaders for connecting analog signals.
- Compatible with Waveshare sensor interface standard for easy connection to various analog sensor modules.
- Onboard input/output interface via screw terminals for connecting analog/digital signals.
- Features an AD/DA detect circuit for signal demonstration.
3. Board Layout and Interface Definition
This section details the physical layout and pin definitions of the AD/DA Expansion Board.

Figure 2: Labeled components of the Waveshare High-Precision AD/DA Board.
- Raspberry Pi GPIO interface: For connecting with the Pi.
- AD/DA input/output: Screw terminals for signal connections.
- AD input: Pinheaders, compatible with Waveshare sensor interface standard.
- 7.68M crystal: Provides timing for the board.
- LM285-2.5: Provides reference voltage for the ADC chip.
- Photo resistor: An example sensor for demonstration.
- LED output indicator: Visual feedback for output.
- 10K potentiometer: An example input for demonstration.
- DAC8552: 16-bit high-precision DAC, 2 channels.
- Power indicator: LED to show power status.
- ADS1256: 24-bit high-precision ADC, 8 channels (4 differential input).
- ADC testing jumper: For configuring ADC test modes.
- DAC testing jumper: For configuring DAC test modes.
- Power selection jumper: To select power source.
- ADC reference ground configuration: When AD single inputted, the AINCOM is reference terminal, can be connected to GND or external reference voltage.
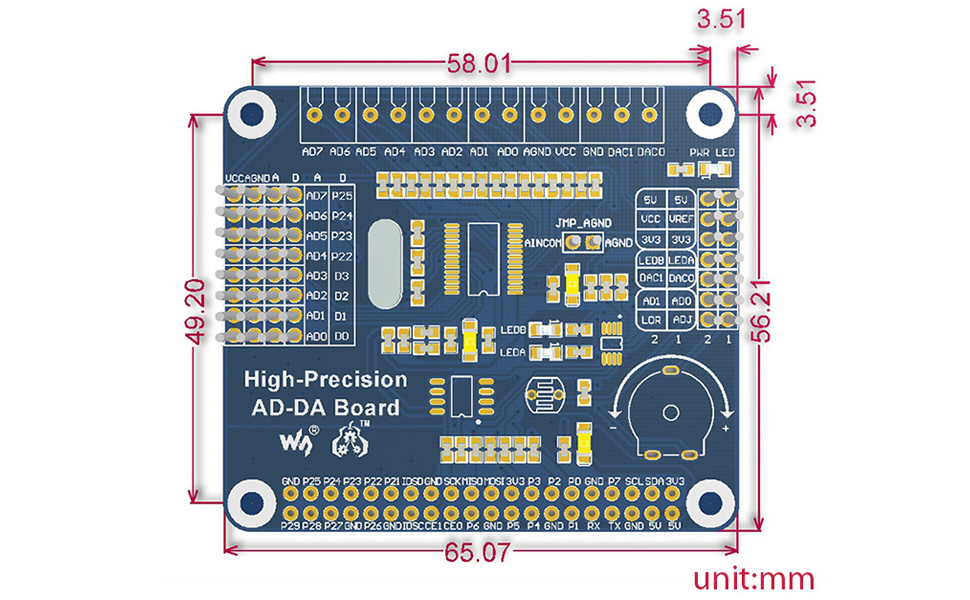
Figure 3: Pin definitions for the Waveshare High-Precision AD/DA Board.
| STIFT | SYMBOL | BESCHREIBUNG |
|---|---|---|
| 1, 17 | 3.3 V | Stromversorgung (3.3V) |
| 2, 4 | 5V | Stromversorgung (5V) |
| 3, 5, 7, 8, 10, 18, 22, 24, 26, 27, 28, 29, 32, 36, 38, 40 | NC | Nicht verbunden |
| 6, 9, 14, 20, 25, 30, 34, 39 | Masse | Boden |
| 11 | DRDY | ADS1256 data ready output, low active |
| 12 | ZURÜCKSETZEN | ADS1256 reset input |
| 13 | PDWN | ADS1256 sync/power off input, low active |
| 15 | CS0 | ADS1256 chip select, low active |
| 16 | CS1 | DAC8552 chip select, low active |
| 19 | LÄRM | SPI-Dateneingang |
| 21 | DOUT | SPI-Datenausgabe |
| 23 | SCK | SPI-Uhr |
| 31, 33, 35, 37 | GPIO | Extend to sensor interface |
4. Einrichtungsanweisungen
Follow these steps to set up your Waveshare High-Precision AD/DA Expansion Board with a Raspberry Pi:
- Physische Verbindung: Carefully align the 40-pin GPIO header of the AD/DA board with the corresponding pins on your Raspberry Pi. Press down gently to ensure a secure connection.
- Stromversorgung: Ensure your Raspberry Pi is powered off before connecting the AD/DA board. Once connected, power on the Raspberry Pi. The power indicator LED on the AD/DA board should illuminate.
- Softwareinstallation:
- Access the official Waveshare Wiki for the "High-Precision AD/DA Board" to find the latest drivers and exampder Code.
- Download and install the necessary libraries and example programs for the ADS1256 ADC and DAC8552 DAC. This typically involves cloning a Git repository and compiling C or Python code.
- Ensure the Broadcom GPIO library is correctly installed and configured for your Raspberry Pi operating system (e.g., Raspbian).
- Erster Test: Führen Sie das bereitgestellteample code to verify basic functionality of both the ADC and DAC. This will help confirm correct hardware connection and software setup.
Notiz: Refer to the Waveshare Wiki for detailed, up-to-date software installation guides and specific commands for your Raspberry Pi model and operating system.
5. Bedienungsanleitung
Operating the High-Precision AD/DA Board involves configuring the ADC and DAC chips via SPI communication from the Raspberry Pi.
5.1 Analog-to-Digital Conversion (ADC) with ADS1256
- Eingangsanschluss: Connect analog signals to the AD input pinheaders or screw terminals (AD0-AD7). The ADS1256 supports 8 single-ended channels or 4 differential channels.
- Konfiguration: Use the provided software libraries to configure the ADS1256. Key parameters include:
- Kanalauswahl: Select the desired input channel(s).
- Verstärkungseinstellung: Adjust the programmable gain amplifier (PGA) for optimal signal range.
- Datenrate: Stellen Sie dieampling rate (up to 30ksps). Note that higher sample rates may introduce more noise.
- Referenzvolumentage: Configure the internal or external reference voltage.
- Datenerfassung: Initiate conversions and read the 24-bit digital data from the ADS1256 via SPI. The DRDY pin indicates when new data is available.
5.2 Digital-to-Analog Conversion (DAC) with DAC8552
- Ausgangsanschluss: Connect your output devices to the DAC0 and DAC1 pins on the screw terminals.
- Datenausgabe: Send 16-bit digital values to the DAC8552 via SPI. The DAC will convert these values into corresponding analog voltages.
- Wellenformerzeugung: By continuously updating the DAC with a sequence of digital values, you can generate various analog waveforms.
Siehe das Example code and the ADS1256/DAC8552 datasheets for detailed programming information and advanced configurations.
6. Wartung
Proper maintenance ensures the longevity and reliable operation of your AD/DA Expansion Board:
- Handhabung: Always handle the board by its edges to avoid touching components, especially the sensitive ICs. Static electricity can damage electronic components.
- Reinigung: Reinigen Sie die Platine bei Bedarf vorsichtig mit einer weichen, trockenen Bürste oder Druckluft, um Staub zu entfernen. Vermeiden Sie die Verwendung von Flüssigkeiten oder Scheuermitteln.
- Lagerung: Store the board in an anti-static bag in a dry, cool environment when not in use.
- Verbindungen: Periodically check all connections (GPIO, screw terminals) to ensure they are secure and free from corrosion.
- Firmware-/Software-Updates: Regularly check the Waveshare Wiki for any updated drivers, libraries, or firmware that may improve performance or fix issues.
7. Fehlerbehebung
If you encounter issues with your AD/DA Expansion Board, consider the following troubleshooting steps:
- Platine nicht erkannt:
- Ensure the board is correctly seated on the Raspberry Pi's GPIO header.
- Verify that the Raspberry Pi is powered on and the AD/DA board's power LED is lit.
- Check SPI interface enablement on your Raspberry Pi (e.g., via
raspi-config).
- Incorrect Readings/Outputs:
- Double-check your wiring for analog inputs/outputs.
- Review your software configuration for the ADS1256 (gain, data rate, channel selection) and DAC8552.
- Ensure the reference voltagDie Einstellungen sind korrekt.
- Test with known voltage sources for ADC and measure DAC output with a multimeter.
- Noise at higher sample rates for ADC is expected; consider lower rates for higher precision.
- Software-/Treiberprobleme:
- Confirm that you are using the correct and latest software libraries from the Waveshare Wiki.
- Verify that all dependencies (e.g., Broadcom GPIO library) are installed and correctly configured.
- Check for compilation errors if building from source.
- Consult community forums or the Waveshare support page for known issues and solutions.
- Board Not Functioning:
- Disconnect and reconnect the board.
- Try a different Raspberry Pi if available to rule out Pi-specific issues.
- Inspect the board for any visible damage or bent pins.
8. Spezifikationen
| Besonderheit | Detail |
|---|---|
| Produktname | High-Precision AD/DA Board |
| Marke | Wellenanteil |
| ADC Chip | ADS1256 (24-bit, 8-channel, 4-differential input) |
| ADC Sampling-Rate | Up to 30ksps |
| DAC-Chip | DAC8552 (16-bit, 2-channel) |
| Schnittstelle | SPI (Serielle Peripherieschnittstelle) |
| Kompatibilität | Raspberry Pi (40PIN GPIO) |
| Betriebssystem | Linux |
| Konnektivitätstechnologie | GPIO |
| Technische Daten | 7.09 x 3.94 x 3.54 Zoll (ca. 180 x 100 x 90 mm) |
| Artikelgewicht | 0.353 Unzen (ca. 10 Gramm) |
| Im Lieferumfang enthaltene Komponenten | High-Precision AD/DA Board, RPi screws pack (2pcs) |

Figure 4: Physical dimensions of the Waveshare High-Precision AD/DA Board in millimeters.
9. Garantie und Support
Informationen zur Garantie, zum technischen Support und weitere Ressourcen finden Sie auf der offiziellen Waveshare-Website. website or their product Wiki page. The Wiki often contains detailed documentation, schematics, and example code that can be invaluable for advanced users and troubleshooting.
Waveshare Offiziell WebWebsite: www.waveshare.com
Product Wiki: Suchen nach "High-Precision AD/DA Board" on the Waveshare Wiki for specific documentation.


