1. Einleitung
The FireAngel HT-630 Heat Alarm is designed to provide early warning of fires by detecting rapid increases in temperature. Unlike smoke alarms, this heat alarm utilizes Thermistek technology to react to heat rather than smoke, making it ideal for installation in environments where smoke alarms might frequently trigger false alarms, such as kitchens, garages, and lofts.
This alarm features a sealed 10-year battery, ensuring continuous protection without the need for battery replacement throughout its operational lifespan. It is equipped with a test/silence button for easy functional checks and temporary silencing.
Hauptmerkmale:
- Thermistek heat sensing technology for rapid temperature increase detection.
- 10-year sealed battery life, eliminating battery changes.
- Integrated power indicator and test/silence button.
- Suitable for kitchens, garages, and lofts where smoke alarms are not recommended.
- Audible alarm with 85 decibels sound level.

Abbildung 1: Front view of the FireAngel HT-630 Heat Alarm, showing the central test button and warning text.
2. Sicherheitshinweise
Bitte lesen Sie vor der Installation und Inbetriebnahme alle Anweisungen sorgfältig durch. Bewahren Sie diese Anleitung zum späteren Nachschlagen auf.
- This heat alarm is designed for domestic use only.
- Do not paint the alarm. Paint can block the sensor and prevent proper operation.
- Nicht in Bereichen mit extremen Temperaturen oder hoher Luftfeuchtigkeit installieren.
- Regularly test the alarm as described in the 'Operation' section.
- The battery is sealed and not replaceable. Do not attempt to open the unit.
- Upon activation, the alarm produces a loud sound. Avoid prolonged exposure to the alarm sound at close range.
3. Installation und Platzierung
Empfohlene Platzierung:
Heat alarms are specifically recommended for areas where smoke alarms are unsuitable due to potential false alarms. These areas include:
- Küchen: To detect fires from cooking without reacting to cooking fumes.
- Garagen: To detect fires from vehicles or stored flammable materials without reacting to vehicle exhaust.
- Lofts/Attics: Where dust or temperature fluctuations might affect smoke alarms.
Install the alarm on the ceiling, centrally in the room if possible, and at least 30cm (12 inches) away from walls or light fittings. Avoid placing near air vents, fans, or areas with high airflow that could interfere with heat detection.

Abbildung 2: Diagram illustrating recommended placement of various alarms within a home, specifically showing heat alarms in the kitchen, garage, and loft.
Installationsschritte:
- Bereiten Sie die Montageplatte vor: Separate the mounting plate from the alarm unit by twisting the alarm counter-clockwise.
- Markieren und Bohren: Hold the mounting plate against the ceiling at your desired installation point. Mark the positions for the screw holes. Drill holes and insert wall plugs if necessary.
- Montageplatte anbringen: Secure the mounting plate to the ceiling using the provided screws. Ensure it is firmly attached.
- Attach Alarm Unit: Align the alarm unit with the mounting plate and twist it clockwise until it clicks securely into place. This action will activate the sealed battery.
- Testen Sie den Alarm: Press and hold the test button for a few seconds until the alarm sounds. This confirms proper installation and functionality.

Abbildung 3: Diagram showing the three-step installation process for the heat alarm: preparing the mounting plate, attaching it to the ceiling, and twisting the alarm onto the plate.
4. Bedienung
Testen des Alarms:
It is crucial to test your heat alarm regularly to ensure it is functioning correctly. Test the alarm weekly or at least monthly.
- Press and hold the large 'TEST / x' button located on the front of the alarm.
- The alarm will emit a loud, continuous sound. Release the button when the sound stops.
- Sollte der Alarm nicht ertönnen, konsultieren Sie bitte den Abschnitt „Fehlerbehebung“.
Alarmsignale:
- Loud, Continuous Alarm: Indicates a rapid rise in temperature has been detected, signaling a potential fire. Evacuate the premises immediately.
- Short Chirp (every 45 seconds): Indicates a low battery warning. Since the battery is sealed, the entire unit must be replaced.
- Short Chirp (every 30 seconds): Indicates a fault with the alarm. The unit should be replaced.
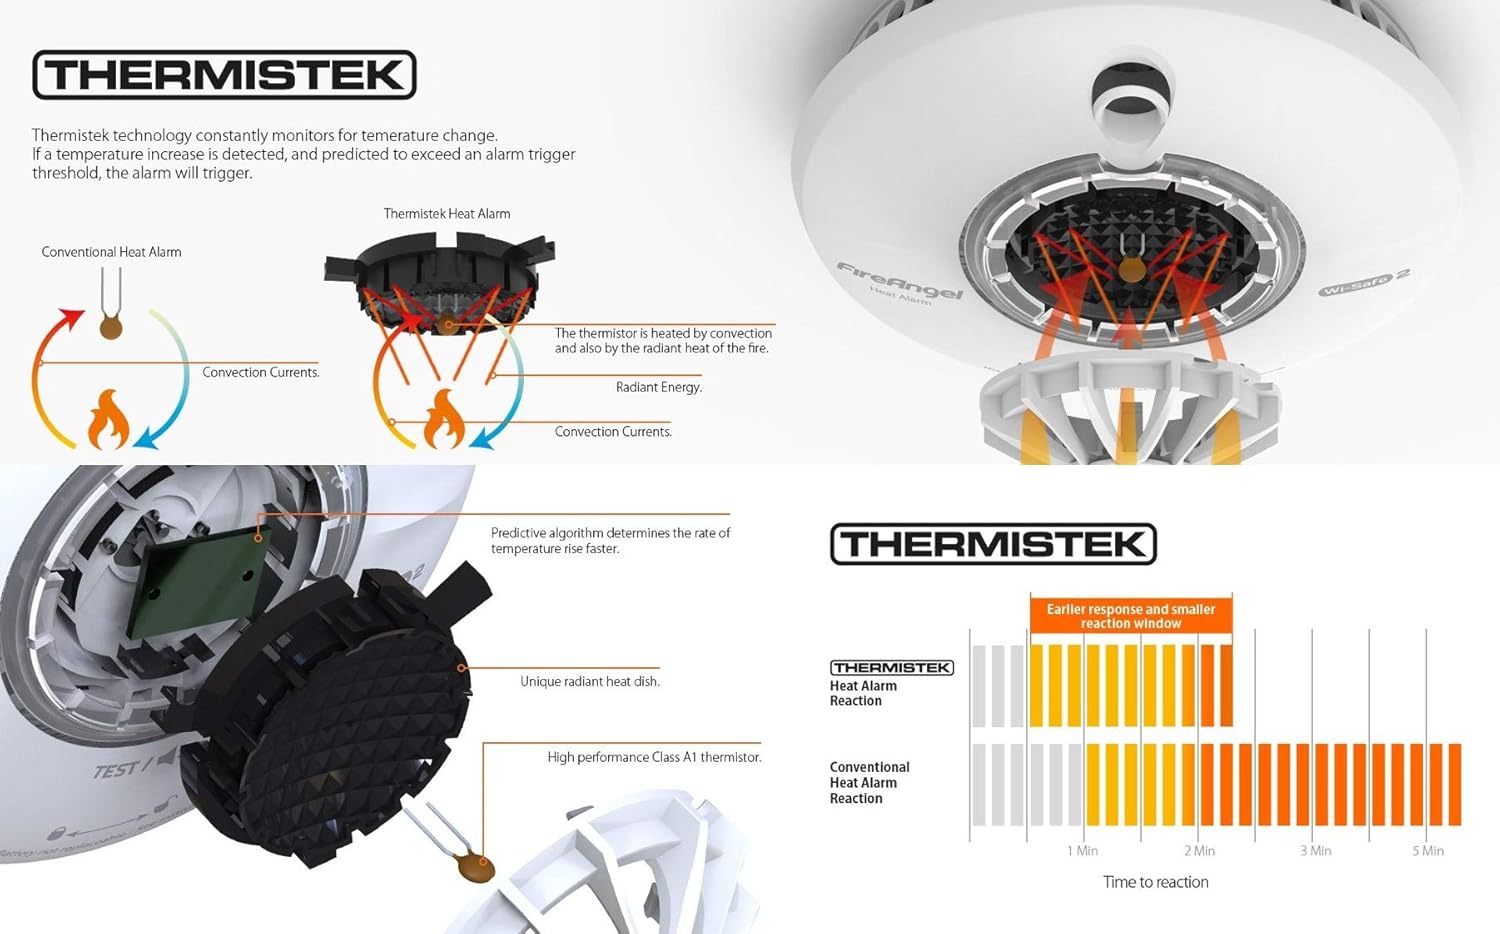
Abbildung 4: Infographic explaining Thermistek technology, comparing its rapid heat detection to conventional heat alarms with diagrams of convection currents and radiant energy.
5. Wartung
The FireAngel HT-630 Heat Alarm requires minimal maintenance due to its sealed battery and design.
- Regelmäßige Tests: As mentioned in the 'Operation' section, test the alarm weekly or monthly.
- Reinigung: Gently vacuum the alarm's exterior with a soft brush attachment once a month to remove dust and debris. Do not use cleaning solvents or spray chemicals directly on the alarm.
- Batterie: The 10-year sealed battery is designed to last the lifetime of the alarm. If a low battery chirp occurs, the entire unit must be replaced.
- Lebensende: After 10 years from activation, the alarm will indicate its end-of-life. Replace the unit promptly.
6. Fehlerbehebung
- Der Alarm ertönt während des Tests nicht:
Ensure the alarm is correctly twisted onto its mounting plate, activating the battery. If it still doesn't sound, the unit may be faulty and requires replacement. - Alarm chirps every 45 seconds:
This indicates a low battery. The sealed battery cannot be replaced. The entire alarm unit must be replaced. - Alarm chirps every 30 seconds:
This indicates a fault with the alarm unit. The alarm should be replaced immediately. - Fehlalarme:
While less common with heat alarms, ensure the alarm is not installed directly above heat sources (e.g., stove burners, ovens) or in areas with extreme temperature fluctuations. If false alarms persist, review placement and consider if the environment is suitable for a heat alarm.
7. Spezifikationen
| Besonderheit | Detail |
|---|---|
| Modellnummer | HT-630R |
| Erkennungstechnologie | Thermistek Heat Sensing |
| Stromquelle | Sealed 10-Year Lithium Battery |
| Alarm Schallpegel | 85 Decibels at 3 meters |
| Technische Daten | 5.31 x 5.31 x 2.36 Zoll |
| Artikelgewicht | 6.3 Unzen (180 Gramm) |
| Material | Plastik |
| Zertifizierung | CE marked, Kitemarked (BS 5446-2:2003 KM 677057) |
| Nutzungsumgebung | Indoor (Kitchens, Garages, Lofts) |

Abbildung 5: Image displaying the CE mark and Kitemark certification logos, indicating compliance with European safety standards (BS 5446-2:2003 KM 677057).
8. Garantie und Support
Manufacturer's Guarantee:
The FireAngel HT-630 Heat Alarm comes with a 10-year manufacturer's guarantee, covering defects in materials and workmanship under normal use and service. This guarantee period begins from the date of purchase.
Bitte bewahren Sie Ihren Kaufbeleg für Garantieansprüche auf.
Kundendienst:
For technical assistance, warranty claims, or further information regarding your FireAngel HT-630 Heat Alarm, please contact FireAngel customer support through their official webWebsite oder die Kontaktdaten, die auf Ihrer Produktverpackung angegeben sind.
WebWebsite: www.fireangel.co.uk


