1. Produktüberschreitungview
The Dino-Lite AM4113ZT is a versatile USB digital microscope designed for detailed observation and analysis. It features 1.3-megapixel resolution, offering true optical magnification from 20x to 50x, and up to 200x. This model includes integrated polarized light to reduce glare on reflective surfaces, MicroTouch for convenient image capture, and measurement capabilities through its accompanying software.

Image 1.1: The Dino-Lite AM4113ZT USB Digital Microscope, showcasing dank seines kompakten Designs.

Bild 1.2: Überview of the Dino-Lite AM4113ZT's primary features, including magnification range, software compatibility, and specialized functions.
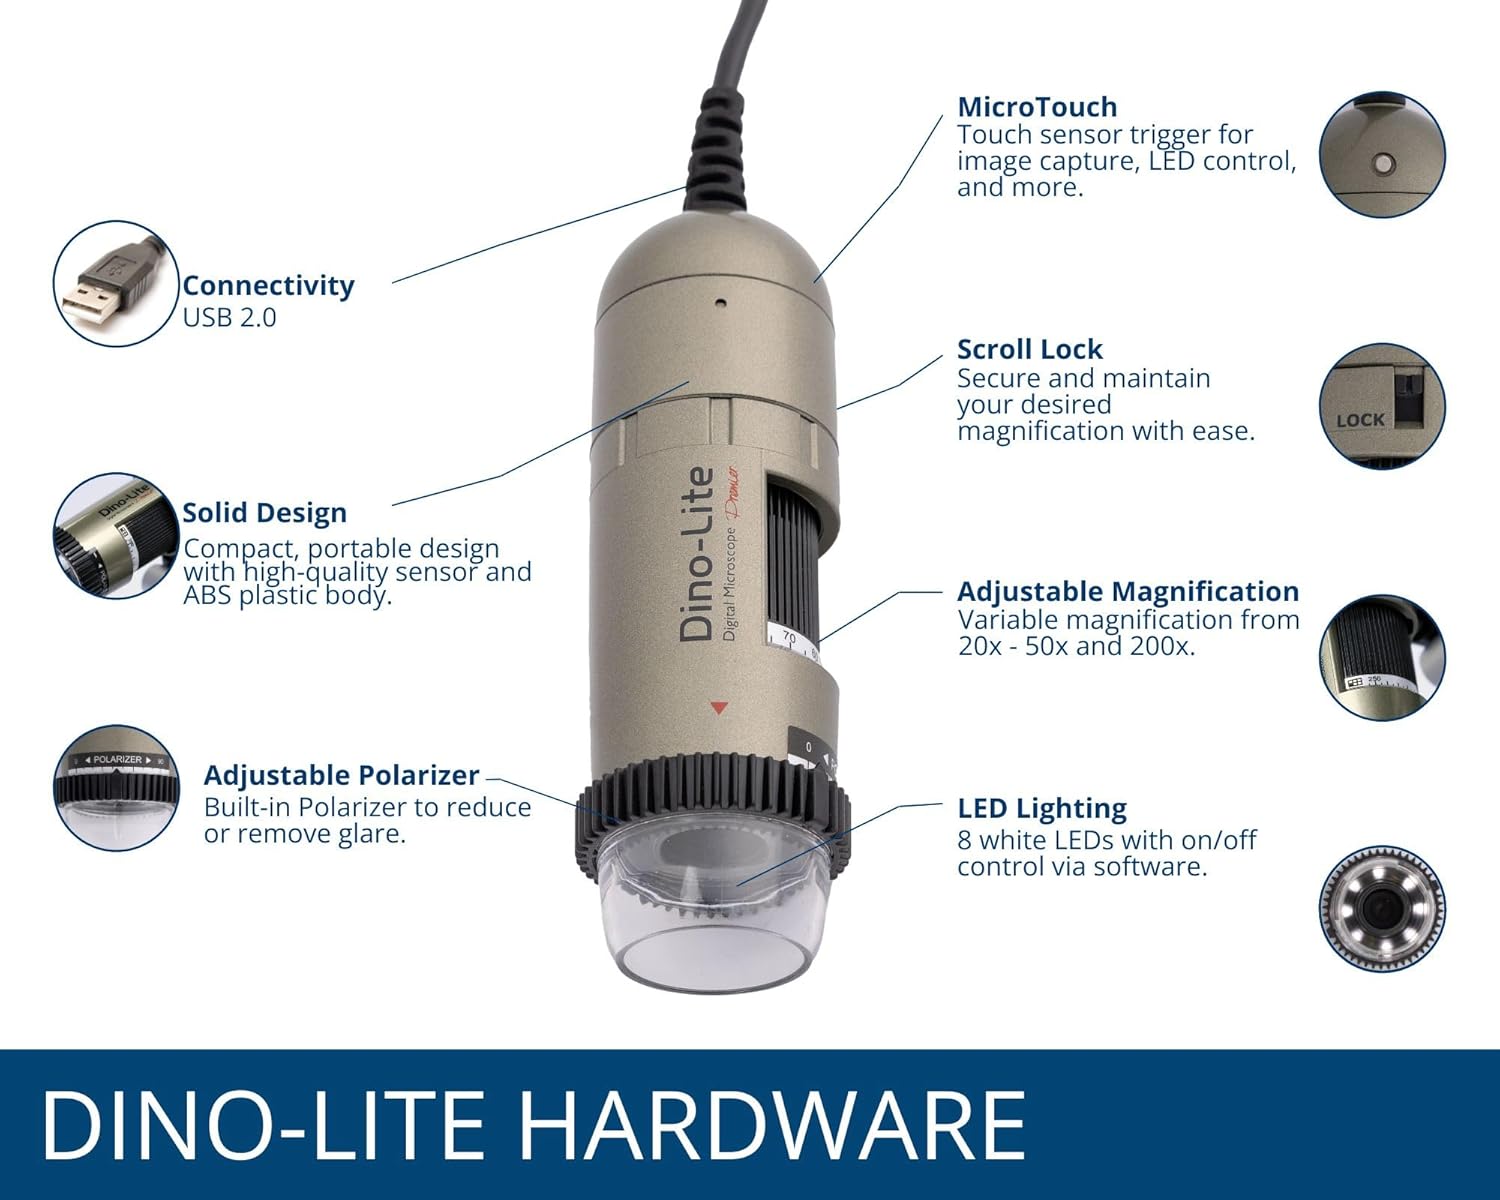
Image 1.3: Detailed illustration of the Dino-Lite AM4113ZT hardware, highlighting its various components and their functions.
2. Packungsinhalt
Bitte überprüfen Sie, ob alle unten aufgeführten Artikel in Ihrer Produktverpackung enthalten sind:
- Dino-Lite AM4113ZT USB Digital Microscope
- Kurzanleitung
- Software Download Link/Information
- Tragetasche
- Calibration Target + Cover
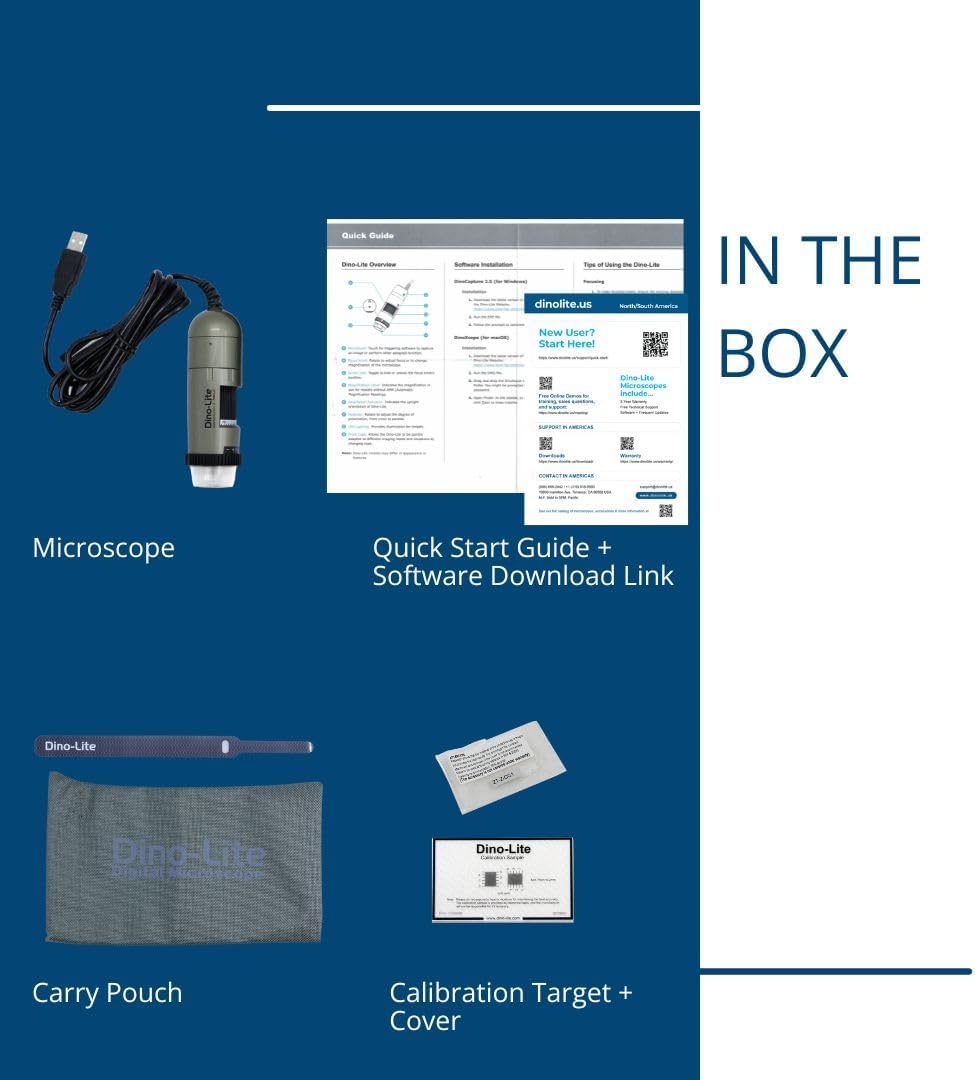
Image 2.1: Visual representation of the items included in the Dino-Lite AM4113ZT product box.
3. Einrichtung
3.1 Softwareinstallation
- Software herunterladen: Visit the official Dino-Lite website or use the provided software download link to obtain the latest version of DinoCapture (for Windows) or DinoXcope (for Mac).
- Software installieren: Folgen Sie den Anweisungen auf dem Bildschirm, um die Software auf Ihrem Computer zu installieren.
- Systemanforderungen: Ensure your operating system (Windows or Mac) meets the minimum requirements specified by the software.

Image 3.1: The DinoCapture software interface displayed on a laptop, demonstrating its functionality for image capture and analysis.
3.2 Connecting the Microscope
- Connect the USB cable from the Dino-Lite AM4113ZT microscope to an available USB port on your computer.
- The operating system should automatically detect the device.
- Launch the DinoCapture (Windows) or DinoXcope (Mac) software. The microscope's live feed should appear in the software window.
The Dino-Lite AM4113ZT can be used handheld for quick inspections or mounted on an optional stand (sold separately) for more stable and precise observations.

Image 3.2: The Dino-Lite AM4113ZT shown in both handheld use and mounted on a stand, demonstrating its adaptability for various inspection needs.
4. Bedienungsanleitung
4.1 Einstellen der Vergrößerung
The AM4113ZT offers variable optical magnification from 20x to 50x, and a fixed 200x magnification. To adjust the magnification:
- Rotate the magnification dial on the microscope body.
- Observe the live image in the software to achieve the desired level of detail.
- For stable observation at a specific magnification, use the scroll lock mechanism to secure the dial.

Image 4.1: Close-up of the magnification dial and scroll lock on the Dino-Lite AM4113ZT.
4.2 Using Polarized Light
The integrated adjustable polarizer helps reduce glare on reflective surfaces, improving image clarity:
- Rotate the polarizer ring located at the front of the microscope.
- Adjust until glare is minimized and surface details become clearer.

Image 4.2: The adjustable polarizer ring, designed to control reflections and enhance image quality.
4.3 Image Capture and LED Control
- MicroTouch: Gently touch the MicroTouch sensor on the microscope body to capture a still image.
- Software Capture: Use the capture button within the DinoCapture/DinoXcope software to take photos or record videos.
- LED-Beleuchtung: The microscope features 8 white LEDs. Control their on/off status and brightness through the software interface.
4.4 Messfunktionen
The DinoCapture/DinoXcope software provides advanced measurement tools:
- After capturing an image, use the software to perform various measurements such as length, area, and angles.
- Ensure proper calibration using the included calibration target for accurate measurements.

Image 4.3: The Dino-Lite AM4113ZT positioned on a stand, illustrating a stable setup for detailed observation and measurement tasks.
5. Wartung
5.1 Reinigung
- Linse: Verwenden Sie ein weiches, fusselfreies Tuch, das speziell für optische Linsen entwickelt wurde, um die Mikroskoplinse vorsichtig abzuwischen. Vermeiden Sie scheuernde Materialien oder aggressive Chemikalien.
- Körper: Wischen Sie das Mikroskopgehäuse mit einem weichen, trockenen Tuch ab. Falls nötig, wischen Sie es leicht ab.amp Verwenden Sie ein mit milder Seife befeuchtetes Tuch, anschließend ein trockenes Tuch. Achten Sie darauf, dass keine Flüssigkeit in das Gerät gelangt.
- Vermeiden: Do not use alcohol, benzene, thinners, or other chemical solvents, as they may damage the plastic components.
5.2 Speicherung
- Store the microscope in its protective carry pouch when not in use.
- Bewahren Sie das Gerät an einem kühlen, trockenen Ort auf, fern von direkter Sonneneinstrahlung, extremen Temperaturen und hoher Luftfeuchtigkeit.
- Vermeiden Sie die Lagerung in staubiger Umgebung.
6. Fehlerbehebung
6.1 Kein Bild angezeigt
- Ensure the USB cable is securely connected to both the microscope and the computer.
- Verify that the DinoCapture/DinoXcope software is running and the correct device is selected.
- Versuchen Sie, eine Verbindung zu einem anderen USB-Anschluss an Ihrem Computer herzustellen.
- Starten Sie die Software und/oder Ihren Computer neu.
6.2 Blurry or Unfocused Image
- Adjust the magnification dial to bring the object into focus.
- Ensure the microscope is held steady or mounted on a stable stand.
- Check the working distance between the microscope lens and the object. Adjust as needed for optimal focus at the selected magnification.
- Clean the microscope lens if smudges or dust are present.
6.3 Software Issues (Crashing, Freezing)
- Stellen Sie sicher, dass Ihre Software auf die neueste Version aktualisiert ist.
- Check your computer's system resources (RAM, CPU) to ensure they meet the software's requirements.
- Schließen Sie andere ressourcenintensive Anwendungen, die im Hintergrund laufen.
- Installieren Sie die Software neu, falls das Problem weiterhin besteht.
6.4 Glare on Specimen
- Rotate the adjustable polarizer ring on the microscope to minimize reflections.
- Adjust the intensity of the LED lighting through the software.
- Change the angle of the microscope relative to the specimen.
7. Spezifikationen
| Besonderheit | Detail |
|---|---|
| Modellname | AM4113ZT |
| Bildauflösung | 1.3 Megapixel (1280 x 1024) |
| Vergrößerung | 20x - 50x, 200x (Optical) |
| Videobildrate | Bis zu 30 FPS |
| Konnektivität | USB 2.0 |
| Lichtquelle | 8 White LEDs (adjustable via software) |
| Besondere Merkmale | MicroTouch, Measurement, Adjustable Polarized Light |
| Kompatible Geräte | Personal Computer, Laptop (Windows/Mac) |
| Technische Daten | 6.5 Zoll L x 7.3 Zoll B x 2.6 Zoll H |
| Artikelgewicht | 0.11 Kilogramm (3.87 Unzen) |
| Material | Plastik |
| Bandtage | 5 Volts (via USB) |
8. Garantie und Support
8.1 Garantieinformationen
For detailed warranty information regarding your Dino-Lite AM4113ZT USB Digital Microscope, please refer to the warranty card included in your product packaging or visit the official Dino-Lite webDie Garantiebedingungen können je nach Region und Kaufdatum variieren.
8.2 Technischer Support
If you encounter issues not covered in this manual or require further assistance, please contact Dino-Lite customer support. Contact information can typically be found on the official Dino-Lite webauf der Website oder in Ihrer Produktdokumentation.
- Online-Ressourcen: Check the Dino-Lite website for FAQs, driver updates, and additional support materials.
- Kontakt: Refer to your product's quick start guide or the manufacturer's webWebsite für spezifische Kontaktinformationen (Telefon, E-Mail oder Support-Portal).


