1. Einleitung
Thank you for choosing the Nobsound EL34 HiFi Stereo Tube Amplifier. Dies amplifier is designed to deliver exceptional audio quality with its single-ended Class A vacuum tube design. This manual provides essential information for the safe and efficient setup, operation, and maintenance of your amplifier. Please read this manual thoroughly before using the product.
2. Sicherheitshinweise
- Stromversorgung: Stellen Sie sicher, dass ampDer Verstärker ist an eine Steckdose mit der richtigen Spannung angeschlossen.tage (110-120V or 220-240V, 50-60Hz) as specified on the unit.
- Belüftung: Platzieren Sie die amplifier in a well-ventilated area. Do not block ventilation openings. Maintain adequate space around the unit for heat dissipation.
- Hitze: Vacuum tubes generate significant heat. Avoid touching the tubes during operation or immediately after powering off. Keep flammable materials away from the ampschwerer.
- Feuchtigkeit: Setzen Sie die amplifier to water, moisture, or excessive humidity. Do not operate with wet hands.
- Fremdkörper: Fügen Sie keine Objekte in den/die/das ein. ampÖffnungen des Verstärkers.
- Wartung: Versuchen Sie nicht, das Gerät zu warten amplifier yourself. Refer all servicing to qualified personnel. High voltages sind im Inneren des Geräts vorhanden.
- Platzierung: Platzieren Sie die amplifier on a stable, level surface. Avoid placing it near strong magnetic fields or other heat sources.
- Netzkabel: Protect the power cord from being walked on or pinched. Unplug the unit during lightning storms or when unused for long periods.
3. Packungsinhalt
Carefully unpack your Nobsound EL34 amplifier and check for the following items:
- 1x Nobsound EL34 AmpLifier-Einheit
- 2x EL34B Vacuum Tubes
- 2x 6H8C Vacuum Tubes
- 1x 5Z4P Vacuum Tube
- 1x Netzkabel

Image: The Nobsound EL34 amplifier unit, displaying its dimensions and a clear list of included accessories: 1x Amplifier, 2x EL34B Tubes, 2x 6H8C Tubes, 1x 5Z4P Tube, and 1x Power Cord.
4. Einrichtung
4.1. Rohrinstallation
The vacuum tubes are typically packaged separately to prevent damage during shipping. Install them carefully into their designated sockets on the amplifier. Ensure the pins align correctly with the socket holes and gently push down until the tube is seated firmly.
- Identify the tube types: 2x EL34B, 2x 6H8C, and 1x 5Z4P.
- Locate the corresponding sockets on the amplifier chassis. The sockets are usually labeled or arranged in a specific pattern. Refer to the image below for guidance.
- Align the pins of each tube with the holes in its respective socket. For tubes with a keying pin (a thicker pin or a gap), ensure it aligns with the notch in the socket.
- Drücken Sie den Schlauch vorsichtig gerade in die Buchse, bis er vollständig eingerastet ist. Wenden Sie dabei keine Gewalt an.

Bild: Oben view of the Nobsound EL34 amplifier chassis, clearly showing the arrangement of the five tube sockets where the vacuum tubes are to be installed.

Bild: Eine Nahaufnahme view of the individual vacuum tubes included with the amplifier: two 6H8C tubes, two EL34B tubes, and one 5Z4P tube, essential for proper operation.
4.2. Lautsprecher anschließen
Connect your speakers to the appropriate output terminals on the rear panel of the amplifier. Ensure you match the speaker impedance (4Ω or 8Ω) to the corresponding terminals on the amplifier for optimal performance and to prevent damage.
- Identifizieren Sie die positiven (+) und negativen (-) Anschlüsse an Ihren Lautsprechern und ampschwerer.
- Connect the positive terminal of your left speaker to the left channel's positive terminal on the ampschwerer.
- Connect the negative terminal of your left speaker to the left channel's negative terminal on the ampschwerer.
- Repeat for the right speaker.
- Stellen Sie sicher, dass alle Verbindungen sicher sind, um Signalverluste oder Kurzschlüsse zu vermeiden.
4.3. Audioquelle anschließen
Connect your audio source (e.g., CD player, DAC, streamer) to the 'IN' RCA input jacks on the rear panel of the ampVerstärker mit hochwertigen Cinch-Kabeln.
- Connect the left channel output of your audio source to the 'L' (left) input jack on the ampschwerer.
- Connect the right channel output of your audio source to the 'R' (right) input jack on the ampschwerer.
4.4. Stromanschluss
After all audio connections are made, connect the provided power cord to the ampvom Stromeingang des Verstärkers an eine geeignete Wandsteckdose.
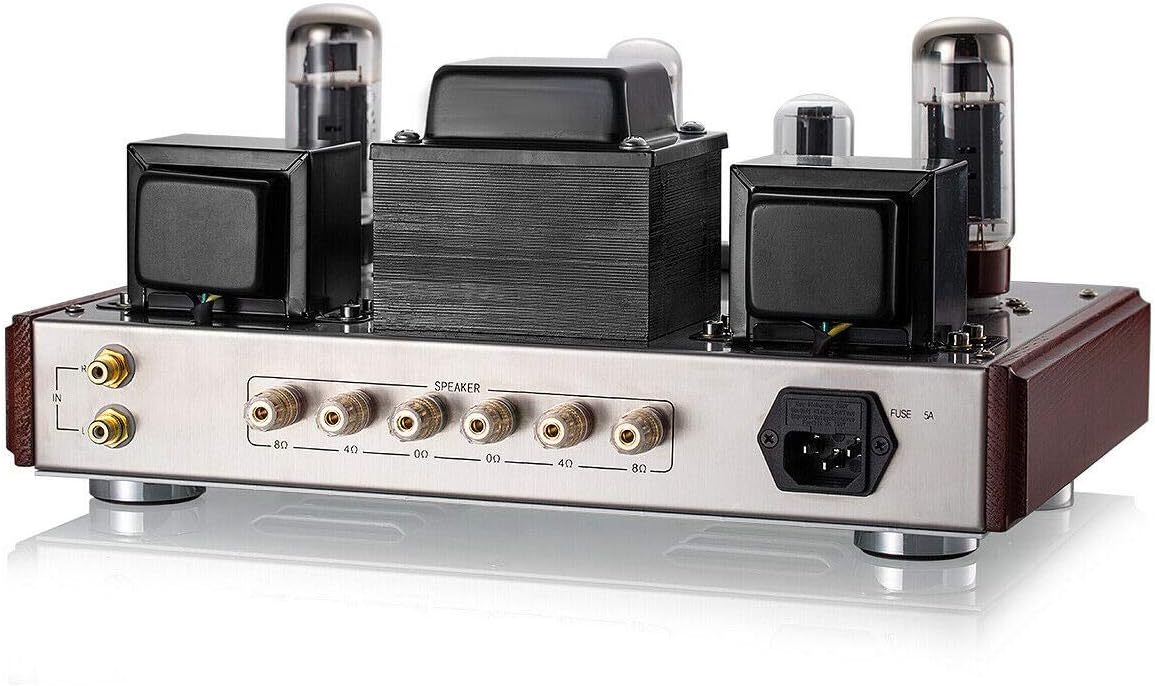
Image: Rear panel of the Nobsound EL34 amplifier, illustrating the RCA input jacks, speaker output terminals (4Ω and 8Ω options), and the power inlet with a 5A fuse holder.
5. Bedienungsanleitung
5.1. Ein-/Ausschalten
- Einschalten: Ensure all connections are secure and the volume knob is set to minimum. Flip the power switch to the 'ON' position. The tubes will begin to glow, indicating the amplifier is warming up. Allow a few minutes for the tubes to reach optimal operating temperature before increasing das Volumen.
- Ausschalten: Turn the volume knob to minimum, then flip the power switch to the 'OFF' position.
5.2. Lautstärkeregelung
The large knob on the front panel controls the master volume. Rotate clockwise to increase volume and counter-clockwise to decrease it. Always start with the volume at its lowest setting before playing audio to avoid sudden loud sounds.
5.3. Sound Characteristics
The Nobsound EL34 amplifier is known for its warm, rich, and detailed sound signature characteristic of tube amplifiers. It delivers firm and full mids, smooth highs, and deep bass. This amplifier is particularly well-suited for genres such as vocals, strings, pipes, and jazz, providing a natural and soft presentation.
6. Wartung
6.1. Reinigung
- Always power off and unplug the ampvor der Reinigung.
- Verwenden Sie ein weiches, trockenes Tuch, um die Außenflächen abzuwischen.
- Bei hartnäckigen Flecken hilft ein leichtes damp Ein Tuch kann verwendet werden, anschließend sollte sofort ein trockenes Tuch darübergelegt werden.
- Verwenden Sie keine scharfen Chemikalien, Scheuermittel oder Lösungsmittel, da diese die Oberfläche beschädigen können.
- Use a soft brush or compressed air to gently remove dust from around the tubes and ventilation openings.
6.2. Tube Care and Replacement
- Vacuum tubes have a finite lifespan and may need replacement over time. Signs of aging tubes include reduced sound quality, increased noise, or uneven channel output.
- When replacing tubes, ensure the amplifier is powered off and unplugged, and allow the tubes to cool completely.
- Gently grasp the tube and pull it straight up from its socket. Avoid twisting.
- Insert new, compatible tubes following the installation steps in Section 4.1. It is recommended to replace tubes with matched sets for optimal performance.
7. Fehlerbehebung
Wenn Sie Probleme mit Ihrem amplifier, please consult the following troubleshooting guide before seeking professional service.
| Problem | Mögliche Ursache | Lösung |
|---|---|---|
| Kein Strom / Gerät schaltet sich nicht ein | Power cord not connected; Wall outlet not active; Blown fuse. | Ensure power cord is securely connected. Test wall outlet with another device. Check and replace the fuse (5A) if blown. |
| Kein Ton / Geringe Lautstärke | Incorrect input/output connections; Volume knob at minimum; Faulty audio source; Damaged speaker cables; Tubes not seated correctly or faulty. | Verify all audio input and speaker output connections. Increase volume. Test with a different audio source. Check speaker cables for damage. Re-seat tubes or try replacing them. |
| Distorted sound / Hum or noise | Loose connections; Interference from other electronics; Ground loop issue; Aging or faulty tubes. | Check all cables for secure connections. Move amplifier away from other electronic devices. Try a ground loop isolator. Consider replacing tubes. |
| One channel silent or weaker | Loose speaker or input cable; Faulty tube in one channel; Imbalance in audio source. | Check and re-secure all cables for the affected channel. Swap tubes between channels to identify a faulty tube. Test with a different audio source. |
8. Spezifikationen
| Parameter | Wert |
|---|---|
| Ausgangsleistung | 8 W × 2 (Ultra-linear connection) |
| Schläuche | 5Z4P x1 / 6H8C x2 / PSVANE EL34B x2 |
| Frequenzgang | 20 Hz - 25 kHz |
| Ausgangsimpedanz | 4 Ω, 8 Ω |
| Verzerrung | ≤ 1 % (1 kHz) |
| Eingangsimpedanz | 100 KΩ |
| Eingangsempfindlichkeit | 500 mV - 2000 mV |
| Signal-Rausch-Verhältnis (SNR) | 90 dB |
| Eingangsleistung | 110-120 V / 220-240 V / 50-60 Hz |
| Transformatorleistung | 150 Watt |
| Abmessungen (L x T x H) | 352 x 216 x 55 mm |
| Gewicht | 12 kg |
| Anzahl der Kanäle | 2 |
| Montagetyp | Freistehende |
| Konforme Spezifikationen | CE |
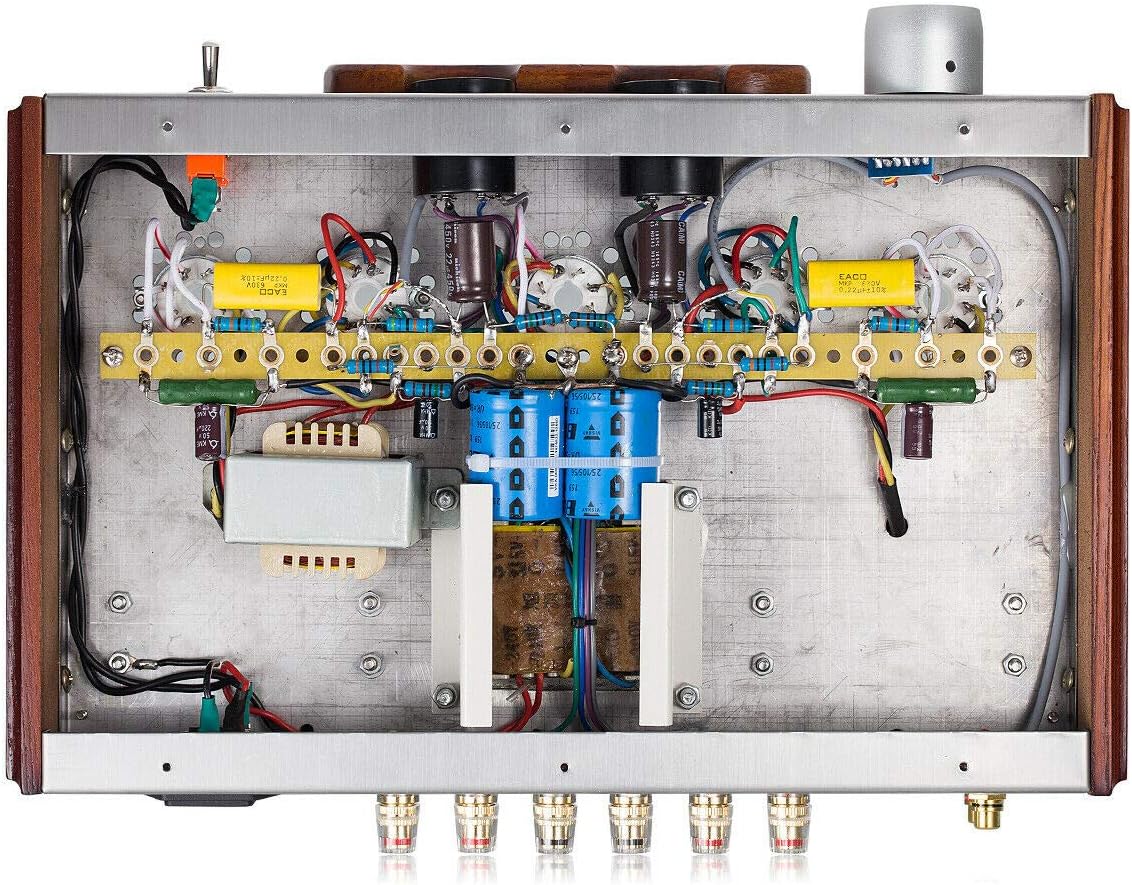
Abbildung: Ein interner view of the Nobsound EL34 ampVerstärker, Showcasing its hand-wired components and robust construction.
9. Garantie und Support
Specific warranty information for this product was not provided at the time of manual creation. For details regarding warranty coverage, terms, and conditions, please refer to the documentation included with your purchase or contact the retailer/manufacturer directly.
For technical support, service, or inquiries, please contact Nobsound customer service or your authorized dealer. Keep your purchase receipt and product serial number handy when contacting support.


