1. Einleitung
This manual provides instructions for setting up, operating, maintaining, and troubleshooting your NETGEAR Nighthawk X4 AC2200 WiFi Mesh Range Extender (Model EX7300). This device is designed to extend your existing WiFi coverage, creating a seamless WiFi system throughout your home or office.
The EX7300 supports AC2200 dual-band wireless speeds up to 2200Mbps, ideal for HD streaming and online gaming. It features Mesh Smart Roaming and One WiFi Name, allowing your devices to automatically connect to the strongest WiFi signal as you move around your home, without needing to manually switch networks. The extender is compatible with any standard WiFi router, gateway, or ISP-provided gateway.
2. Packungsinhalt
Überprüfen Sie, ob Ihr Paket die folgenden Artikel enthält:
- AC2200 Nighthawk X4 Range Extender (EX7300)
- Kurzanleitung
Falls Artikel fehlen oder beschädigt sind, wenden Sie sich bitte an den NETGEAR-Support.
3. Physikalische Merkmale
Familiarize yourself with the buttons and indicators on your EX7300 extender.
Front View mit LEDs

This image shows the front of the NETGEAR EX7300 WiFi Mesh Range Extender, highlighting its LED indicators for power, router link, and client link. These LEDs provide visual feedback on the device's status and connection quality.
- Betriebs-LED: Zeigt den Stromstatus an.
- Router-Verbindungs-LED: Shows connection strength to the router (Green: Best, Amber: Good, Red: Poor).
- Client Link LED: Shows connection strength to client devices.
- WPS-LED: Zeigt den WPS-Verbindungsstatus an.
Seite View mit Knöpfen
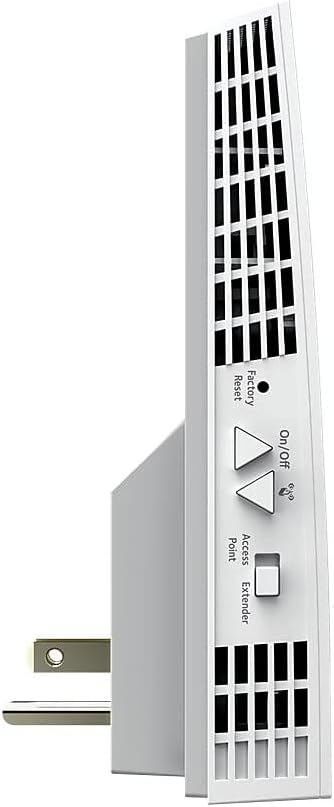
This image displays the side of the NETGEAR EX7300, featuring the Factory Reset button, On/Off switch, and a toggle for Access Point/Extender mode. These controls are essential for managing the device's functions.
- Schaltfläche zum Zurücksetzen auf Werkseinstellungen: Resets the extender to factory default settings.
- Ein-/Ausschalter: Schaltet das Gerät ein oder aus.
- Mode Switch (Access Point/Extender): Wählt den Betriebsmodus aus.
Unten View with Ethernet Port

This image shows the bottom of the NETGEAR EX7300, highlighting the Gigabit Ethernet port. This port allows for a wired connection to devices like gaming consoles or smart TVs, providing maximum speed and stability.
- Gigabit-Ethernet-Port: For wired connections to devices.
Hinteren View with Product Label

This image displays the rear of the NETGEAR EX7300, showing the product information label. This label contains important details such as the model number, serial number, and regulatory compliance information.
- Produktetikett: Contains model, serial number, and other regulatory information.
4. Einrichtung
The NETGEAR EX7300 can be set up using either the WPS (Wi-Fi Protected Setup) method or the NETGEAR Installation Assistant. For a seamless installation, it is recommended to complete the basic setup in the same room as your current router.
4.1. WPS-Einrichtungsmethode
- Schließen Sie den Extender an: Plug the EX7300 extender into an electrical outlet in the same room as your WiFi router.
- Drücken Sie WPS auf dem Extender: Press the WPS button on the side of the extender. The WPS LED on the extender will start blinking.
- Drücken Sie WPS am Router: Within two minutes, press the WPS button on your WiFi router. Refer to your router's manual if you cannot locate the WPS button.
- Verbindung überprüfen: The WPS LED on the extender will light up solid green when a good connection is established between your WiFi router and the extender.
- Extend 5GHz Band (Optional): If your WiFi router supports the 5GHz band and you wish to extend it, repeat the WPS process.
- Verlegen Sie den Extender: Unplug the extender and move it to a new location. Choose a spot that is about halfway between your router and the area where you experience a poor WiFi signal. The chosen location must be within range of your existing WiFi router network.
- Check Router Link LED: Plug the extender into an electrical outlet in the new location. Wait for the Power LED to light green. Use the Router Link LED to help you choose an optimal location.
- Green or Amber: Zeigt eine gute Verbindung zum Router an.
- Rot: The extender is too far from the router. Move it closer to the router and try again.
- Geräte verbinden: Connect your client devices (laptops, smartphones, etc.) to the new extended WiFi network. The extender uses your existing WiFi name with "_EXT" appended (e.g., "YourWiFiName_EXT"). Use the same WiFi password as your router.
- Verify Client Link LED: Once your devices are connected and placed in the desired area, check the Client Link LED on the extender. If it is solid amber or green, your WiFi network has been properly extended.
4.2. NETGEAR Installation Assistant Setup
If your router does not support WPS, or if you prefer a browser-based setup, follow these steps:
- Schließen Sie den Extender an: Plug the EX7300 extender into an electrical outlet in the same room as your WiFi router.
- Verbindung zum WLAN des Repeaters herstellen: On your computer or mobile device, connect to the extender's default WiFi network (e.g., "NETGEAR_EXT"). No password is required initially.
- Browser starten: Öffnen Sie ein web Browser und gehen Sie zu www.mywifiext.net.
- Befolgen Sie die Anweisungen auf dem Bildschirm: The NETGEAR Installation Assistant will guide you through the setup process, including selecting your existing WiFi network(s) and entering your WiFi password(s).
- Relocate and Verify: After initial setup, follow the relocation and LED verification steps as described in the WPS setup method (Step 6 onwards).
4.3. Videoanleitung zur Einrichtung
How to Setup NETGEAR Wall Plug WiFi Range Extenders
This video provides a visual guide on how to set up NETGEAR Wall Plug WiFi Range Extenders, including the EX7300 model. It demonstrates the WPS setup process and general placement recommendations for optimal performance.
5. Bedienung Ihres Extenders
Once set up, your EX7300 extender operates to provide extended WiFi coverage. Here are key operational aspects:
- One WiFi Name (Mesh Smart Roaming): The EX7300 supports Mesh Smart Roaming, which means it uses the same WiFi network name (SSID) as your main router. This allows your devices to automatically connect to the strongest WiFi signal as you move around your home, without needing to manually switch networks.
- Dualband-Konnektivität: The extender operates on both 2.4GHz and 5GHz WiFi bands, providing flexibility and optimal performance for various devices. The 5GHz band offers higher speeds for demanding tasks like streaming and gaming, while the 2.4GHz band provides broader coverage.
- Gigabit-Ethernet-Port: Use the Gigabit Ethernet port on the bottom of the extender to connect wired devices such as smart TVs, gaming consoles, or desktop computers for a stable and high-speed internet connection.
- Zugangspunktmodus: The EX7300 can also function as an Access Point. If you have an Ethernet cable running to an area with no WiFi, you can connect the extender to the Ethernet cable and switch it to Access Point mode to create a new WiFi hotspot.
5.1. FastLane Technology
The EX7300 features NETGEAR's patented FastLane™ Technology, which uses both WiFi bands to create a super-fast connection. This is particularly beneficial for high-bandwidth applications like HD streaming and online gaming, ensuring minimal lag and buffering.
FastLane Technology | Ensuring Faster Downloads with your WiFi Range Extender
This video explains NETGEAR's FastLane Technology and how it enhances download speeds and overall performance when using a WiFi Range Extender like the EX7300.
NETGEAR Nighthawk X4 AC2200 WiFi Range Extender (EX7300) Overview
Dieses Video bietet einen kurzen Überblick überview of the NETGEAR Nighthawk X4 AC2200 WiFi Range Extender (EX7300), showcasing seine Merkmale und Vorteile.
6. Wartung
To ensure optimal performance and longevity of your NETGEAR EX7300 extender, follow these maintenance guidelines:
- Firmware-Updates: Regularly check for and install firmware updates. Firmware updates often include performance improvements, bug fixes, and security enhancements. You can check for updates via the NETGEAR Installation Assistant or the NETGEAR Nighthawk app.
- Reinigung: Keep the extender clean and free from dust. Use a soft, dry cloth to wipe the exterior. Do not use liquid cleaners or aerosols. Ensure ventilation slots are not blocked.
- Optimale Platzierung: Periodically check the Router Link LED to ensure the extender is still in an optimal location. Environmental changes (e.g., new furniture, appliances) can affect WiFi signal strength.
- Aus- und Wiedereinschalten: If you experience intermittent connectivity issues, try power cycling the extender by unplugging it from the outlet, waiting 10-15 seconds, and then plugging it back in.
- Werkseinstellungen zurückgesetzt: In case of persistent issues or if you wish to reconfigure the extender from scratch, perform a factory reset using the Factory Reset button on the side of the device. Note that this will erase all custom settings.
7. Fehlerbehebung
In diesem Abschnitt werden häufig auftretende Probleme behandelt, die bei Ihrem EX7300-Extender auftreten können.
7.1. Keine Internetverbindung
- Check Router Link LED: If the Router Link LED is red, the extender is too far from your router. Relocate the extender closer to your router.
- Routerverbindung überprüfen: Ensure your main WiFi router has an active internet connection.
- Setup erneut ausführen: If the issue persists, try re-running the setup process using either WPS or the Installation Assistant.
7.2. Poor WiFi Signal or Slow Speeds
- Optimale Platzierung: Ensure the extender is placed optimally, as indicated by a green or amber Router Link LED. Avoid placing it near large metal objects, concrete walls, or other electronic devices that might cause interference.
- Check Client Link LED: If the Client Link LED is red, your client device is too far from the extender. Move your device closer to the extender.
- Interferenz: Other wireless devices (cordless phones, microwaves, Bluetooth devices) can interfere with WiFi signals. Try changing the WiFi channel on your router or extender.
- Firmware Update: Stellen Sie sicher, dass die Firmware Ihres Repeaters auf dem neuesten Stand ist.
7.3. Cannot Access mywifiext.net
- Direkte Verbindung: Ensure your device is connected to the extender's WiFi network (e.g., "NETGEAR_EXT") or directly via an Ethernet cable during setup.
- Browser-Cache leeren: Versuchen Sie, Ihren Speicher zu leeren. web Löschen Sie den Browser-Cache und die Cookies oder verwenden Sie einen anderen Browser.
- Alternative IP Address: If www.mywifiext.net doesn't work, try accessing the extender's IP address directly. You can find this in your router's connected devices list.
8. Spezifikationen
| Besonderheit | Detail |
|---|---|
| Modell | EX7300 |
| Wireless-Technologie | 802.11ac Dual-Band |
| Datenübertragungsrate | Bis zu 2200 Mbit/s (AC2200) |
| Abdeckung | Bis zu 2300 qm |
| Verbundene Geräte | Bis zu 40 Geräte |
| Ethernet-Anschlüsse | 1 x Gigabit-Ethernet-Anschluss |
| Besondere Merkmale | Mesh Smart Roaming, One WiFi Name, FastLane™ Technology |
| Abmessungen (LxBxH) | 6.3 x 3.2 x 1.7 Zoll |
| Gewicht | 1.05 Pfund |
| Bandtage | 100-240 Volt |
9. Garantie und Support
NETGEAR-Produkte sind auf Zuverlässigkeit und Leistung ausgelegt. Ausführliche Garantieinformationen finden Sie auf der Ihrem Produkt beiliegenden Garantiekarte oder auf der offiziellen NETGEAR-Website. webWebsite.
For technical support, product registration, and access to user forums, visit the NETGEAR support page:
You may also find helpful resources and FAQs on the NETGEAR webWebsite.