Einführung
Thank you for choosing the Domo DO7280S Vacuum Cleaner. This manual provides essential information for the safe and efficient use, maintenance, and troubleshooting of your appliance. Please read it thoroughly before first use and keep it for future reference.
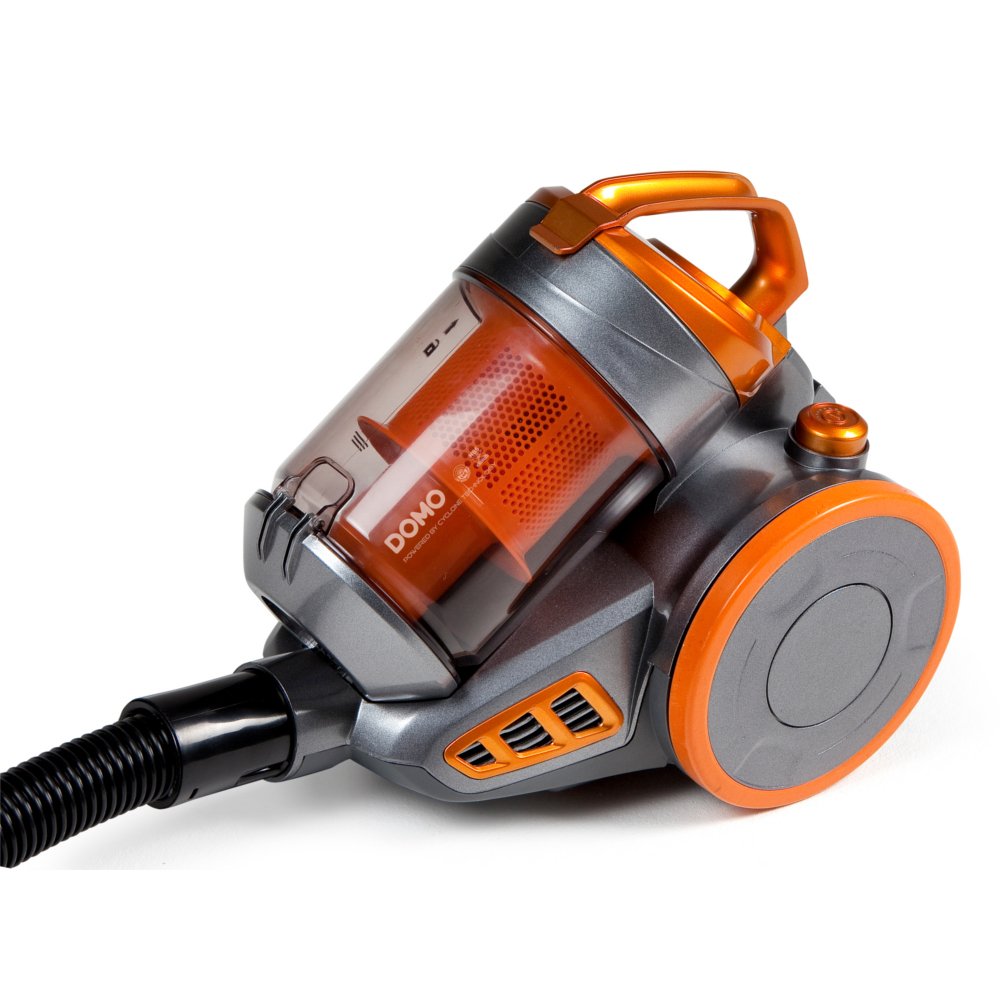
Image: The Domo DO7280S vacuum cleaner, fully assembled with its hose, telescopic tube, and floor brush, ready for use. The main unit is grey and orange.
Sicherheitshinweise
Beachten Sie beim Gebrauch elektrischer Geräte stets grundlegende Sicherheitsvorkehrungen, um das Risiko von Bränden, Stromschlägen und Verletzungen zu verringern.
- Stellen Sie sicher, dass die Stromversorgungslautstärketage entspricht dem Typenschild des Geräts.
- Verwenden Sie den Staubsauger nicht zum Aufsaugen von Wasser oder feuchten Substanzen.
- Brennbare oder entzündliche Materialien, heiße Asche oder scharfe Gegenstände dürfen nicht eingesaugt werden.
- Halten Sie Haare, lose Kleidung, Finger und alle Körperteile von Öffnungen und beweglichen Teilen fern.
- Vor der Reinigung oder Wartung des Geräts den Netzstecker ziehen.
- Betreiben Sie den Staubsauger nicht mit beschädigtem Kabel oder Stecker.
- Dieses Gerät ist nur für den Hausgebrauch bestimmt.
Produkt überview
The Domo DO7280S is a cylinder vacuum cleaner designed for efficient cleaning across various surfaces. It features a multi-filter system and electronic suction control.
Hauptbestandteile:
- Main Unit (Motor, Dust Container, Filters)
- Flexibler Schlauch
- Teleskop-Metallrohr
- Eco-brush Floor Nozzle
- Crevice Tool with Brush (Accessory)

Abbildung: Seite view of the Domo DO7280S vacuum cleaner, highlighting the main unit, large wheels, and the connection point for the hose and telescopic tube.
Aufstellen
- Auspacken: Nehmen Sie alle Komponenten vorsichtig aus der Verpackung. Bewahren Sie die Verpackung für die spätere Lagerung oder den Transport auf.
- Attaching the Flexible Hose: Stecken Sie das Ende des flexiblen Schlauchs in den Sauganschluss des Hauptgeräts, bis es hörbar einrastet.
- Zusammenbau des Teleskoprohrs: Connect the handle end of the flexible hose to the telescopic metal tube. Adjust the tube length by pressing the release button and sliding it to the desired height.
- Connecting the Floor Nozzle: Attach the Eco-brush floor nozzle to the end of the telescopic tube. Ensure it is firmly connected.
- Stromanschluss: Ziehen Sie das Netzkabel vom Hauptgerät heraus und stecken Sie es in eine geeignete Steckdose.
Betrieb
- Ein-/Ausschalten: Drücken Sie den Ein-/Ausschalter am Hauptgerät, um den Staubsauger ein- oder auszuschalten.
- Saugleistung einstellen: Use the electronic suction control dial or buttons on the main unit to adjust the suction strength according to the surface being cleaned. Lower settings are suitable for delicate fabrics, while higher settings are for carpets and hard floors.
- Using the Eco-brush: The Eco-brush is designed for efficient cleaning on various floor types. For optimal performance, move the nozzle slowly over the surface.
- Verwendung von Zubehör: For specific cleaning tasks, detach the Eco-brush and attach the crevice tool with brush for corners, edges, and upholstery.
- Dust Container Full Indicator: The vacuum cleaner is equipped with an indicator that signals when the dust container needs to be emptied. Observe this indicator for optimal performance.
Wartung
Regular maintenance ensures the longevity and optimal performance of your Domo DO7280S vacuum cleaner. Always unplug the appliance before performing any maintenance.
Entleeren des Staubbehälters:
- Drücken Sie den Entriegelungsknopf, um den Staubbehälter vom Hauptgerät zu trennen.
- Halten Sie den Staubbehälter über einen Abfalleimer.
- Open the bottom lid of the dust container to release the collected dirt.
- Close the lid securely and reattach the dust container to the main unit.
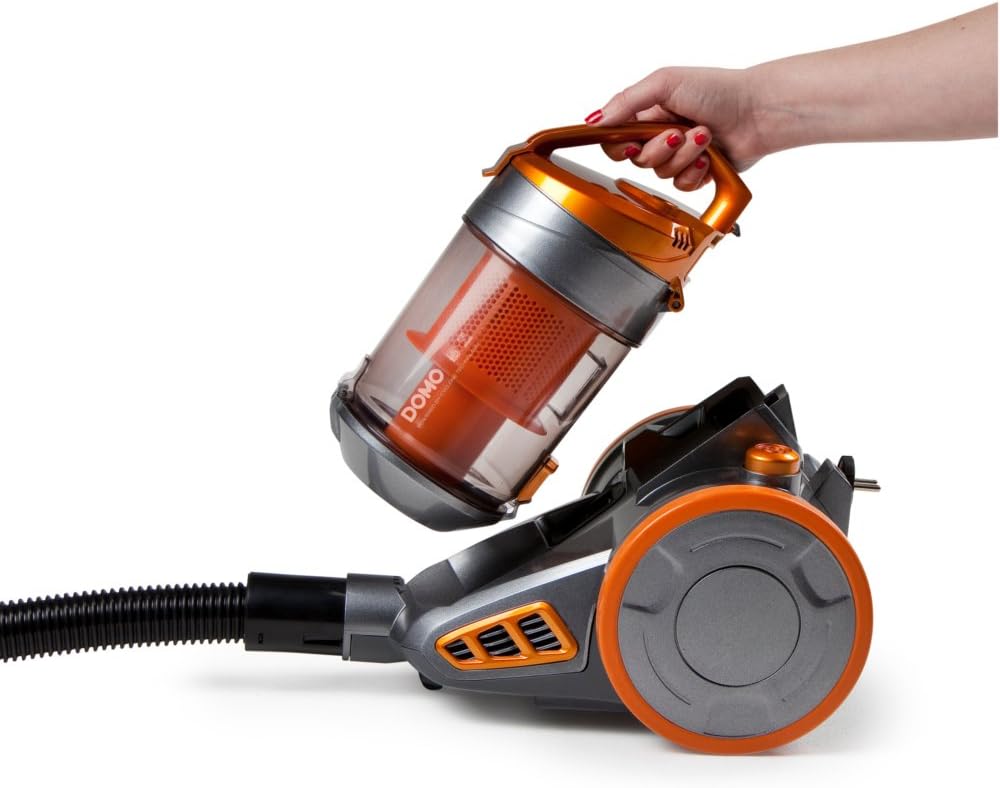
Image: A hand demonstrating the removal of the transparent orange dust container from the main body of the Domo DO7280S vacuum cleaner.

Image: A hand opening the bottom lid of the transparent orange dust container, revealing the internal filter system, ready for emptying.
Reinigung der Filter:
The Domo DO7280S features a multi-filter system. Regular cleaning of these filters is crucial for maintaining suction power.
- After emptying the dust container, remove the internal filters.
- Tap the filters gently over a bin to dislodge fine dust.
- If washable, rinse filters under cold running water. Ensure they are completely dry before reinserting.
- Do not use detergents or hot water on filters unless specified.
- Replace filters if they are damaged or excessively worn.
Fehlerbehebung
| Problem | Mögliche Ursache | Lösung |
|---|---|---|
| Kein Strom | Nicht eingesteckt; Steckdose defekt; Netzschalter nicht gedrückt. | Steckerverbindung prüfen; Steckdose mit einem anderen Gerät testen; Netzschalter fest drücken. |
| Geringe Saugleistung | Staubbehälter voll; Filter verstopft; Schlauch/Rohr/Düse blockiert. | Staubbehälter leeren; Filter reinigen oder austauschen; auf Verstopfungen prüfen und diese gegebenenfalls beseitigen. |
| Ungewöhnliche Geräusche | Verstopfung im Schlauch/Rohr/der Düse; Motorproblem. | Prüfen Sie, ob Verstopfungen vorhanden sind, und beseitigen Sie diese gegebenenfalls. Sollten die Geräusche weiterhin bestehen, wenden Sie sich bitte an den Kundendienst. |
| Staubaustritt | Staubbehälter nicht richtig geschlossen; Filter nicht korrekt eingesetzt oder beschädigt. | Ensure dust container is securely closed; check filter installation; replace damaged filters. |
Technische Daten
| Besonderheit | Detail |
|---|---|
| Marke | Domo |
| Modellnummer | DO7280S |
| Technische Daten | 43 x 32.99 x 27 cm |
| Artikelgewicht | 5.58 kg |
| Capacity (Dust Container) | 1.5 Liter |
| Wastage | 1000 Watt |
| Energieeffizienzklasse | C |
| Jährlicher Energieverbrauch | 38 Kilowattstunden pro Jahr |
| Oberflächenempfehlung | Alle Etagen |
| Formfaktor | Kanister |
Garantie und Support
For warranty information, technical support, or service inquiries, please refer to the warranty card included with your product or contact Domo customer service directly. Keep your proof of purchase for warranty claims.


