1. Einleitung
The Behringer EUROPOWER PMP2000D is a high-performance, ultra-compact 2 x 1000-Watt stereo powered mixer designed for a wide range of live sound applications. This unit combines a powerful Class-D amplifier, a versatile 14-channel mixer, and a studio-grade Klark Teknik multi-FX processor into a single, portable device. It is engineered to deliver exceptional sonic performance and reliability for musicians, DJs, and event organizers.
Key features include revolutionary Class-D amplifier technology for enormous power and super-light weight, 9 "Invisible" IMP mic preamps with switchable +48 V phantom power for condenser microphones, and a high-quality KLARK TEKNIK FX processor with 25 presets. The PMP2000D is also "Wireless-ready" for seamless integration with BEHRINGER digital wireless systems (sold separately).
2. Wichtige Sicherheitshinweise
Please read these instructions carefully before operating the PMP2000D. Retain this manual for future reference. Observe all warnings and follow all instructions to ensure safe and optimal performance.
- Energiequelle: Schließen Sie das Gerät nur an eine Wechselstromsteckdose mit der angegebenen Spannung an.tage. Stellen Sie sicher, dass das Netzkabel nicht beschädigt oder eingeklemmt ist.
- Belüftung: Do not block any ventilation openings. Install in accordance with the manufacturer’s instructions, ensuring adequate airflow around the unit.
- Wasser und Feuchtigkeit: Do not use this apparatus near water or expose it to dripping or splashing. Do not place objects filled with liquids on the apparatus.
- Hitze: Installieren Sie das Gerät nicht in der Nähe von Wärmequellen wie Heizkörpern, Heizregistern, Öfen oder anderen Geräten (einschließlich ampKonverter (Lüfter), die Wärme erzeugen.
- Erdung: Machen Sie den Sicherheitszweck des polarisierten oder geerdeten Steckers nicht zunichte. Ein polarisierter Stecker hat zwei Stifte, von denen einer breiter als der andere ist. Ein geerdeter Stecker hat zwei Stifte und einen dritten Erdungsstift. Der breite Stift oder der dritte Stift dienen Ihrer Sicherheit. Wenn der mitgelieferte Stecker nicht in Ihre Steckdose passt, wenden Sie sich an einen Elektriker, um die veraltete Steckdose auszutauschen.
- Wartung: Überlassen Sie alle Wartungsarbeiten qualifiziertem Servicepersonal. Eine Wartung ist erforderlich, wenn das Gerät auf irgendeine Weise beschädigt wurde, z. B. wenn das Netzkabel oder der Stecker beschädigt sind, Flüssigkeit in das Gerät verschüttet wurde oder Gegenstände hineingefallen sind, das Gerät Regen oder Feuchtigkeit ausgesetzt war, nicht normal funktioniert oder fallengelassen wurde.
3. Einrichtung
3.1 Auspacken und Prüfen
Carefully unpack your PMP2000D and inspect it for any signs of damage that may have occurred during transit. If damage is found, contact your dealer immediately. Retain the original packing materials for future shipping or storage.
3.2 Platzierung
Place the mixer on a stable, flat surface. Ensure there is sufficient space around the unit for proper ventilation to prevent overheating. Avoid placing it near direct heat sources or in direct sunlight. The unit is designed for indoor use.
3.3 Stromanschluss
Connect the supplied AC power cord to the PMP2000D's power inlet and then to a suitable grounded electrical outlet. Ensure the power switch on the mixer is in the OFF position before connecting to power.
3.4 Anschließen von Lautsprechern
The PMP2000D features two powerful amplifiers. Connect your passive loudspeakers to the speaker outputs on the rear panel. Ensure the impedance of your speakers matches the recommended impedance range of the mixer (typically 4-8 ohms per channel). Use high-quality speaker cables for optimal sound transmission.

Abbildung 3.4.1: Frontplatte darüberview of the PMP2000D, illustrating the layout of channels, effects, and master controls.
3.5 Anschließen von Mikrofonen und Instrumenten
Use XLR cables for microphones and 1/4-inch TS/TRS cables for line-level instruments or other audio sources. The PMP2000D offers 9 mono channels with XLR and 1/4-inch inputs, and additional stereo channels for various connections. For condenser microphones, activate the +48V phantom power switch located on the main section.
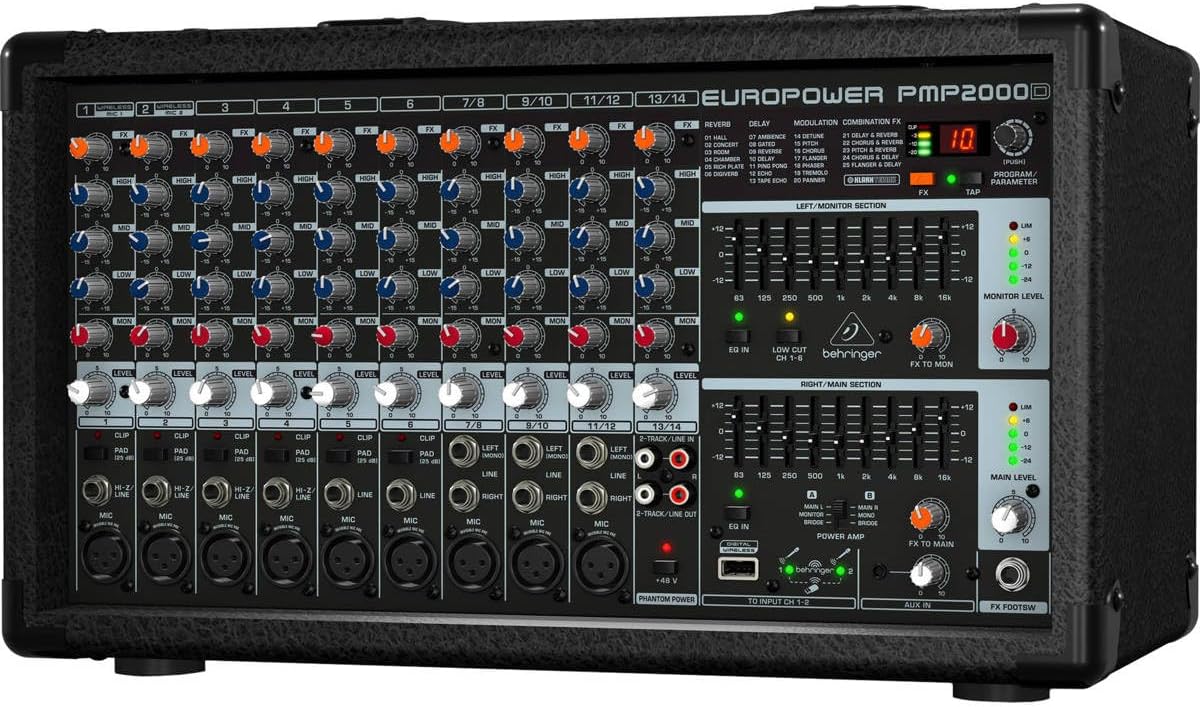
Abbildung 3.5.1: Schräg view of the PMP2000D, showing the various input jacks for microphones and line-level devices.
3.6 Erstes Einschalten
After all connections are made, ensure all channel level controls and the main level control are set to minimum. Power on the PMP2000D. Gradually increase the main level and then individual channel levels to achieve the desired sound.
4. Operating the PMP2000D
4.1 Kanalsteuerung
- DAZUGEWINNEN: Adjusts the input sensitivity for each channel. Set this to ensure a strong signal without clipping (indicated by the CLIP LED).
- EQ (HIGH, MID, LOW): Three-band equalizer for shaping the tone of each input signal. Adjust to enhance or cut specific frequencies.
- FX: Steuert die Signalstärke, die vom Kanal an den internen Effektprozessor gesendet wird.
- EBENE: Passt die Gesamtlautstärke des Kanals im Hauptmix an.
4.2 Main Section Controls
- HAUPTLEVEL: Regelt die Gesamtlautstärke des Hauptmixes.
- MONITOR LEVEL: Regelt die Lautstärke des Monitorausgangs.
- FX TO MAIN/MON: Controls the amount of the effects signal sent to the main and monitor outputs.
- GRAFISCHER EQ: A 7-band stereo graphic equalizer allows for precise frequency shaping of the main and monitor outputs.
- PHANTOM POWER (+48V): Activates phantom power for condenser microphones connected to the XLR inputs.
4.3 Klark Teknik Multi-FX Processor
The integrated Klark Teknik FX processor offers 25 high-quality presets including various reverbs, choruses, flangers, delays, and multi-effects. Use the PROGRAM/PARAMETER knob to select an effect and adjust its specific parameters. The TAP button can be used to set delay times in real-time.

Figure 4.3.1: The Klark Teknik digital effects processor, similar to the one integrated into the PMP2000D, offering various sound enhancements.
4.4 Wireless Option
The PMP2000D is designed to be "Wireless-ready." This means it can seamlessly integrate with Behringer ULM series USB digital wireless microphones (not included). Simply plug the ULM receiver into the dedicated USB port on the mixer to utilize wireless microphone capabilities.
5. Wartung
Proper maintenance ensures the longevity and optimal performance of your PMP2000D.
- Reinigung: Use a soft, dry cloth to clean the exterior of the unit. Do not use abrasive cleaners, solvents, or waxes.
- Belüftung: Überprüfen Sie regelmäßig, ob die Lüftungsöffnungen frei von Staub und Schmutz sind. Verstopfte Lüftungsöffnungen können zu Überhitzung führen.
- Lagerung: Bei längerer Nichtbenutzung sollte der Mixer an einem kühlen, trockenen Ort aufbewahrt werden, vorzugsweise in der Originalverpackung oder einem Schutzkoffer.
- Flüssigkeitsexposition: Avoid spilling liquids on the unit. If liquid enters the chassis, immediately disconnect power and seek professional servicing.
6. Fehlerbehebung
This section addresses common issues you might encounter with your PMP2000D.
- Kein Strom:
- Check if the power cord is securely connected to both the mixer and the power outlet.
- Überprüfen Sie, ob die Steckdose funktioniert.
- Check the fuse. If blown, replace with a fuse of the same type and rating.
- Keine Tonausgabe:
- Ensure the MAIN LEVEL control is turned up.
- Check individual channel LEVEL controls and GAIN settings.
- Verify speaker connections and ensure speakers are functional.
- Confirm input sources are active and connected correctly.
- Verzerrter Klang:
- Reduce the GAIN on input channels if the CLIP LED is frequently illuminating.
- Lower the MAIN LEVEL or individual channel levels.
- Check speaker impedance and ensure it matches the mixer's output.
- Rückkopplung (Hohes Pfeifen):
- Move microphones further away from speakers.
- Reduce the GAIN or LEVEL of the offending microphone channel.
- Use the graphic equalizer to cut frequencies that are causing feedback.
- Effekte funktionieren nicht:
- Ensure the FX control on the desired channel is turned up.
- Check the FX TO MAIN/MON controls in the main section.
- Verify an effect program is selected on the Klark Teknik FX processor.
If these steps do not resolve the issue, please contact qualified service personnel.
7. Spezifikationen
The following are key technical specifications for the Behringer EUROPOWER PMP2000D:
- Leistungsabgabe: 2 x 1000 Watts (stereo)
- Amplifier-Technologie: Klasse D
- Kanäle: 14 (9 mono mic/line, 4 stereo line)
- Mikrofonvorstufeamps: 9 x "Invisible" IMP mic preamps mit +48V Phantomspeisung
- Effektprozessor: Klark Teknik Multi-FX processor with 25 presets
- Ausgleich: 3-band EQ per channel, 7-band stereo graphic EQ on main/monitor outputs
- Kabellose Verbindung: "Wireless-ready" for Behringer ULM digital wireless system (not included)
- Artikelgewicht: 19.84 Pfund (9 kg)
- Produktabmessungen: 17.91 x 9.84 x 10.87 Zoll (45.5 x 25 x 27.6 cm)
- Energiequelle: Kabelgebundene Elektrik

Figure 7.1: Efficiency comparison of Class-D versus Class-AB amplifier technologies, highlighting the superior efficiency of Class-D used in the PMP2000D.
8. Garantie und Support
For detailed warranty information, please refer to the official Behringer website or the warranty card included with your product. Behringer provides a limited warranty for its products, covering defects in materials and workmanship under normal use.
If you require technical support, service, or have questions regarding your PMP2000D, please visit the official Behringer support page or contact their customer service department. You can often find FAQs, software updates, and additional documentation online.
For the official User Manual (PDF), please refer to the manufacturer's documentation available online: Behringer PMP2000D User Manual PDF


