1. Einleitung
The Vivitar DVR988-BLK 360 Action Camera is designed to capture immersive 360-degree photos and videos. It features dual 12.1-megapixel lenses, enabling a complete panoramic view of your surroundings. The camera supports recording in 4K and 1080p HD resolutions and includes a 2.0-inch preview screen for immediate content review. Integrated Wi-Fi functionality facilitates direct connection to smartphones and tablets for convenient sharing.

Front view of the Vivitar DVR988-BLK 360 Action Camera, showing the dual lenses and control buttons.
2. Lieferumfang
Bitte überprüfen Sie, ob alle folgenden Artikel in Ihrer Produktverpackung enthalten sind:
- Vivitar DVR988-BLK 360 Action Camera
- USB-Kabel
- Spritzwassergeschütztes Gehäuse
- Drahtlose Fernbedienung
- Befestigungsclips
- Benutzerhandbuch (dieses Dokument)
3. Einrichtung
3.1 Laden des Akkus
The camera uses a rechargeable Lithium Ion battery. Before first use, fully charge the battery using the provided USB cable connected to a power source (e.g., computer USB port or USB wall adapter). The charging indicator light will typically change color or turn off when charging is complete.
3.2 Einlegen einer Speicherkarte
This camera requires a microSD card (not included) to store photos and videos. Locate the memory card slot, typically on the side or bottom of the camera. Insert the microSD card with the gold contacts facing the correct direction until it clicks into place. Ensure the card is formatted in the camera's settings before initial use to prevent data corruption.
3.3 Anbringen von Zubehör
Utilize the included mounting clips and splash-proof case to secure your camera in various environments. The mounting clips allow attachment to surfaces or gear, while the splash-proof case provides protection against water splashes and dust.

The camera mounted on a skateboard using an accessory, demonstrating versatile attachment options.
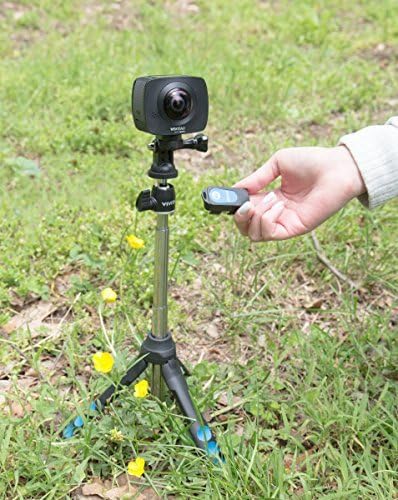
The camera positioned on a tripod, with a user holding the wireless remote control.

The camera secured to a tree branch using a clamp mount, illustrating outdoor usage.
4. Bedienung der Kamera
4.1 Ein-/Ausschalten
To power on the camera, press and hold the Power button (usually marked with a universal power symbol) until the screen illuminates. To power off, press and hold the Power button again until the camera shuts down.
4.2 Fotos aufnehmen
In photo mode, press the Shutter/Record button once to capture a 12.1-megapixel still image. The camera's 360-degree lenses will capture a panoramic photo.
4.3 Videos aufnehmen
Switch to video mode. Press the Shutter/Record button to start recording 360-degree video in either 4K or 1080p HD resolution. Press the button again to stop recording. The camera features built-in video stitching software to seamlessly combine the viewAufnahmen beider Objektive.
4.4 Using the 2.0-inch Preview Bildschirm
The integrated 2.0-inch screen allows you to preview your shots and review captured photos and videos directly on the camera. Navigate through menus and playback options using the camera's control buttons.
4.5 drahtlose Fernbedienung
The included wireless remote control allows you to operate the camera from a distance, which is useful for capturing shots where direct interaction with the camera is not feasible or desired.
4.6 WLAN-Konnektivität und App
Activate the camera's built-in Wi-Fi. Download the corresponding Vivitar app on your smartphone or tablet. Connect your device to the camera's Wi-Fi network. This enables live viewing, remote control, and direct sharing of your photos and videos to social media or other platforms.
5. Wartung
5.1 Reinigung der Linsen
Use a soft, lint-free cloth specifically designed for optical lenses to gently clean the camera lenses. Avoid using abrasive materials or chemical cleaners, which can damage the lens coating. For stubborn smudges, a small amount of lens cleaning solution can be applied to the cloth, not directly to the lens.
5.2 Batteriepflege
To prolong battery life, avoid fully discharging the battery frequently. Store the camera and battery in a cool, dry place when not in use. If storing for extended periods, charge the battery to approximately 50% capacity.
5.3 Speicherung
Store the camera in a protective case to prevent scratches and impacts. Keep it away from extreme temperatures, high humidity, and strong magnetic fields.
6. Fehlerbehebung
- Kamera lässt sich nicht einschalten: Ensure the battery is fully charged. If the issue persists, try connecting the camera directly to a power source via the USB cable to see if it powers on.
- Schlechte Video-/Fotoqualität: Ensure sufficient lighting conditions. Check that the lenses are clean and free from smudges. Verify that the camera settings are configured for the desired resolution (4K or 1080p).
- Probleme mit der Wi-Fi-Verbindung: Ensure the camera's Wi-Fi is enabled. Restart both the camera and your smart device. Confirm that you are within the camera's Wi-Fi range. Check for app updates or compatibility issues with your device's operating system.
- Speicherkartenfehler: Ensure the microSD card is properly inserted. If errors occur, try formatting the card using the camera's menu options. Notiz: Formatting will erase all data on the card, so back up important files zuerst.
- Fernbedienung funktioniert nicht: Check the battery in the remote control. Ensure the camera is in a mode that supports remote operation and that there are no obstructions between the remote and the camera.
7. Spezifikationen
| Besonderheit | Spezifikation |
|---|---|
| Modellnummer | DVR988-BLK |
| Marke | Vivitar |
| Fotosensor-Technologie | CCD |
| Auflösung der Videoaufnahme | 4K HD, 1080p HD |
| Maximale Brennweite | 120 Millimeter |
| Videoaufnahmeformat | MPEG |
| Unterstütztes Audioformat | AAC, MP3 |
| Bildschirmgröße | 2 Zoll |
| Konnektivitätstechnologie | W-lan |
| Farbe | Schwarz |
| Artikelgewicht | 1.1 Pfund |
| Batterien | 1 Lithium-Ionen-Akku (im Lieferumfang enthalten) |
| Hersteller | Sakar International, Inc. |
| Datum der ersten Verfügbarkeit | 28. September 2016 |
8. Garantie und Support
For detailed warranty information, please refer to the warranty card included with your product or visit the official Vivitar website. For technical support, troubleshooting assistance, or service inquiries, please contact Vivitar customer service through their official channels.
Vivitar Official WebWebsite: www.vivitar.com


