1. Sicherheitshinweise
Please read all safety instructions carefully before operating the meat grinder. Failure to follow these instructions may result in injury or damage to the appliance.
- Elektrische Sicherheit: Ensure the grinder is connected to a grounded 220V power outlet. Do not operate with wet hands or in wet conditions. Disconnect power before cleaning or servicing.
- Scharfe Klingen: The cutting blade and grinding plates are extremely sharp. Handle with care during assembly, disassembly, and cleaning.
- Use Stomper Only: Never use your hands or fingers to push meat into the feed tube. Always use the provided meat stomper.
- Abstand halten: Keep hands, hair, loose clothing, and utensils away from moving parts during operation.
- Aufsicht: Do not leave the grinder unattended while in operation. Keep out of reach of children.
- Richtige Belüftung: Ensure adequate ventilation around the motor during extended use to prevent overheating.
2. Produktüberschreitungview
The Pro-Cut KG-22W-XP #22 Meat Grinder is a robust and efficient appliance designed for high-capacity meat processing. Its stainless steel construction ensures durability and hygiene.
Hauptmerkmale:
- Motor: 2HP / 1.49kW, 1-Phase
- Bandtage: 220 Volt
- Grinding Capacity (3/8"): 30 lb/min (First Grind)
- Übertragung: Gear-driven for long working hours
- Material: Edelstahlkonstruktion
Komponenten:
Familiarize yourself with the main components of your meat grinder:
- Motoreinheit (Sockel)
- Grinder Head (Housing)
- Auger (Worm)
- Schneidklinge
- Grinding Plates (various sizes)
- Locking Ring (Retaining Ring)
- Trichterschale
- Meat Stomper (Pusher)
- Sausage Stuffing Tubes (optional accessory)
Produktbilder:
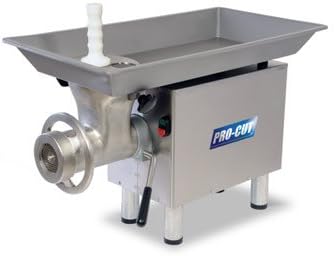
Figure 1: Fully assembled Pro-Cut KG-22W-XP #22 Meat Grinder 2HP.

Abbildung 2: Produktabmessungen: 33"L x 16.5"B x 26"H.
3. Aufbau und Montage
Proper assembly is crucial for safe and efficient operation. Follow these steps to set up your meat grinder:
- Schleifkopf anbringen: Secure the grinder head to the front of the motor unit. Use the locking knob to firmly secure it in place.
- Bohrer einsetzen: Slide the auger (worm) into the grinder head. Ensure the plastic bushing is on the back end of the auger and that the auger's splined connection fully seats with the motor drive.
- Schneidklinge platzieren: Position the cutting blade onto the auger shaft. Ensure the sharp edges face outwards towards the grinding plate.
- Schleifplatte auswählen: Choose your desired grinding plate (e.g., coarse 10mm or fine 4.5mm) and place it over the cutting blade. Align the plate's depression with the protrusion on the grinder head.
- Sicherer Verriegelungsring: Screw the locking ring onto the grinder head. Tighten it hand-tight only. Overtightening can cause excessive wear on the plates and blade.
- Install Hopper Tray: Slide the stainless steel hopper tray onto the top of the grinder head.

Figure 3: Attaching the grinder head to the motor unit.
Video 1: Detailed assembly guide for the meat grinder components, including the auger, blade, and plates.
4. Bedienungsanleitung
Preparing Meat for Grinding:
- Gekühltes Fleisch: For best results, ensure meat is very cold, almost frozen (between 32°F and 34°F / 0°C and 1°C). This prevents smearing and ensures a cleaner grind.
- Cut into Strips/Cubes: Cut meat into pieces that fit easily into the feed tube without forcing. Remove any large bones or excessive sinew.
Schleifprozess:
- Einschalten: Ensure the grinder is properly assembled and plugged into a 220V outlet. Turn the power switch to the 'ON' position.
- Fleischfutter: Place prepared meat into the hopper tray. Use the meat stomper to gently push the meat down into the feed tube. Never use your hands.
- Collect Ground Meat: Stellen Sie einen geeigneten Behälter unter den Fleischwolfkopf, um das Hackfleisch aufzufangen.
- Second Grind (Optional): For finer ground meat, pass the meat through the grinder a second time, potentially using a finer grinding plate.

Figure 4: Always use the meat stomper to feed meat into the grinder.
Sausage Stuffing (with optional accessories):
To stuff sausages, replace the grinding plate and cutting blade with the wide stuffing plate and your chosen sausage stuffing tube. The stuffing plate allows the auger to push meat directly into the tube without further grinding.
- Remove Grinding Plate and Blade: Disassemble the locking ring, grinding plate, and cutting blade.
- Install Stuffing Plate and Tube: Place the wide stuffing plate onto the auger. Attach the desired sausage stuffing tube to the flange and then secure it with the locking ring.
- Bereiten Sie C vorasings: Bereiten Sie Ihre Wurst vorasings according to their specific instructions (e.g., soaking).
- Gefüllte Würstchen: Feed the seasoned ground meat into the hopper. The auger will push the meat through the stuffing tube into the casing. Führen Sie die casing as it fills to ensure even distribution and prevent air pockets.
Video 2: Demonstration of meat grinding and sausage stuffing using a commercial grinder.
5. Wartung und Reinigung
Regular cleaning and maintenance will extend the life of your meat grinder and ensure hygienic operation.
- Stromversorgung trennen: Always unplug the grinder from the power outlet before cleaning or disassembling.
- Komponenten zerlegen: Remove the hopper tray, locking ring, grinding plate, cutting blade, and auger from the grinder head.
- Saubere Teile: Wash all removable parts (grinder head, auger, blade, plates, locking ring, hopper tray, stomper, stuffing tubes) with warm, soapy water. Use a brush to remove any meat residue.
- Spülen und Trocknen: Rinse all parts thoroughly with clean water. Dry immediately to prevent rust, especially for stainless steel components.
- Motoreinheit reinigen: Wischen Sie die Motoreinheit mitamp Stoff. Tauchen Sie die Motoreinheit nicht in Wasser.
- Schmieren (optional): Apply a thin layer of food-grade mineral oil to the metal parts (blade, plates, auger) before storage to prevent corrosion.
- Lagerung: Store all parts in a dry, safe place.
Video 3: Demonstration of disassembling and cleaning a meat grinder.
6. Fehlerbehebung
Sollten Sie Probleme mit Ihrem Fleischwolf haben, beachten Sie bitte die folgenden häufigen Probleme und Lösungen:
- Motor Stalls or Struggles:
- Meat may be too warm or cut into pieces that are too large. Ensure meat is very cold and cut into appropriate sizes.
- Grinding plate or blade may be dull or improperly installed. Check assembly and sharpness.
- Too much meat being fed at once. Reduce the amount of meat in the hopper.
- Meat Smears or Comes Out Mushy:
- Meat is too warm. Ensure meat is chilled to near-freezing temperatures.
- Blade or plate is dull. Replace or sharpen components.
- Grinder Head Leaks:
- Locking ring may not be tightened sufficiently (hand-tight).
- Components are not properly seated. Reassemble carefully.
- Übermäßige Geräusche oder Vibrationen:
- Loose components. Check all assembled parts for tightness.
- Foreign object in the grinder. Disconnect power and inspect thoroughly.
7. Spezifikationen
| Spezifikation | Detail |
|---|---|
| Marke | Pro-Schnitt |
| Modell | KG-22W-XP |
| Motor | 2HP / 1.49kW, 1-Phase |
| Bandtage | 220 Volt |
| Grinding Capacity (3/8" First Grind) | 30 Pfund/Minute |
| Produktabmessungen (L x B x H) | 33" x 16.5" x 26" |
| Gewicht | 79 Pfund |
| Material | Edelstahl |
| Übertragung | Getriebe |
| UPC | 782078207412 |
| ASIN | B01M7UTEGY |
8. Garantie und Support
For warranty information and customer support, please refer to the documentation included with your purchase or contact Pro-Cut customer service directly. Keep your proof of purchase for any warranty claims.
Kontaktinformationen: Please visit the official Pro-Cut webAuf dieser Website finden Sie die aktuellsten Kontaktdaten und Support-Ressourcen.


