1. Einleitung
This manual provides essential information for the proper installation, operation, and maintenance of the Nice RBA4 control unit. The Nice RBA4 is designed to manage and control automated gate systems, ensuring reliable and safe operation. Please read this manual carefully before proceeding with any installation or operation.
2. Sicherheitshinweise
Wichtige Sicherheitshinweise:
- Installation and maintenance must be performed by qualified personnel only, in compliance with local electrical and safety regulations.
- Disconnect power to the unit before performing any installation, maintenance, or troubleshooting.
- Ensure all wiring connections are secure and correctly polarized to prevent damage to the unit or connected devices.
- Do not expose the control unit to moisture, extreme temperatures, or corrosive substances.
- Keep children and unauthorized persons away from the gate automation system during operation.
- Always use original Nice spare parts and accessories.
3. Packungsinhalt
The Nice RBA4 package typically includes:
- 1x Nice RBA4 Control Unit
- Basic terminal blocks for connections (may be pre-installed)
- Antenna (may be integrated or separate)
Please verify all components upon unpacking. If any items are missing or damaged, contact your supplier immediately.
4. Einrichtung und Installation
The installation of the Nice RBA4 control unit requires technical expertise. It is strongly recommended that installation be carried out by a professional installer.
4.1. Komponentenidentifikation
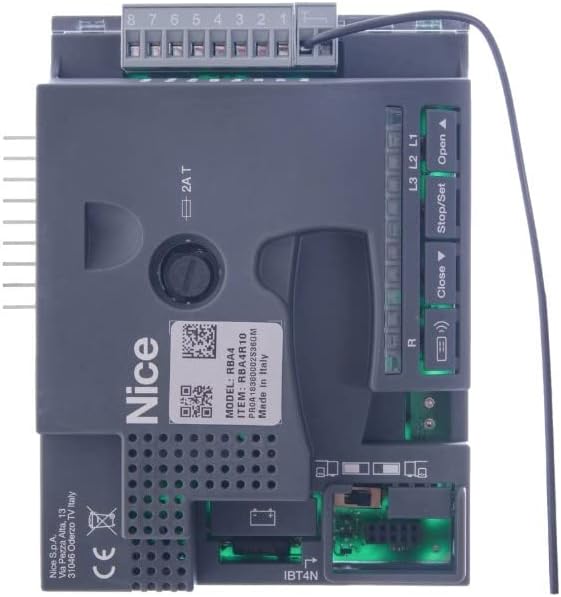
Abbildung 1: Nice RBA4 Control Unit (Top View). This image shows the main control board with the 8-pin terminal block, 'Open', 'Stop/Set', and 'Close' buttons, L1, L2, L3 LEDs, and the IBT4N port. Labels like 'MODEL: RBA4' and 'Made in Italy' are visible.

Abbildung 2: Nice RBA4 Control Unit (Alternative View). Das view highlights the green terminal block and additional buttons such as 'Radio', 'Stop Set', and 'PP'. Detailed terminal labels like 'FLASH', 'PHOTOTEST', 'STOP', 'OPEN', 'CLOSE', '24V', 'GND', 'ANTENNA' are visible, along with 'Fuse 1AT'.
4.2. Montage
Mount the control unit in a secure, weather-protected enclosure, ensuring adequate ventilation and accessibility for wiring and maintenance. Use appropriate fasteners to secure the unit firmly.
4.3. Kabelverbindungen
Refer to Figure 1 and Figure 2 for terminal identification. All connections must be made with the main power supply disconnected.
- Stromversorgung: Connect the main power supply to the designated terminals (typically L1, L2, L3 or specific power input terminals). Ensure correct voltage and current ratings as per the product specifications.
- Motoranschlüsse: Connect the gate motor wires to the motor output terminals.
- Sicherheitsausrüstungen: Connect safety devices such as photocells (e.g., to 'PHOTOTEST' terminals), safety edges, and emergency stop buttons (e.g., to 'STOP' terminals).
- Steuergeräte: Connect command devices like push buttons (e.g., 'OPEN', 'CLOSE', 'PP' for pedestrian pass), key switches, or remote receivers.
- Zubehör: Connect any additional accessories such as flashing lights (e.g., 'FLASH' terminal) or auxiliary outputs.
- Antenne: Connect the antenna to the dedicated antenna terminal for optimal radio signal reception.
Sicherungen: The unit is equipped with fuses (e.g., 'Fuse 1AT', 'Fuse 2AT') for protection. Ensure these are correctly rated and in good condition.
4.4. Erstkonfiguration
After all connections are made, restore power. The unit may require initial programming or parameter setting. Consult the detailed technical manual available on the manufacturer's website for specific programming procedures, including motor force adjustment, opening/closing times, and safety device configuration.
5. Bedienungsanleitung
Once installed and configured, the Nice RBA4 control unit allows for various modes of operation.
- Manuelle Bedienung: Use the 'Open', 'Stop/Set', and 'Close' buttons directly on the control unit for manual control of the gate.
- Fernbedienung: If a radio receiver is connected and remote controls are programmed, use the remote to operate the gate. The 'Radio' button on the board is typically used for programming new remote controls.
- Automatische Operation: Depending on the configuration, the gate may operate automatically based on inputs from photocells or timers.
- Stop/Set Function: The 'Stop/Set' button serves as an emergency stop and is also used to enter programming mode for parameter adjustments.
6. Wartung
Regular maintenance ensures the longevity and safe operation of your Nice RBA4 control unit and the entire gate automation system.
- Sichtprüfung: Überprüfen Sie regelmäßig die Steuereinheit und die gesamte Verkabelung auf Anzeichen von Beschädigungen, Verschleiß oder lockeren Verbindungen.
- Reinigung: Keep the unit clean and free from dust and debris. Use a soft, dry cloth for cleaning. Do not use abrasive cleaners or solvents.
- Funktionsprüfung: Regularly test the operation of the gate, safety devices (photocells, emergency stop), and remote controls.
- Professionelle Inspektion: It is recommended to have the entire gate automation system inspected by a qualified technician at least once a year.
7. Fehlerbehebung
If the Nice RBA4 control unit or the gate system is not functioning correctly, consider the following basic troubleshooting steps:
- Kein Strom: Check the main power supply to the unit. Verify that the circuit breaker is not tripped and that all power connections are secure.
- Tor bewegt sich nicht:
- Check if any safety devices (e.g., photocells) are obstructed or misaligned.
- Verify motor connections.
- Check the fuses on the control unit. Replace if blown (ensure correct rating).
- Fernbedienung funktioniert nicht:
- Überprüfen Sie die Batterie in der Fernbedienung.
- Ensure the remote control is properly programmed to the receiver.
- Unberechenbares Verhalten: Disconnect power for a few minutes, then reconnect. This can sometimes reset the unit.
If the problem persists after performing these checks, do not attempt further repairs. Contact a qualified technician or Nice customer support for assistance.
8. Spezifikationen
| Besonderheit | Spezifikation |
|---|---|
| Modell | NICE RBA4 |
| Artikelgewicht | 3 Kilogramm |
| ASIN | B01N19LTW1 |
| Herstellerreferenz | NICE RBA4 |
| Anzahl der Artikel | 1 |
| Verfügbarkeit von Ersatzteilen | Informationen nicht verfügbar |
Note: Detailed electrical specifications (e.g., input voltage, motor compatibility, current draw) are typically found in the full technical manual provided by the manufacturer.
9. Garantie und Support
For warranty information, please refer to the terms and conditions provided at the time of purchase or contact your authorized Nice dealer. Specific warranty periods and coverage may vary by region and retailer.
For further technical support, detailed manuals, or to find an authorized service center, please visit the official Nice webWebsite:


