1. Einleitung
The Joie Stages ISOFIX Car Seat is designed to provide safety and comfort for your child from birth up to approximately 7 years of age. This car seat adapts to your child's growth, functioning as a rearward-facing infant seat, a forward-facing seat, and a Group 2 booster. Please read this manual thoroughly before installation and use to ensure correct usage and maximum safety.

Bild 1.1: Vorderseite view of the Joie Stages ISOFIX Car Seat.
2. Sicherheitshinweise
Die Sicherheit Ihres Kindes hat oberste Priorität. Bitte halten Sie sich stets an die folgenden Richtlinien:
- This car seat is certified to ECE R44/04 safety standards.
- Always ensure the car seat is correctly installed and secured in the vehicle before placing your child in it.
- Lassen Sie Ihr Kind niemals unbeaufsichtigt im Autositz.
- Ensure the 5-point harness is properly adjusted and snug against your child's body, with no slack.
- The Tri-Protect headrest with Intelli-Fit foam provides enhanced side impact protection. Ensure it is adjusted to the correct height for your child.
- Verwenden Sie den Kindersitz nicht, wenn er in einen Unfall verwickelt war, auch wenn keine sichtbaren Schäden vorhanden sind.
- Refer to your vehicle's owner's manual for information on child restraint installation points.
3. Produktmerkmale
The Joie Stages ISOFIX Car Seat offers several features designed for safety and convenience:
- ECE R44/04 Certified: Meets European safety standards, including an integrated ISOFIX base.
- Multi-Stage Verwendung: Suitable rearward-facing up to 18kg (approx. birth to 4 years) and forward-facing from 9-25kg (approx. 1 to 7 years).
- Tri-Protect Headrest: Features 3 layers of security, including patented Intelli-Fit foam and Guard Surround Safety side impact panels for superior head and neck protection.
- Washable Seat Pad: Quick-release, washable seat pad for easy cleaning.
- 7-fach verstellbare Rückenlehne: One-hand, 7-position recline adjustment on the base, usable without reinstalling the seat.
- 5-Punkt-Gurt: Secure harness system for child restraint.
4. Einrichtung und Installation
Eine fachgerechte Installation ist entscheidend für die Sicherheit Ihres Kindes. Befolgen Sie diese Schritte sorgfältig.
4.1 Rearward-Facing Installation (Birth to 18kg)
- Ensure the vehicle seat is suitable for ISOFIX installation.
- Die ISOFIX-Konnektoren werden durch Drücken der Entriegelungsknöpfe aus der Basis des Kindersitzes herausgezogen.
- Align the ISOFIX connectors with the ISOFIX anchorage points in your vehicle and push firmly until they click into place. Green indicators will confirm correct attachment.
- Push the car seat firmly against the vehicle seat back to remove any slack.
- Adjust the load leg to the vehicle floor, ensuring it is firmly planted and the indicator shows green.
- Verify the seat is securely installed by pulling on it. There should be minimal movement.

Abbildung 4.1: Seite view illustrating the ISOFIX base and load leg.
4.2 Forward-Facing Installation (9-25kg)
For forward-facing use, the car seat can be installed using either the ISOFIX connectors and top tether (if applicable to your vehicle and seat model) or the vehicle's 3-point seat belt.
4.2.1 ISOFIX Installation (Forward-Facing)
- Follow steps 1-5 from the rearward-facing installation.
- Route the vehicle's top tether strap (if available and required by your vehicle) through the designated path on the car seat and attach it to the vehicle's top tether anchorage point. Tighten until secure.
4.2.2 Vehicle Seat Belt Installation (Forward-Facing)
- Platzieren Sie den Kindersitz auf dem Fahrzeugsitz und achten Sie darauf, dass er stabil steht.
- Route the vehicle's 3-point seat belt through the designated belt guides on the car seat. Refer to the labels on the car seat for the correct belt path.
- Buckle the vehicle seat belt and pull it tight to remove all slack. Ensure the car seat is firmly secured and does not move excessively.
5. Bedienungsanleitung
5.1 Ihr Kind mit dem 5-Punkt-Gurt sichern
- Setzen Sie Ihr Kind in den Autositz.
- Führen Sie die beiden Schnallenzinken zusammen und schieben Sie sie in die Schnalle ein, bis sie einrasten.
- Pull the harness adjustment strap to tighten the harness until it is snug against your child's body. Ensure you can only fit one finger between the harness and your child's collarbone.
- To loosen the harness, press the harness release button (usually located near the crotch buckle) and pull the shoulder straps outwards.

Image 5.1: Detail of the 5-point harness buckle.
5.2 Adjusting the Headrest and Harness Height
The headrest and harness height adjust simultaneously. Ensure the shoulder straps are at or just below your child's shoulders when rearward-facing, and at or just above when forward-facing.
- Locate the headrest adjustment lever at the top of the headrest.
- Drücken Sie den Hebel und schieben Sie die Kopfstütze nach oben oder unten in die gewünschte Position.
- Den Hebel loslassen, um die Kopfstütze zu arretieren.
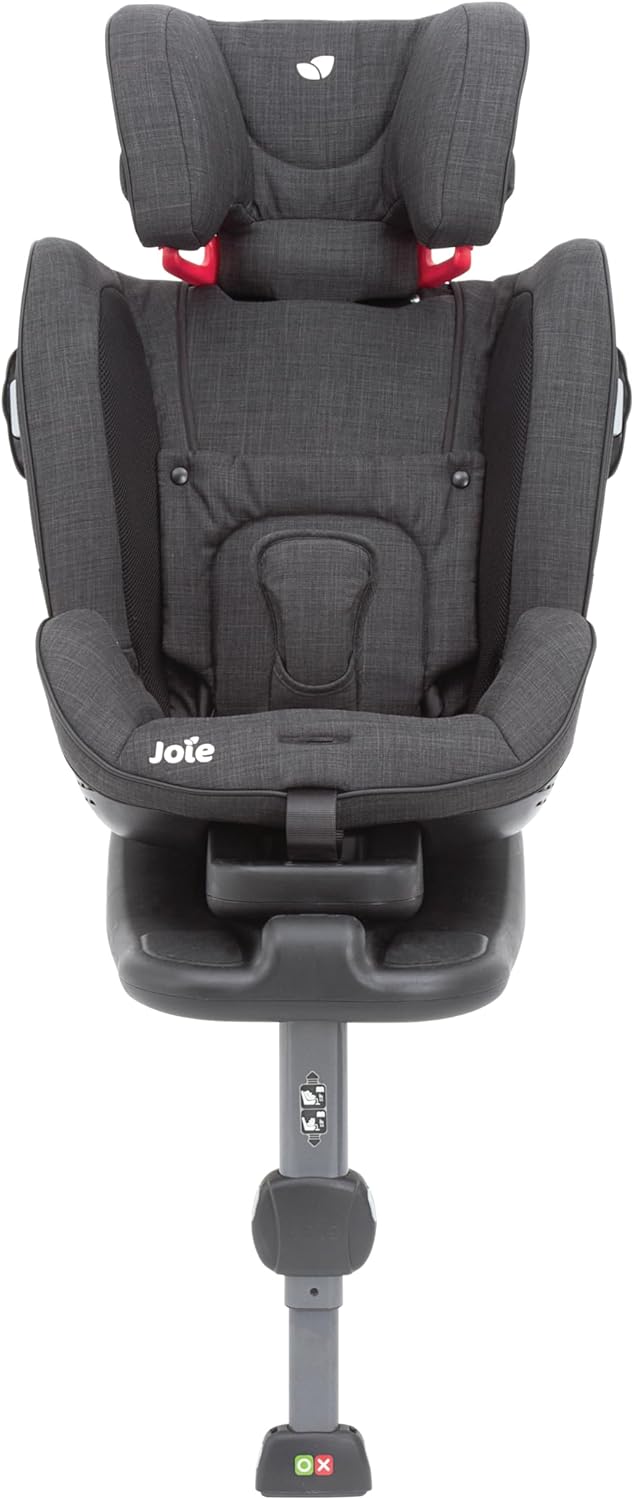
Image 5.2: Headrest adjusted to a higher position.
5.3 Einstellen der Liegeposition
The car seat features a 7-position recline that can be adjusted with one hand without reinstalling the seat.
- Locate the recline adjustment handle at the front of the car seat base.
- Pull the handle and simultaneously push or pull the car seat to the desired recline position.
- Release the handle to lock the recline in place.

Image 5.3: Recline adjustment mechanism.
6. Wartung
Regular maintenance ensures the longevity and hygiene of your car seat.
- Reinigung des Sitzpolsters: The seat pad is quick-release and washable. Refer to the care label on the fabric for specific washing instructions (typically machine wash cold on a delicate cycle). Do not use bleach. Air dry only.
- Reinigung des Geschirrs: Wischen Sie die Gurte des Gurtes mit einem Tuch ab.amp cloth and mild soap. Do not machine wash or submerge the harness straps, as this can weaken the material.
- Reinigung von Kunststoff- und Metallteilen: Kunststoff- und Metallteile mit dem Mittel abwischenamp Tuch und milder Seife. Verwenden Sie keine Scheuermittel oder Lösungsmittel.
- Lagerung: Bewahren Sie den Kindersitz bei Nichtgebrauch an einem kühlen, trockenen Ort und vor direkter Sonneneinstrahlung geschützt auf.
7. Fehlerbehebung
If you encounter issues with your car seat, refer to the following common solutions:
- Der Kindersitz fühlt sich nach dem Einbau locker an: Recheck all installation steps. Ensure ISOFIX connectors are fully engaged (green indicators visible) and the load leg is firmly planted. If using a seat belt, ensure it is pulled taut and routed correctly through all guides.
- Das Geschirr lässt sich schwer festziehen/lockern: Check for any twists in the harness straps. Ensure the harness release button is fully pressed when loosening. The harness should move freely.
- Child's Head Slumps Forward: Ensure the recline position is appropriate for your child's age and the installation mode (rearward-facing often requires a more reclined position). Adjust the headrest to provide proper support.
- Buckle Not Engaging: Ensure both buckle tongues are fully inserted into the buckle until a distinct click is heard. Check for any debris obstructing the buckle mechanism.
8. Spezifikationen
| Modellnummer | I1507AAPAV000 |
| Marke | Joie |
| Produktabmessungen (L x B x H) | 77 x 65 x 52 cm |
| Artikelgewicht | 8.2 Kilogramm |
| Materialzusammensetzung | Stahl, Kunststoff |
| Zielgeschlecht | Unisex |
| Gewicht des rückwärtsgerichteten Kindes | Bis zu 18 Kilogramm |
| Gewicht des nach vorne gerichteten Kindes | 9 - 25 Kilograms |
| Empfohlene maximale Höhe | 105 Zentimeter |
| Kabelbaumtyp | 5-Punkt |
| Installationstyp | ISOFIX (with load leg) or Vehicle Seat Belt |
| Sicherheitsstandard | ECE R44/04 |

Abbildung 8.1: Produktabmessungen überview.
9. Garantie und Support
The Joie Stages ISOFIX Car Seat comes with a 1 Year Local (Singapore) Warranty. For warranty claims or technical support, please retain your proof of purchase and contact the authorized Joie distributor or retailer in your region. For general inquiries, you may visit the official Joie webWebsite oder wenden Sie sich an die Kundendienstabteilung.